Setting Up the Dell™ DR Series System as a VTL Backup Target on Microsoft® Data Protection Manager Dell Engineering January 2016 A Dell Technical White Paper
Revisions Date Description February 2015 Initial release April 2015 Updated for current release January 2016 Updated content related to spanned tapes and driver and registry requirements, THIS WHITE PAPER IS FOR INFORMATIONAL PURPOSES ONLY, AND MAY CONTAIN TYPOGRAPHICAL ERRORS AND TECHNICAL INACCURACIES. THE CONTENT IS PROVIDED AS IS, WITHOUT EXPRESS OR IMPLIED WARRANTIES OF ANY KIND. © 2016 Dell Inc. All rights reserved.
Table of contents 1 Executive summary ........................................................................................................................................................................... 4 2 Installing and configuring the DR Series system ....................................................................................................................... 5 3 Creating and configuring iSCSI target containers for Microsoft DPM ......................................................
1 Executive summary This document provides information about how to set up the Dell DR Series system as a backup target for Microsoft Data Protection Manager (DPM) software (Microsoft DPM 2010 and later). This document is a quick reference guide and does not include all DR Series system deployment best practices. For additional information, see the DR Series system documentation and other data management application best practices whitepapers for your specific DR Series system at: http://support.dell.
2 Installing and configuring the DR Series system 1. Rack and cable the DR Series system and power it on. 2. Initialize the DR Series system. For more information, in the Dell DR Series System Administrator Guide, refer to the following topics: “iDRAC Connection,” “Logging in and Initializing the DR Series System,” and “Accessing iDRAC6/iDRAC7 Using RACADM”. 3. Log on to iDRAC using the default address 192.168.0.120, or the IP that is assigned to the iDRAC interface.
5. After the virtual console is open, log on to the system with the user administrator and the password St0r@ge! (the “0” in the password is the numeral zero). 6. Set the user-defined networking preferences. 7. 6 View the summary of preferences and confirm that it is correct.
8. Log on to the DR Series system administrator console using the IP address you just provided for the DR Series system, the username administrator, and the password St0r@ge! (the “0” in the password is the numeral zero). 9. Join the DR Series system to Active Directory. Note: If you do not want to add the DR Series system to Active Directory, see the DR Series System Owner’s Manual for guest logon instructions. a.
b. Enter your Active Directory credentials.
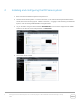
3 Creating and configuring iSCSI target containers for Microsoft DPM 3.1 Creating the iSCSI VTL container For this procedure, you need to create and export the iSCSI container as described in the following steps. 1. Select Containers in the navigation panel on the left navigation area, and then click the Create link at the top of the page. 2. Enter the container name, select Virtual Tape Library (VTL), and then click Next.
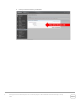
3. For the Access Protocol, select iSCSI, and then specify the Data Management Application Access Control by entering the Microsoft DPM server IP Address, IQN, or FQDN. For Microsoft DPM, you also need to specify Marker Type as Auto. Click Next. 4. Click Create a New Container to create the VTL container.
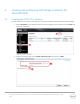
3.2 Configuring the Microsoft DPM Server – Windows 1. Configure the iSCSI Initiator Software for Windows by providing the IP or FQDN of the DR unit in the Target field, and then click Quick Connect. The Quick Connect dialog box opens that indicates a connection was made but is set inactive as show below. 2. Click Done to close the dialog box and proceed by selecting the newly discovered target.
3. In the Advanced Settings dialog box, select to Enable CHAP log on and type the User Name and Target Secret / Password. Click OK. See Appendix A for more details about accounts and credentials.
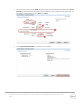
The iSCSI target should now show as connected, and the device discovery can now proceed.
3.3 Installing device drivers for the DR Series system iSCSI VTL After making an iSCSI connection to the VTL, the next step is to install drivers. For the DR Series system to work properly with Microsoft DPM, you need to install drivers for the medium changer and tape drives. 1. From the cmd prompt, type the following command to open Device Manager. devmgmt.msc The DR Series system iSCSI VTL will be listed in the Device Manager as shown in the following screenshot. 2.
3. Extract the package contents and install the drivers through the Device Manager. (You can refer to Microsoft online help for instructions on installing device drivers.) After installation, the library drivers will appear in the Device Manager, as shown in the following screenshot.
4. You need to upgrade the device drivers for the tape drive as well. Use the following drivers, which you can download from IBM as per your operating system at: http://www933.ibm.com/support/fixcentral/swg/selectFixes?parent=Tape%2Bdrivers%2Band%2Bsoftware&pr oduct=ibm/Storage_Tape/Tape+device+drivers&release=1.0&platform=Windows&function=all • • Windows 2008 R2 SP1 - IBMTape.x64_w08_6250 Windows 2012 R2 - IBMTape.x64_w12R2_6248_WHQL_Cert Note: You should Install the drivers in non-exclusive mode.
3.4.1 Adjusting BufferQueueSize, ConnectionNoActivityTimeout, and ConnectionNoActivityTimeoutForNonCCJobs registry settings Follow these steps: 1. Open a Command Prompt and type the following command to open the Registry Editor window. regedit 2. In the Registry Editor window, go to the following path: [HKEY_LOCAL_MACHINE\SOFTWARE\Microsoft\Microsoft Data Protection Manager\Agent 3. Right-click and select New > DWORD (32 bit) Value, and then enter the value as: BufferQueueSize 4.
3.4.2 Adding the TapeSize parameter Follow these steps: 1. Open a Command Prompt and then type the following command to open the Registry Editor window: regedit 2. In the Registry Editor, go to the following path: [HKEY_LOCAL_MACHINE\SOFTWARE\Microsoft\Microsoft Data Protection Manager\Agent 3. Right-click and select New > DWORD (32 bit) Value, and enter the value as: TapeSize 4. Right-click TapeSize, and then select Modify.
3.4.3 Adding the Storport key and BusyRetryCount parameter for each tape Follow these steps. 1. To add the Storport key, go to the following path: HKEY_LOCAL_MACHINE\System\CurrentControlSet\Enum\SCSI\\\DeviceParameters 2. To get a list of all the tape devices in your DPM Server to which you need to add the registry key, run the following command from an administrative command prompt. wmic tapedrive list brief This command returns a list of tape drives Scsi\DeviceID\Instance that you
4. To add BusyRetryCount value for Storport key, right-click and select New > DWORD (32 bit) Value. Enter the value as BusyRetryCount 5. Right-click BusyRetryCount and select Modify. Select the Base value as Decimal, and enter 250 as the value in the text box. Click OK. 6.
3.4.4 Disabling TUR Follow these steps. 1. 21 To disable TUR, you need to find the service name used by the tapes. To find the service name, go to the following path: HKEY_LOCAL_MACHINE\System\CurrentControlSet\Enum\SCSI\\\ Setting Up the Dell™ DR Series System as a VTL Backup Target on Microsoft® Data Protection Manager | January 2016
If you click INSTANCE, you can see the Service parameter. • • If DPM installed on Win 2012R2, Service name will be “ibmtp2k12”. If DPM installed on Win 2008R2 SP1, Service name will be “ibmtp2k8”. 2. Go to the following location, and select the appropriate service. \HKEY_LOCAL_MACHINE\SYSTEM\CurrentControlSet\Services\Service_Name 3. Right-click and select New > DWORD (32 bit) Value. Enter the value as: AutoRun 4. Right-click AutoRun and select Modify.
3.5 Setting up Microsoft DPM to use the newly created iSCSI VTL 1. 23 Within the Microsoft DPM Administration interface, access the Libraries submenu item and select to Rescan for Devices.
2. Once the iSCSI library has been detected by the Microsoft DPM application, then proceed to Enable the library for use. Right-click the newly discovered library and select to enable it. 3. Once the library has been enabled to use, it must now be inventoried to identify the media available for further configuration. Select and confirm to Inventory the newly added library.
4. Once the inventory is complete, the media can now be placed into production as needed. 5. You should reboot the system for registry settings to take effect.
4 Performing backup and restore by using the DR Series system VTL This section describes how to perform file-based backup and restore. 1. 26 Install/push the DPM agent on the client that contains the files to be protected. After a successful installation on the DPM agent, the client is listed under Agents > Protected. The DPM installation shows 1 protected agent and 1 library.
2. Click Protection > New to open the Create New Protection Group Wizard, and then click Next.
3. Select server options, and then click Next.
4. Select the folder that needs to be protected, and click OK for the system state selection. Click Next.
5. Enter a name for the protection group, and select Tape for short term protection. Select the option, I want long-term protection using tape, and click Next.
6. Specify the short-term recovery goals and click Next.
7. 32 Specify the long-term protection goals. Customize these settings if required, and click Next.
8. Under Library and Tape Detail, do the following: a. Select the Library for primary backup and Copy Library for additional copy of the backup. b. You can also select Check backup for data integrity. c. Select Do not compress or encrypt data for both short-term and long-term backup, d. Click Next. Note: The DR Series system has built-in compression and encryption features; therefore, enabling these features on DPM might affect savings.
Setting Up the Dell™ DR Series System as a VTL Backup Target on Microsoft® Data Protection Manager | January 2016
9. Review the protection group summary and click Create group.
10. Make sure that the protection group is created successfully. Click Close. 11. To start an offline backup, expand the protection group, and select the data entry. Click Recovery Point to start a full backup. Click OK.
12. You can view the progress of the backup job from the Monitoring tab.
5 Restoring from tape 1. 38 Click Recovery and select your protected volume. On the right, select the recovery point that you want to restore and right-click the recoverable item that you want to restore. The Restore Wizard opens.
2. Review the recovery selection and click Next.
3. Make the appropriate selection for the recovery type and click Next.
4. Specify the recovery options and click Next.
5. Review the summary and click Recovery.
6. To monitor the restore job, click Monitor > All jobs in progress.
6 Setting up the DR Series system cleaner Performing scheduled disk space reclamation operations are recommended as a method for recovering disk space from system containers in which files were deleted as a result of deduplication. The cleaner runs during idle time. If your workflow does not have a sufficient amount of idle time on a daily basis, then you should consider scheduling the cleaner to force it to run during a scheduled time.
7 Monitoring deduplication, compression, and performance After backup jobs have run, the DR Series system tracks capacity, storage savings, and throughput on the DR Series system dashboard. This information is valuable in understanding the benefits of the DR Series system. Note: Deduplication ratios increase over time. It is not uncommon to see a 2-4x reduction (25-50% total savings) on the initial backup. As additional full backup jobs are completed, the ratios will increase.
A Managing VTL protocol accounts and credentials A.1 Managing iSCSI account details By default, the iSCSI username is the hostname of the DR Series system and can be confirmed by reviewing the output of the iscsi –account --user CLI command. For example: >iscsi --show --user user : dr9-interop-a7 The default iSCSI password is St0r@ge!iscsi. You can modify this password in the iSCSI tab of the Clients page. Click Edit CHAP Password and enter a new password as needed.
A.
B Managing VTL media and space usage B.1 General performance guidelines for DMA configuration B.2 • The DR Series system (version 3.2 and later) provides inline VTL deduplication, compression, and encryption at rest functionality. Backup applications (such as Dell NetVault, Symantec BackupExec, Symantec NetBackup, and so on) should be configured so that any multiplexing, pre-compression, software-side deduplication, or encryption is disabled.
5. Calculate the data footprint during the retention period for change rate data sets based on a 10-1 deduplication ratio 6. Calculate the ratios within the retention period for each of the data sets 7. Determine the lowest ratio data set to be retired within the retention period and create media of size that closest matches this data footprint so that when a retention period is met the most amount of media is recycled to invoke data reclamation alignment and optimizing media consumption.
20TB Total initial footprint with a 10% change rate Week Pre-Deduplication 10% Change Rate Logical Logical Logical Incremental Size Full Metrics Metrics 1 24.2TB 20TB 2TB 2 24.2TB 20TB 2TB 3 24.2TB 20TB 2TB 4 24.2TB 20TB 2TB 5 24.2TB 20TB 2TB Total 121TB NOTE: For complete details please refer to the Dell DR Disk Backup Appliance Capacity Sizing Guide: A Dell Technical White Paper or contact a support or sales specialist for assistance. B.
2. Select and edit the target VTL container. 3. In the field Add More Tape (no of Tape), enter the number of tapes to add to the VTL container. Alternatively, you can also use the “vtl –create_carts” CLI command for this operation: > vtl --create_carts --name TEST_VTL_LALA --tapes 10 Created 10 cartridges 4. After the VTL media has been added to the target VTL container, Microsoft DPM must now be updated to be able to use said media. Select the VTL and conduct an inventory update.
B.7 Space reclamation B.7.1 General guidelines The DR Series system VTL feature is presented to operating systems and data management applications (DMAs) alike as devices either through iSCSI or NDMP protocol connectivity. The DMA interfaces with the virtual tape library and all its underlying components, including the drives and media though these specific protocols.