
White Papers


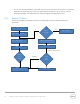
Table Of Contents

9 Seeding from a Dell™ DR Series System to an External Device | August 2014
9. If the data to be seeded is completely gathered and the seed job is complete, you can delete the
job by entering the following command.
seed –delete
2.3 Important notes about the seeding export process
• If ‘seed –delete’ is executed, all of the information about the seeding job is removed from the DR
Series system. If a new job is created for the same container, then it will copy all the data once again.
• The seeding process does not require that data ingest be stopped; even to the container to which the
data is seeded. This means the DR Series system can continue to function normally while seeding is in
process.
• If the external device runs out of space, you should enter the commands ‘seed –stop,’ ‘seed –
remove_device,’ and then ‘seed –add_device’ to add the new device. Enter ‘seed –start’ to
continue seeding to the new device or the same device after the data on the device is imported on the
target.
• If the seeding process encounters any errors writing to the device, then you should remove the device
by executing the command, ‘seed –stop,’ followed by ‘seed –remove_device’. The device can be
re-attached, or a new device can be attached. To start seeding after adding a device, enter the
command, ‘seed –start’. Seeding at this point will continue from the point where it stopped earlier.
If seeding is stopped for any reason, enter the ‘seed –stop’ command, which will stop all of the
seeding I/O activity. To continue again, enter the command, ‘seed –start’.
• You need to export the attached device through the CIFS protocol. It can be a Windows share or a
share exported from a Linux machine using the Samba protocol.
• During seeding, replication can be enabled as needed on the same containers to the same DR Series
system or to different DR Series systems.
• Seeding does not delete the data on the device. Data on the device can also co-exist with the seed
data. It is optional to delete the data on the device to free up the space for accommodating seed data.