
Users Guide


Using and Configuring Virtual Media 145
Additionally, you must have administrator rights to install and use the virtual media feature. Before
installing the ActiveX control, Internet Explorer may display a security warning. To complete the ActiveX
control installation procedure, accept the ActiveX control when Internet Explorer prompts you with a
security warning.
Linux-Based Management Station
To run the virtual media feature on a management station running the Linux operating system, install a
supported version of Mozilla or Firefox. If the virtual media plug-in is not installed or if a newer version is
available, a dialog box appears during the installation procedure to confirm the plug-in installation on
the management station. Ensure that the user ID running the browser has write permissions in the
browser's directory tree. If the user ID does not have write permissions, you cannot install the virtual
media plug-in.
See "Supported Web Browsers" for more information.
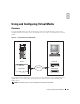
Running Virtual Media
NOTICE: Do not issue a racreset command when running a Virtual Media session. Otherwise, undesired results
may occur, including loss of data.
Using Virtual Media, you can "virtualize" a diskette image or drive, enabling a floppy image, floppy drive,
or optical drive on your management console to become an available drive on the remote system.
Supported Virtual Media Configurations
You can enable Virtual Media for one floppy drive and one optical drive. Only one drive for each media
type can be virtualized at a time.
Supported floppy drives include a floppy image or one available floppy drive. Supported optical drives
include a maximum of one available optical drive or one ISO image file.
Running Virtual Media Using the Web User Interface
Connecting Virtual Media
1
Open a supported Web browser on your management station. See "Supported Web Browsers."
NOTICE: Console Redirection and Virtual Media only supports 32-bit Web browsers. Using 64-bit Web
browsers may generate unexpected results or failure of operations.
2
Connect and log into the DRAC 5. See "Accessing the Web-Based Interface" for more information.
3
Click the
Media
tab and then click
Virtual Media
.
The
Virtual Media
page appears with the client drives that can be virtualized.
NOTE: The Floppy Image File under Floppy Drive (if applicable) may appear, as this device can be virtualized
as a virtual floppy. You can select one optical drive and one floppy at the same time, or a single drive.