
Users Guide


Using the RACADM Command Line Interface 161
or
racadm sslcertupload -t 1 -f c:\cert\cert.txt subcommands
RACADM Synopsis
racadm -r <RAC IP Address> -u <username> -p <password> <subcommand>
<subcommand options>
racadm -i -r <RAC IP Address> <subcommand> <subcommand options>
For example:
racadm -r 192.168.0.120 -u root -p calvin getsysinfo
racadm -i -r 192.168.0.120 getsysinfo
If the HTTPS port number of the RAC has been changed to a custom port other than the default port
(443), the following syntax must be used:
racadm -r <RAC IP Address>:<port> -u <username> -p <password>
<subcommand> <subcommand options>
racadm -i -r <RAC IP Address>:<port> <subcommand> <subcommand options>
RACADM Options
Table 9-1 lists the options for the racadm command.
Enabling and Disabling the racadm Remote Capability
NOTE: It is recommended that you run these commands on your local system.
The racadm remote capability is enabled by default. If disabled, type the following racadm command to
enable:
racadm config -g cfgRacTuning -o cfgRacTuneRemoteRacadmEnable 1
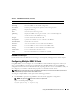
Table 9-1. racadm Command Options
Option Description
-r <racIpAddr>
-r <racIpAddr>:<port number>
Specifies the controller’s remote IP address.
Use :<port number> if the DRAC 5 port number is not the default
port (443)
-i Instructs racadm to interactively query the user for user name and
password.
-u <usrName> Specifies the user name that is used to authenticate the command
transaction. If the -u option is used, the -p option must be used, and the
-i option (interactive) is not allowed.
-p <password> Specifies the password used to authenticate the command transaction.
If the -p option is used, the -i option is not allowed.