
Owners Manual


telephone service and support team. Damage due to servicing that is not authorized by Dell is not covered by
your warranty. Read and follow the safety instructions that are shipped with your product.
1. Follow the safety guidelines listed in the Safety instructions section.
2. Follow the procedure listed in the Before working inside your system section.
3. Removing the cooling fan assembly.
4. If installed, remove the 165 W heat sink.
5. Remove the cooling shroud.
Steps
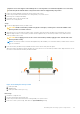
1. Locate the appropriate memory module socket.
CAUTION: Handle each memory module only by the card edges, ensuring not to touch the middle of the
memory module or metallic contacts.
2. Open the ejectors on the memory module socket outward to allow the memory module to be inserted into the socket.
3. Align the edge connector of the memory module with the alignment key of the memory module socket, and insert the
memory module in the socket.
CAUTION: Do not apply pressure at the center of the memory module; apply pressure at both ends of the
memory module evenly.
NOTE: The memory module socket has an alignment key that enables you to install the memory module in the socket in
only one orientation.
4. Press the memory module with your thumbs until the socket levers firmly click into place.
When the memory module is properly seated in the socket, the levers on the memory module socket align with the levers on
the other sockets that have memory modules installed.
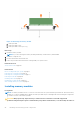
Figure 28. Installing the memory module
a. memory module
b. alignment key
c. memory module socket ejector (2)
Next steps
1. Install the cooling shroud.
2. If removed, install the 165 W heat sink.
3. Follow the procedure listed in the After working inside your system section.
4. Press F2 to enter System Setup, and check the System Memory setting.
Installing and removing system components
87