
Owners Manual


The system should have already changed the value to reflect the installed memory.
5. If the value is incorrect, one or more of the memory modules may not be installed properly. Ensure that the memory module
is firmly seated in the memory module socket.
6. Run the system memory test in system diagnostics.
Related references
Safety instructions on page 66
Related tasks
Before working inside your system on page 67
Removing the cooling shroud on page 74
Removing the cooling fan assembly on page 77
Removing a heat sink on page 88
Installing a heat sink on page 94
Installing the cooling shroud on page 75
After working inside your system on page 67
Processors and heat sinks
NOTE: If you are using the Intel E5-2689 v4 (165 W) processor:
● Using PCIe risers 1 and 3 can result in thermal errors.
● You must remove the 165 W heat sink to replace the memory module. You must also reapply the thermal paste when the
heat sink is removed.
● All the cooling fans work at optimum speed to ensure sufficient cooling.
Use the following procedures when:
● Removing and installing a heat sink
● Installing an additional processor
● Replacing a processor
NOTE: To ensure proper cooling, you must install a processor blank in any empty processor socket.
Removing a heat sink
Prerequisites
CAUTION:
Never remove the heat sink from a processor unless you intend to remove the processor. The heat
sink is necessary to maintain proper thermal conditions.
WARNING: The heat sink is hot to touch. Allow the heat sink to cool for some time after powering down the
system.
1. Follow the safety guidelines listed in the Safety instructions section.
2. Follow the procedure listed in the Before working inside your system section.
3. If installed, remove the full-length PCIe card(s).
4. Remove the cooling shroud.
5. Keep the Phillips #2 screwdriver ready.
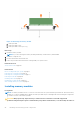
Steps
1. Loosen one of the screws that secure the heat sink to the system board.
Allow some time (approximately 30 seconds) for the heat sink to loosen from the processor.
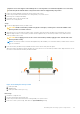
2. Remove the screw diagonally opposite to the screw that you first removed.
3. Repeat step 1 and 2 for removing the remaining two screws.
4. Remove the heat sink.
88
Installing and removing system components