Dell™ E178WFP Flat Panel Monitor User's Guide About Your Monitor Front View Back View Side View Bottom View Monitor specifications Caring for your Monitor Using Your Adjustable Monitor Stand Product Specific Problems Monitor Specific Troubleshooting Common Problems Product Specific Problems Appendix Attaching the Stand Organizing Your Cables Using the Tilt Removing the Stand FCC Notice (U.S.
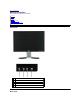
Back to Contents Page About Your Monitor Dell™ E178WFP Flat Panel Monitor User's Guide Front View Back View Side View Bottom View Monitor Specifications LCD Monitor Quality & Pixel Policy Caring for your Monitor Front View 1 Menu selection button 2 Brightness Contrast / Down(-) button 3 Auto-Adjust / Up(+) button 4 Power On/Off button with LED indicator Back View
1 Security lock slot Attach a lock to secure your monitor. 2 Dell Soundbar mounting brackets Attach the optional Dell Soundbar. 3 Barcode serial number label Refer to this label if you need to contact Dell for technical support. 4 Regulatory rating label List the regulatory approvals. 5 Stand removal button Press to release the stand. 6 VESA mounting holes ( 100mm - behind attached stand) Use to mount monitor. 7 Cable holder Help organize cables by passing them through the holder.
Right side Left side Bottom View 1 AC power cord connector 2 VGA connector
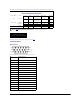
Monitor Specifications General Model number E178WFP Flat Panel Screen type Active matrix - TFT LCD Screen dimensions 17 inches (17-inch diagonal viewable image size) Preset display area: Horizontal 367.2 mm(14.46 inches) Vertical 229.5 mm(9.04 inches) Pixel pitch 0.255 mm x 0.
Electrical The following table lists the electrical specification: Video input signals Analog RGB: 0.7 Volts +/-5%, 75 ohm input impedance Synchronization input signals D-sub: Detachable, Analog, 15pin, shipped attached to the monitor AC input voltage / frequency / current 100 to 240 VAC / 50-60 Hz / 1.5 A Max. Inrush current 120V: 30A (Max.) 240V: 60A (Max.
functioning. The following table shows the power consumption and signaling of this automatic power-saving feature: Power Management Definition VESA's Mode Video H-sync V-sync Power Used ON Active Yes Yes maximum 40W Power Saving Blanked No Yes Blanked Yes No> Blanked No Blanked -- Power Saving LED color 0% Green <=2W >80% Amber <=2W >80% Amber No <=2W >80% Amber -- <=1W >80% Off typical 34W Switch Off NOTE: The OSD functions only in the normal operation mode.
Plug and Play Capability You can install the monitor in any Plug and Play-compatible system. The monitor automatically provides the computer system with its Extended Display Identification Data (EDID) using Display Data Channel (DDC) protocols so the system can configure itself and optimize the monitor settings. Most monitor installations are automatic; you can select different settings, if required.
Back to Contents Page Appendix Dell™ E178WFP Flat Panel Monitor User's Guide FCC Notice (U.S. Only) CAUTION: Safety Instruction Contacting Dell Your Monitor Set-up Guide FCC Notice (U.S. Only) and Other Regulatory Information For FCC Notice and other regulatory information, see the regulatory compliance website located at www.dell.com\regulatory_compliance. CAUTION: Safety Instructions For information on safety instructions, refer to your Product Information Guide.
Country Code: 54 Technical Support toll-free: 0-800-222-0154 City Code: 11 or toll-free: 0-800-444-0724 toll-free: 0-800-666-0789 Sales www.dell.com/aw Online Support Aruba Technical Support Customer Service and Sales la-techsupport@dell.com toll-free: 800-1727 toll-free: 800-1729 support.ap.dell.com Online Support support.ap.dell.
Customer Service and Sales Online Support Technical Support for XPS computers only Belgium (Brussels) General Support International Access Code: 00 General Support Fax Country Code: 32 Customer Service City Code: 2 Corporate Sales Fax Switchboard 1-800-534-3142 support.euro.dell.com 02 481 92 96 02 481 92 88 02 481 92 95 02 713 15 65 02 481 91 00 02 481 92 99 02 481 91 00 www.dell.com/bz Online Support Belize la-techsupport@dell.
Customer Service Home/Home Office Small Business Medium/Large Business, Government, Education toll-free: 1-800-847-4096 toll-free: 1-800-906-3355 toll-free: 1-800-387-5757 Hardware Warranty Phone Support Canada (North York, Ontario) XPS Computers Only International Access Code: 011 Computers for Home/Home Office toll-free: 1-866-398-8977 toll-free: 1-800-847-4096 Computers for Small/Medium/Large Business, Government toll-free: 1-800-387-5757 Printers, Projectors, Televisions, Handheld, Digital Juke
Large Corporate Accounts Key Accounts Large Corporate Accounts North Large Corporate Accounts North Government and Education Large Corporate Accounts East Large Corporate Accounts East Government and Education Large Corporate Accounts Queue Team Large Corporate Accounts South Large Corporate Accounts West Large Corporate Accounts Spare Parts toll-free: 800 858 2628 toll-free: 800 858 2999 toll-free: 800 858 2955 toll-free: 800 858 2020 toll-free: 800 858 2669 toll-free: 800 858 2572 toll-free: 800 85
www.dell.com/do Online Support Dominican Republic Technical Support Customer Service and Sales la-techsupport@dell.com 1-800-156-1834 1-800-156-1588 www.dell.com/ec Online Support la-techsupport@dell.com Ecuador toll-free: 999-119-877-655-3355 (calling from Quito and Guayaquil only) Technical Support, Customer Service, Sales (calling or EEUU (512) 723-0020 from Quito) Technical Support, Customer Service, Sales (calling toll-free: 1-800-999-119-877-655-3355 from Guayaquil) www.dell.
Online Support Technical Support for XPS computers only Technical Support Germany (Frankfurt) Technical Support at Home International Access Code: 00 Home/Small Business Customer Service Country Code: 49 Global Segment Customer Service tech_support_central_europe@dell.
International Access Code: 001 Country Code: 852 Technical Support - Projectors, PDAs, Switches, Routers, etc. Customer Service Large Corporate Accounts Global Customer Programs Medium Business Division Home and Small Business Division Online Support 00852-3416 0906 00852-3416 0910 00852-3416 0907 00852-3416 0908 00852-3416 0912 00852-2969 3105 support.ap.dell.com Portable and Desktop Support Portables, Desktop, and Peripherals E-mail Portable Support E-mail Phone Numbers support.ap.dell.
Home Ireland (Cherrywood) Small Business International Access Code: 00 Medium Business Country Code: 353 Large Business City Code: 1 Sales E-mail 1850 333 200 1850 664 656 1850 200 646 1850 200 646 Dell_IRL_Outlet@dell.com Customer Service Home and Small Business Business (greater than 200 employees) 01 204 4014 1850 200 982 General Fax/Sales Fax Switchboard U.K. Customer Service (dial within U.K. only) Corporate Customer Service (dial within U.K. only) U.K. Sales (dial within U.K.
Japan (Kawasaki) Technical Support - Projectors, PDAs, Printers, Routers toll-free: 0120-981-690 International Access Code: 001 Technical Support outside of Japan - Projectors, PDAs, Printers, Routers 81-44-556-3468 Country Code: 81 Faxbox Service City Code: 44 24-Hour Automated Order Status Service Customer Care Business Sales Division - up to 400 employees 044-556-3344 Public Sales - government agencies, educational institutions, and medical institutions 044-556-5963 Individual User Online Sal
Country Code: 60 PowerConnect, and PowerVault Customer Service toll-free: 1800 881 306 (option 4) City Code: 4 24-Hour Automated Order Status Service Transaction Sales Corporate Sales 1 800 88 4432 toll-free: 1 800 888 202 toll-free: 1 800 888 213 www.dell.com/mx Online Support Technical Support la-techsupport@dell.
PowerEdge and PowerVault toll-free: 0800-335-540 New Zealand Technical Support for XPS computers only International Access Code: 00 Customer Service Country Code: 64 Home and Small Business toll-free: 0800-289-3355 (option 3) toll-free: 0800-941-128 (option 3) Business, Education, and Government toll-free: 0800-449-602 24-Hour Automated Order Status Service Sales Home and Home Office toll-free: 0800 441 567 toll-free: 0800-289-3355 toll-free: 0800-941-121 Small Business toll-free: 0800-941-128 B
57 95 999 Country Code: 48 Sales City Code: 22 Customer Service Fax Reception Desk Fax Switchboard Online Support Portugal Technical Support International Access Code: 00 Customer Service Country Code: 351 Sales 57 95 806 57 95 998 57 95 999 support.euro.dell.com 707200149 800 300 413 800 300 410 or 800 300 411 or 800 300 412 or 21 422 07 10 21 424 01 12 Fax www.dell.
Transaction Sales Corporate Sales toll-free: 1 800 394 7412 toll-free: 1 800 394 7419 support.euro.dell.com Online Support Technical Support Slovakia (Prague) Enterprise GOLD International Access Code: 00 Business Support Country Code: 421 Customer Service Fax Tech Fax Switchboard (Sales) czech_dell@dell.com 02 5750 8303 02 5750 8308 02 5750 8301 420 22537 2707 02 5441 8328 02 5441 8328 02 5441 7585 support.euro.dell.
International Access Code: 00 Relational Customer Service Country Code: 46 Home/Small Business Customer Service City Code: 8 Employee Purchase Program (EPP) Support Technical Support Fax Sales 08 590 05 642 08 587 70 527 020 140 14 44 08 590 05 594 08 587 705 81 support.euro.dell.
support.euro.dell.com Online Support dell_direct_support@dell.com Customer Service Online support.euro.dell.com/uk/en/ECare/form/home.asp Sales Home and Small Business Sales Corporate/Public Sector Sales 0870 907 4000 01344 860 456 Customer Service Home and Small Business Corporate U.K.
International Access Code: 011 Customer Service Country Code: 1 Automated Order Status Small Business Medium and Large Business State and Local Government Federal Government Healthcare K-12 Education Higher Education Employee Purchase Program (EPP) Financial Services Leases and Loans Dell Preferred Accounts (DPA) Sales Dell Outlet Store Software and Peripherals Sales toll-free: 1-800-624-9897 toll-free: 1-800-433-9014 toll-free: 1-800-456-3355 toll-free: 1-877-671-3355 toll-free: 1-800-981-3355 tol
Back to Contents Page Setting Up Your Monitor Dell™ E178WFP Flat Panel Monitor User's Guide Connecting Your Monitor Using the Front Panel Buttons Using the OSD Using the Dell™ Soundbar (Optional) Connecting Your Monitor CAUTION: Before you begin any of the procedures in this section, see the Safety Instructions. 1. 2. 3. 4. 5. Turn off your computer and unplug its power cable. Connect the blue (analog D-sub) display connector cable to the corresponding video port on the back of your computer.
Brightness/Contrast Hot Key B C Use these buttons to adjust (decrease/increase ranges) items in the OSD. NOTE: You can activate automatic scroll feature by pressing and holding either + or - button. - and + buttons C Use this button to activate automatic setup and adjustment. The following dialog will appear on screen as the monitor self-adjusts to the current input: Auto adjustment In Progress. Auto Adjust Auto Adjustment button allows the monitor to self-adjust to the incoming video signal.
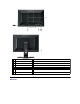
2. 3. 4. Icon A Function icons B Main Menu D Sub-Menu name E Resolution C Menu icon Press the - and + buttons to move between the function icons. As you move from one icon to another, the function name is highlighted to reflect the function or group of functions (sub-menus) represented by that icon. See the table below for a complete list of all the functions available for the monitor. Press the MENU button once to activate the highlighted function.
Phase If satisfactory results are not obtained using the Phase adjustment, use the Pixel Clock adjustment and then use Phase again. NOTE: This function may change the width of the display image. Use the 'Horizontal' function of the 'Position' menu to center the display image on the screen. Color Settings: Adjusts the color temperature and saturation. Color Settings adjust the color temperature.
Select Theater Preset for playing a movie. Select Sports Preset for viewing sports. Select Nature Preset for general viewing. For general picture or web or watch TV, choose Nature Preset. User can adjust the Hue(Tint)/Saturation based on the preference. NOTE: 'Color temperature' is a measure of the 'warmth' of the image colors (red/green/blue). The two available presets ('Blue' and 'Red') favor blue and red accordingly.
Language: Language sets the OSD to display in one of the five languages (English, Español, Français, Deutsch, Japanese). NOTE: The language chosen affects only the language of the OSD. It has no effect on any software running on the computer. Factory Reset: Factory Reset returns the settings to the factory preset values for the selected group of functions. Exit is used to exit out of Factory Reset menu. For All settings, all user adjustable settings are reset at one time except Language settings.
NOTE:If you select 'disable' for DDC/CI,the warning message appears on screen.You can select Yes or No according to need. Automatic Save With the OSD open, if you make an adjustment and then either proceed to another menu, or exit the OSD, the monitor automatically saves any adjustments you have made. If you make an adjustment and then wait for the OSD to disappear the adjustment will also be saved. OSD Warning Messages A warning message may appear on the screen indicating that the monitor is out of sync.
1. Headphone connectors 2. Power indicator 3. Power/Volume control Soundbar Attachment to the Monitor 1. Working from the rear of the monitor, attach the Soundbar aligning the two slots with the two tabs along the bottom rear of the monitor. 2. Slide the Soundbar to the left until it snaps into place. 3. Connect the Soundbar with the power brick. 4. Plug the power cables of the power brick into a nearby outlet. 5.
Back to Contents Page Product Specific Problems Dell™ E178WFP Flat Panel Monitor User's Guide Monitor Specific Troubleshooting Common Problems Product Specific Problems CAUTION: Before you begin any of the procedures in this section, follow the Safety Instructions. Monitor Specific Troubleshooting Self-Test Feature Check (STFC) Your monitor provides a self-test feature that allows you to check whether your monitor is functioning properly.
l l l l Missing Pixels LCD screen has spots l l Stuck-on Pixels LCD screen has bright spots l l Brightness Problems Picture too dim or too bright l l l Geometric Distortion Screen not centered correctly l l l l Horizontal/Vertical Lines Screen has one or more lines l l l l l Sync Problems Screen is scrambled or appears torn l l l l l l LCD Scratched Screen has scratches or smudges l l Safety Related Issues Visible signs of smoke or sparks l l Intermittent Problems Monitor malfuncti
No Input Signal when user controls pressed No picture, the LED light is green. When press "+", "-" or "Menu" key, the message " No input signal " will appear. l l l OSD Lock Back to Contents Page All buttons are locked except the "menu" button. No user adjustments are allowed. l Check the signal source Make sure the Computer is not in power saving by moving mouse or pressing any key on the keyboard. Check whether the signal cable is plugged in and seated properly.
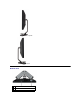
Back to Contents Page Using Your Monitor Stand Dell™ E178WFP Flat Panel Monitor User's Guide Attaching the Stand Organizing Your Cables Using the Tilt Removing the Stand Attaching the Stand NOTE: Stand is detached when the monitor is shipped from the factory. 1. Place the stand on a flat surface. 2. Fit the groove on the back of the monitor onto the two teeth of the upper stand. 3. Lower the monitor so that the monitor mounting area snaps on/locks to the stand.
After attaching all necessary cables to your monitor and computer, (See Connecting Your Monitor for cable attachment,) use the cable holder to neatly organize all cables as shown above. Using the Tilt With the built-in pedestal, you can tilt the monitor to best suit your viewing needs. Removing the Stand After placing the monitor panel on a soft cloth or cushion, press and hold the LCD removal button, and then remove the stand.
NOTE: To prevent scratches on the LCD screen while removing the stand, ensure that the monitor is placed on a clean surface.