User‘s Guide Dell E5515H Model No.
NOTE: A NOTE indicates important information that helps you make better use of your monitor. CAUTION: A CAUTION indicates potential damage to hardware or loss of data if instructions are not followed. WARNING: A WARNING indicates a potential for property damage, personal injury, or death. © 2014 Dell Inc. All rights reserved. Information in this document is subject to change without notice. Reproduction of these materials in any manner whatsoever without the written permission of Dell Inc.
Contents Dell Display Manager User's Guide . . . . . . . . . . . . . . . . . 6 Overview . . . . . . . . . . . . . . . . . . . . . . . . . . . . . . 6 Using the Quick Settings Dialog . . . . . . . . . . . . . . . . 6 Setting Basic Display Functions . . . . . . . . . . . . . . . . .7 Assigning Preset Modes to Applications . . . . . . . . . . . .7 Organizing Windows with Easy Arrange . . . . . . . . . . .
Physical Characteristics . . . . . . . . . . . . . . . . . . . . . . . . . .26 Environmental Characteristics . . . . . . . . . . . . . . . . . . . . . .27 LCD Monitor Quality & Pixel Policy . . . . . . . . . . . . . 28 Maintenance Guidelines . . . . . . . . . . . . . . . . . . . . 28 Caring for Your Monitor . . . . . . . . . . . . . . . . . . . . . . . . . .28 Setting Up the Monitor . . . . . . . . .
Contact Dell . . . . . . . . . . . . . . . . . . . . . . . . . . . . 59 Setting Up Your Monitor . . . . . . . . . . . . . . . . . . . . . . . . 60 Setting the display resolution to 1920 x 1080 (Maximum)60 If you have a Dell desktop or a Dell portable computer with Internet access . . . . . . . . . . . . . . . . . . . . . . . . . . 61 If you have a non Dell desktop, portable computer, or graphics card . . . . . . . . . . . . . . . . . .
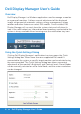
Dell Display Manager User's Guide Overview Dell Display Manager is a Windows application used to manage a monitor or a group of monitors. It allows manual adjustment of the displayed image, assignment of automatic settings, energy management, image rotation and other features on select Dell models. Once installed, Dell Display Manager will run each time the system starts and will place its icon in the notification tray.
The Quick Settings dialog box also provides access to Dell Display Manager’s advanced user interface which is used to adjust Basic functions, configure Auto Mode and access other features. Setting Basic Display Functions A Preset Mode for the selected monitor can be manually applied using the menu on the Basic tab. Alternatively, Auto Mode can be enabled. Auto Mode causes your preferred Preset Mode to be applied automatically when specific applications are active.
Dell Display Manager is pre-configured for many popular applications. To add a new application to the assignment list, simply drag the application from the desktop, Windows Start Menu or elsewhere, and drop it onto the current list. NOTE: Preset Mode assignments targeting batch files, scripts, and loaders, as well as non-executable files such as zip archives or packed files, are not supported and will be ineffective.
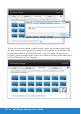
Organizing Windows with Easy Arrange Some Dell models feature Easy Arrange, which allows the selected monitor’s desktop to be organized into various predefined or custom window layouts. When Easy Arrange is enabled, windows can easily be made to reposition and resize automatically to fill specific regions within a window layout. To get started with Easy Arrange, choose a target monitor and select one of the predefined layouts. The regions for that layout will be displayed momentarily on the monitor.
To use the currently saved custom layout, select the custom layout icon. To save a new custom layout, first postion and size up to 10 windows on the desktop andthen click the Save link in Easy Arrange. To delete the currently saved custom layout, close all windows on the desktop and then click the Save link in Easy Arrange.
Applying Energy Conservation Features On supported Dell models the PowerNap tab will be available to provide energy conservation options. When the screensaver activates, the monitor’s Brightness can automatically be set to minimum level or the monitor can be put to sleep in order to save additional power.
About Your Monitor Package Contents Your monitor ships with all the components shown below. Ensure that you have received all the components and Contact Dell if anything is missing. NOTE: Some items may be optional and may not ship with your monitor. Some features or media may not be available in certain countries.
• Mini HDMI to HDMI Cable • USB Upstream Cable (enable the USB ports on the monitor) E5515H G6MH8A00 G6MH8 Q70G55C170001A August 2014 • Drivers and Documentation media • Quick Setup Guide • Safety, Environment, and Regulatory Information (SERI) Product Features The Dell E5515H flat-panel display has an active matrix, Thin-Film Transistor, Liquid Crystal Display. The monitor’s features include: • E5515H: 1386.84 mm (54.
Remote Control 4 Left Press to move the selection left in OSD menu. 1 5 3 6 4 Menu Press to turn on the OSD menu. 11 12 Down Press to move the selection down in OSD menu. 10 2 7 5 Brightness Press to decrease the Brightness. 6 13 7 14 8 15 8 Volume Press to decrease the Volume. 9 MUTE Press to turn the mute function on/ off. 9 10 Preset Modes Display information about Preset Modes. 11 Right Press to move the selection right in OSD menu. 12 OK Confirm an entry or selection.
Inserting the batteries in the remote control The remote control is powered by two 1.5V AAA batteries. To install or replace batteries: 1. Press and then slide the cover to open it. 2. Align the batteries according to the (+) and (–) indications inside the battery compartment. 3. Replace the cover. CAUTION: The incorrect use of batteries can result in leaks or bursting.
Operating range of the remote control Point the top of the remote control toward the LCD monitor’s remote sensor during button operation. Use the remote control within a distance of about 8 m from remote control sensor or at a horizontal and vertical angle of within 15° within a distance of about 5.6 m.
Identifying Parts and Controls Front View 1 1 IR Lens (with LED indicator) Back View 1 2 3 DELL DELL Flat Panel Monitor /Moniteur écran plat Model No. : E5515Hc : 100-240V 50/60Hz 2.5A Flat Panel Monitor /Moniteur écran plat Model No. : E5515Hc : 100-240V 50/60Hz 2.5A S/N: CN-0 P2NYV-64180-46D-001T S/N: CN-0 P2NYV-64180-46D-001T REV A00 REV A00 Service Tag:1NGTQV1 Express SVC code:359 576 607 7 Service Tag:1NGTQV1 Manufactured Date: Jul.
Side View 1 2 3 4 5 Label Description Use 1 USB downstream port Connect your USB device. You can only use this connector after you have connected the USB cable to the computer and USB upstream connector on the monitor. 2 USB upstream port Connect the USB cable that comes with your monitor to the computer. Once this cable is connected, you can use the USB connectors on the monitor. 3 Audio-Line in Connect your computer audio output with audio cable.
Monitor Specifications The following sections give you information about the various power management modes and pin assignments for the various connectors of your monitor. Power Management Modes If you have VESA’s DPM compliance display card or software installed in your PC, the monitor automatically reduces its power consumption when not in use. This is referred to as Power Save Mode. If the computer detects input from keyboard, mouse, or other input devices, the monitor automatically resumes functioning.
Activate the computer and monitor to gain access to the Using the OnScreen Display (OSD) Menu. NOTE: The Dell E5515H monitor is ENERGY STAR®-compliant.
19-pin HDMI connector Pin Number Monitor Side of the 19-pin Side Signal Cable 1 TMDS Data2+ 2 TMDS Data2 Shield 3 TMDS Data2- 4 TMDS Data1+ 5 TMDS Data1 Shield 6 TMDS Data1- 7 TMDS Data0+ 8 TMDS Data0 Shield 9 TMDS Data0- 10 TMDS Clock+ 11 TMDS Clock Shield 12 TMDS Clock- 13 CEC 14 Reserved (N.C.
USB Upstream Connector 1 2 3 4 Pin Number 4-pin Side of the Connector 1 DMU 2 VCC 3 DPU 4 GND USB Downstream Connector 1 2 3 4 Pin Number 4-pin Side of the Connector 1 VCC 2 DMD 3 DPD 4 GND 22 About Your Monitor
Plug and Play Capability You can install the monitor in any Plug and Play compatible system. The monitor automatically provides the computer with its Extended Display Identification Data (EDID) using Display Data Channel (DDC) protocols so that the system can configure itself and optimize the monitor settings. Most monitor installations are automatic. You can select different settings if required.
Resolution Specifications Model number Dell E5515H monitor Scan range • Horizontal 30 kHz to 83 kHz (automatic) • Vertical 56 Hz to 76 Hz (automatic) Maximum preset resolution 1920 x 1080 at 60 Hz Support Video Mode Model number Dell E5515H monitor Video display capability (HDMI playback) 480p, 480i, 576p, 576i, 720p, 1080p, 1080i Electrical Specifications Model number Dell E5515H monitor Video input signals Analog RGB: 0.
Preset Display Modes The following table lists the preset modes for which Dell guarantees image size and centering: Display Mode Horizontal Vertical Frequency Frequency (kHz) (Hz) Pixel Clock (MHz) Sync Polarity (Horizontal/ Vertical) VESA, 720 x 400 31.5 70.0 28.3 -/+ VESA, 640 x 480 31.5 60.0 25.2 -/- VESA, 640 x 480 37.5 75.0 31.5 -/- VESA, 800 x 600 37.9 60.3 40.0 +/+ VESA, 800 x 600 46.9 75.0 49.5 +/+ VESA, 1024 x 768 48.4 60.0 65.0 -/- VESA, 1024 x 768 60.0 75.
Physical Characteristics The following table lists the monitor's physical characteristics: Model Number Dell E5515H monitor Connector type D-subminiature, blue connector; HDMI, black connector Signal cable type D-sub: Detachable, Analog, 15-pin. HDMI: Detachable, Digital, 19-pin. Dimensions: (with stand) Height 786.0 mm (30.9 inches) Width 1241.0 mm (48.9 inches) Depth 245.0 mm (9.4 inches) Dimensions: (without stand) Height 721.5 mm (28.4 inches) Width 1241.0 mm (48.9 inches) Depth 64.
Environmental Characteristics The following table lists the environmental conditions for your monitor: Model Number Dell E5515H monitor Temperature • Operating 0 °C to 40 °C (32 °F to 104 °F) • Non-operating Storage: -20 °C to 60 °C (-4 °F to 140 °F) Shipping: -20 °C to 60 °C (-4 °F to 140 °F) Humidity • Operating • Non-operating 20 % to 80 % (non-condensing) Storage: 10 % to 90 % (non-condensing) Shipping: 10 % to 90 % (non-condensing) Altitude • • Operating Non-operating Thermal dissipat
LCD Monitor Quality & Pixel Policy During the LCD Monitor manufacturing process, it is not uncommon for one or more pixels to become fixed in an unchanging state. The visible result is a fixed pixel that appears as an extremely tiny dark or bright discolored spot. When the pixel remains permanently lit, it is known as a “bright dot.” When the pixel remains black, it is known as a “dark dot.” In almost every case, these fixed pixels are hard to see and do not detract from display quality or usability.
Setting Up the Monitor Attaching the Monitor NOTE: The base is detached when the monitor is shipped from the factory. To attach the monitor base: écran plat DELL /Moniteur Monitor 2.5A Flat Panel : E5515Hc 50/60Hz No. Model : 100-240V S/N: CN-0 REV A00 P2NYV-64180-46D-001T Service Tag:1NGTQV1 576 607 SVC code:359 2014 Express Date: 7 Jul. Manufactured socket-outlet. mise mains d'une munie to an earthed courant (B)/NMB-3(B) connected prise de must be sur une CAN ICES-3 branché The equipment www.
Connecting Your Monitor WARNING: Before you begin any of the procedures in this section, follow the Safety Instructions. To connect your monitor to the computer: 1. Turn off your computer and disconnect the power cable. 2. Connect either the blue analog VGA or black HDMI display connector cable to the corresponding video port on the back of your computer. Do not use both cables on the same computer. Use both the cables only when they are connected to two different computers with appropriate video systems.
Connecting the USB cable DELL Flat Panel Monitor /Moniteur écran plat Model No. : E5515Hc : 100-240V 50/60Hz 2.5A S/N: CN-0 P2NYV-64180-46D-001T REV A00 Service Tag:1NGTQV1 Express SVC code:359 576 607 7 Manufactured Date: Jul. 2014 CAN ICES-3 (B)/NMB-3(B) The equipment must be connected to an earthed mains socket-outlet. L'appareil doit être branché sur une prise de courant munie d'une mise à la terre. Raheen Business Park Limerick Ireland www.dell.
Removing the Monitor Stand NOTE: To prevent scratches on the LCD screen while removing the stand, ensure that the monitor is placed on a soft, clean surface. d'une tlet. mise 2014 muniesocket-ou com earthed www.dell.de courant mains CAN The ICES-3 L'apparei equipmen à la (B)/NMB-3 Raheen terre. l Made doit t must (B) in Business être China be branché connecte Park Limerick sur uned to Ireland prisean c 576 e:359 1 7 607 Jul.
Refer to the instructions that come with the VESA-compatible base mounting kit. 1. Place the monitor panel on a soft cloth or cushion on a stable, flat table. 2. Remove the stand. 3. Attach the mounting bracket from the wall mounting kit to the LCD. 4. Mount the LCD on the wall by following the instructions that came with the wall mounting kit. NOTE: For use only with UL-listed wall mount bracket with minimum weight/load bearing capacity of 81.2 kg.
Operating the Monitor Power On the Monitor Press the button to turn on the monitor. DELL Flat Panel Monitor /Moniteur écran plat Model No. : E5515Hc : 100-240V 50/60Hz 2.5A S/N: CN-0 P2NYV-64180-46D-001T REV A00 Service Tag:1NGTQV1 Express SVC code:359 576 607 7 Manufactured Date: Jul. 2014 CAN ICES-3 (B)/NMB-3(B) The equipment must be connected to an earthed mains socket-outlet. L'appareil doit être branché sur une prise de courant munie d'une mise à la terre.
D Exit E Use the Exit key to exit on-screen display (OSD) from menu and sub-menus. Hold about 10 seconds will enable or disable OSD lock. Press the Power button to turn on/off the monitor. Power Front-Panel Keys A B C D Front-Panel Keys A Up B Down C Description Use the Up key to adjust (increase ranges) items in the OSD menu. Use the Down key to adjust (decrease ranges) items in the OSD menu. Use the OK key to confirm your selection. OK D Use the Back key to go back to the previous menu.
Using the On-Screen Display (OSD) Menu Accessing the Menu System NOTE: If you change the settings and then either proceed to another menu or exit the OSD menu, the monitor automatically saves those changes. The changes are also saved if you change the settings and then wait for the OSD menu to disappear. 1. Press the button to open the OSD menu and display the main menu.
The table below provides a list of all the OSD menu options and their functions. Icon Menu and Description Submenus Energy Use This meter shows the energy level being consumed by the monitor in real time. Brightness/ Contrast Use the Brightness and Contrast menu to adjust the Brightness/Contrast.
Icon Menu and Description Submenus Auto Adjust Use this key to activate automatic setup and adjust menu. Dell E5515H Energy Use Brightness / Contrast Auto Adjust Press to adjust the screen automatically. Input Source Color Display Audio Energy Menu Others Resolution: 1024x768, 60Hz Maximum: 1920x1080, 60Hz The following dialog appears on a black screen as the monitor self-adjusts to the current input: Auto Adjustment in Progress...
Icon Menu and Description Submenus Input Source Use the Input Source menu to select between different video signals that may be connected to your monit Dell E5515H Energy Use Brightness / Contrast Auto Select Auto Adjust VGA Input Source HDMI 1 Color HDMI 2 Display Audio Energy Menu Others Resolution: 1024x768, 60Hz Maximum: 1920x1080, 60Hz Auto Select Select Auto Select to scan for available input signals. VGA Select VGA input when you are using the analog (VGA) connector.
Icon Menu and Description Submenus Input Color Format Allows you to set the video input mode to: • RGB: Select this option if your monitor is connected to a computer or DVD player using the HDMI cable (or DisplayPort cable). • YPbPr: Select this option if your DVD player supports only YPbPr output. Preset Modes Allows you to choose from a list of preset color modes.
Icon Menu and Description Submenus Display Use the Displays Settings menu to adjust the monitor's display settings. Energy Use Dell E5515H Brightness / Contrast Aspect Ratio Wide 16:9 Auto Adjust Horizontal Position 50 Input Source Vertical Position 50 Color Sharpness 50 Display Pixel Clock 50 Audio Phase 50 Energy Reset Display Settings Menu Others Resolution: 1024x768, 60Hz Aspect Ratio Maximum: 1920x1080, 60Hz Adjusts the image ratio as Wide 16:9, 4:3, or 5:4.
Icon Menu and Description Submenus Audio Dell E5515H Energy Use Brightness / Contrast Volume 50 Auto Adjust Audio Source PC Audio Input Source Reset Audio Settings Color Display Audio Energy Menu Others Resolution: 1024x768, 60Hz Maximum: 1920x1080, 60Hz Volume Use the buttons to adjust the volume. Minimum is ‘0’ (-). Maximum is ‘100’ (+).
Icon Menu and Description Submenus Energy Dell E5515H Energy Use Brightness / Contrast Power Button LED Off During Active Auto Adjust USB Off During Standby Input Source Reset Energy Settings Color Display Audio Energy Menu Othters Resolution: 1024x768, 60Hz Maximum: 1920x1080, 60Hz Power Button LED Allows you to set the power LED indicator on or off to save energy. USB Allows you to enable or disable USB function during monitor standby mode.
Icon Menu and Description Submenus Menu Select this option to adjust the settings of the OSD such as, the languages of the OSD, the amount of time the menu remains on screen, and so on.
Icon Menu and Description Submenus Others Dell E5515H Energy Use Brightness / Contrast DDC/CI Enable Auto Adjust LCD Conditioning Disable Input Source Reset Other Settings Color Factory Reset Reset All Settings Display Audio Energy Menu Others Resolution: 1024x768, 60Hz DDC/CI Maximum: 1920x1080, 60Hz DDC/CI (Display Data Channel/Command Interface) allows a software on your computer to adjust the monitor display settings like the brightness, color balance etc.
Icon Menu and Description Submenus LCD Conditioning This feature will help reduce minor cases of image retention. If an image appears to be stuck on the monitor, select LCD Conditioning to help eliminate any image retention. Using the LCD Conditioning feature may take some time. LCD Conditioning feature cannot remove severe cases of image retention or burn-in. NOTE: Use LCD Conditioning only when you experience a problem with image retention.
OSD Warning Messages When the monitor does not support a particular resolution mode you will see the following message: Dell E5515H The current input timing is not supported by the monitor display. Please change your input timing to 1920x1080, 60Hz or any other monitor listed timing as per the monitor specifications. This means that the monitor cannot synchronize with the signal that it is receiving from the computer.
Dell E5515H Entering Power Save Mode. Activate the computer and wake up the monitor to gain access to the Using the On-Screen Display (OSD) Menu. If you press any button other than the power button, the following messages will appear depending on the selected input: Dell E5515H There is no signal coming from your computer. Press any key on the keyboard or move the mouse to wake it up. If there is no display, press the monitor button now to select the correct input source on the On-Screen-Display menu.
Dell E5515H ? No HDMI Cable The dispaly will go into Power Save Mode in 5 minutes www.dell.com/support/monitors See Solving Problems for more information.
Setting the Maximum Resolution To set the Maximum resolution for the monitor: Windows® 7 ,Windows® 8/Windows® 8.1: 1. For Windows® 8/Windows® 8.1 only, select the Desktop tile to switch to classic desktop. 2. Right-click on the desktop and click Screen Resolution. 3. Click the dropdown list of the screen resolution and select 1920 x 1080. 4. Click OK. If you do not see 1920x 1080 as an option, you may need to update your graphics driver.
Troubleshooting WARNING: Before you begin any of the procedures in this section, follow the Safety Instruction Self-Test Your monitor provides a self-test feature that allows you to check whether your monitor is functioning properly. If your monitor and computer are properly connected but the monitor screen remains dark, run the monitor self-test by performing the following steps: 1. Turn off both your computer and the monitor. 2. Unplug the video cable from the back of the computer.
4. This box also appears during normal system operation, if the video cable becomes disconnected or damaged. The monitor will enter Power Save Mode after 5 minutes if left at this state. 5. Turn off your monitor and reconnect the video cable; then turn on both your computer and the monitor. If your monitor screen remains blank after you use the previous procedure, check your video controller and computer, because your monitor is functioning properly.
Built-in Diagnostics Your monitor has a built-in diagnostic tool that helps you determine if the screen abnormality you are experiencing is an inherent problem with your monitor, or with your computer and video card. A B C D E Up Down Menu Exit Power NOTE: You can run the built-in diagnostics only when the video cable is unplugged and the monitor is in self-test mode. To run the built-in diagnostics: 1. Ensure that the screen is clean (no dust particles on the surface of the screen). 2.
Common Problems The following table contains general information about common monitor problems you might encounter and the possible solutions. Common Symptoms What You Experience Possible Solutions No Video/Power LED off No picture • Ensure that the video cable connecting the monitor and the computer is properly connected and secure. • Verify that the power outlet is functioning properly using any other electrical equipment. • Ensure that the power button is depressed fully.
Common Symptoms What You Experience Possible Solutions Missing Pixels LCD screen has spots • Cycle power on-off. • Pixel that is permanently off is a natural defect that can occur in LCD technology. For more information on Dell Monitor Quality and Pixel Policy, see Dell Support site at: www.dell.com/support/ monitors. Stuck-on Pixels LCD screen has bright spots • Cycle power on-off. • Pixel that is permanently off is a natural defect that can occur in LCD technology.
Common Symptoms What You Experience Possible Solutions Synchronization Problems Screen is scrambled or appears torn • Reset the monitor to Factory Settings. • Perform Auto Adjust via OSD. (For VGA source only) • Adjust Phase and Pixel Clock controls via OSD. (For VGA source only) • Perform monitor self-test feature check to determine if the scrambled screen appears in self-test mode. • Check for bent or broken pins in the video cable connector. • Restart the computer in the safe mode.
Common Symptoms What You Experience Possible Solutions No sound or sound is low Monitor has no sound or sound is low • Make sure the audio cable is properly connected to the monitor. • Adjust the volume settings of both your monitor and computer. • Make sure the computer sound card driver is properly installed and activated. • Make sure the audio source is correct on the OSD.
Product-Specific Problems Specific Symptoms What You Experience Possible Solutions Screen image is too small Image is centered on • Reset the monitor to Factory Settings. screen, but does not fill entire viewing area Cannot adjust the monitor with the buttons on the front panel OSD does not appear on the screen • Turn off the monitor, unplug the power cord, plug back, and then turn on the monitor. No Input Signal when user controls are pressed No picture, the LED light is white.
Appendix WARNING: Safety Instructions WARNING: Use of controls, adjustments, or procedures other than those specified in this documentation may result in exposure to shock, electrical hazards, and/or mechanical hazards. For information on safety instructions, see the Product Information Guide. FCC Notices (U.S. Only) and Other Regulatory Information For FCC notices and other regulatory information, see the regulatory compliance website located at www.dell.com\regulatory_compliance.
Setting Up Your Monitor Setting the display resolution to 1920 x 1080 (Maximum) For optimal display performance while using the Microsoft Windows operating systems, set the display resolution to 1920 x 1080 pixels by performing the following steps: In Windows® 7, Windows® 8/Windows® 8.1: 1. For Windows® 8/Windows® 8.1 only, select the Desktop tile to switch to classic desktop. 2. Right-click on the desktop and click Screen Resolution. 3.
If you have a Dell desktop or a Dell portable computer with Internet access 1. Go to http://www.dell.com/support, enter your service tag, and download the latest driver for your graphics 2. After installing the drivers for your graphics adapter, attempt to set the resolution to 1920 x 1080 again. NOTE: If you are unable to set the resolution to 1920 x 1080, please contact Dell to inquire about a graphics adapter that supports these resolutions.
Procedures for setting up dual monitors in Windows® 7 or Windows® 8/Windows® 8.1 For Windows® 7 Connect the external monitor(s) to your laptop or desktop using a video cable (VGA, HDMI etc.) and follow any of the below setup method. Method 1: Using keyboard shortcut “Win+P” 1. Press the Windows logo key + P on your keyboard. 2. While holding down the Windows logo key, press P to toggle between the display selections. Method 2: Using the “Screen Resolution” menu 1.
2. Click Multiple displays to choose a display selection. If you do not see the additional monitor listed, click Detect. • You may need to restart your system and repeat steps 1 to 3 if the system does not detect the added monitor.
For Windows® 8/Windows® 8.1 Connect the external monitor(s) to your laptop or desktop using a video cable (VGA, HDMI etc.) and follow any of the below setup method. Method 1: Using keyboard shortcut “Win+P” 1. Press the Windows logo key + P on your keyboard. 2. While holding down the Windows logo key, press P to toggle between the display selections. Method 2: Using the “Screen Resolution” menu 1. From the Start screen, select Desktop tile to switch to the Classic Windows desktop.
2. Right-click on the desktop and click Screen resolution. 3. Click Multiple displays to choose a display selection. If you do not see the additional monitor listed, click Detect. • You may need to restart your system and repeat steps 1 to 3 if the system does not detect the added monitor.
Setting Display Styles For Multiple Monitor After the external monitor(s) have been set up, users can select the desired display style from Multiple displays menu: Duplicate, Extend, Show Desktop On. • Duplicate these displays: Duplicate the same screen on two monitors with the same resolution, chosen based on the monitor with a lower resolution. For Windows® 8/Windows® 8.
• Show desktop only on: Display the status of a particular monitor. This option is typically chosen when the laptop is used as a PC so the user can enjoy a large external monitor. Most current laptops support mainstream resolutions. As shown in the figure above, the resolution of the laptop monitor is only 1280 x 800, but after connecting a 27” external LCD monitor, users can immediately improve their visual enjoyment to 1920 x 1080 Full HD quality.
For Windows® 8/Windows® 8.
Setting Up Your Monitor 69