Edge Gateway 3002 安装和操作手册 计算机型号: Edge Gateway 3002 管制型号: N03G 管制类型: N03G001
注、小心和警告 注: “注”表示帮助您更好地使用该产品的重要信息。 小心: “小心”表示可能会损坏硬件或导致数据丢失,并说明如何避免此类问题。 警告: “警告”表示可能会造成财产损失、人身伤害甚至死亡。
目录 1 概览................................................................................................................................................................... 5 2 系统视图.......................................................................................................................................................... 6 顶部视图............................................................................................................................................................................
恢复 Ubuntu Core 16................................................................................................................................................................ 54 刷新新的 OS 映像................................................................................................................................................................... 55 创建恢复 USB 闪存盘..............................................................................................................................................
概览 1 Edge Gateway 3000 系列是物联网 (IoT) 设备。它安装在边缘网络,让您能够从多个装置和传感器收集、分析及处理数据。它可让 您连接使用于运输、建筑自动化、制造和其他应用的设备。Edge Gateway 具有低电力体系结构,能够支持工业自动化工作负 载,同时保持无风扇配置,以满足环境和可靠性要求。它支持 Windows 10 IoT Enterprise LTSB 2016 和 Ubuntu Core 16 操作系统。 5
2 系统视图 顶部视图 表.
表. 2: 底部视图 功能 1 接地 连接至电源一侧的大型导体,其用来作为目前电路中的众多不 同组件的常见返回路径。 左侧视图 表. 3: 左侧视图 功能 1 防盗开关 机柜打开时(安装 Edge Gateway),触发防盗事件。 注: 外部机柜单独销售。 注: 防盗事件由第三方机柜通过传感器触发至 Edge Gateway。传感器应该具有 电缆,其与 Edge Gateway 上的防盗开关连接器兼容。 2 电源或启动端口 连接 12-57 VDC (1.08-0.23 A) 电源线,为 Edge Gateway 供电。 注: 电源线单独销售。 注: 对于海上应用,限制输入电压为 12-48 VDC。滑轨应用的电缆长度不得超过 30 米。 3 电源和系统状态指示灯 指示电源状态和系统状态。 4 WLAN 或蓝牙状态指示灯 指示 WLAN 或蓝牙是打开还是关闭。 5 云连接状态灯 提示云连接状态。 6 以太网端口一(支持以太网供 电) 连接以太网 (RJ45) 电缆以进行网络访问。提供高达 10/100 Mbps 的数据传输速度, 并且支持 IEEE 802.
功能 注: 插入微型 SD 卡之前先卸下 SD 卡槽填充挡片。 10 微型 SIM 或微型 SD 卡盖 打开护盖,以检修微型 SIM 或微型 SD 卡。 1 USB 电源限制为 0.6 A/3 W。 表.
表. 5: 电源连接器插针定义详细信息 插针 信号 功能 1 DC+ 12–57 VDC 电源 2 DC– 接地 3 IG 9–32 VDC 启动 注: 插针 3 (IG) 连接至车辆的启动状态指示器(可选)或唤醒插针。信号中超过 9 V 的电压表明车辆的引擎在运行。当车辆 在较长一段时间内处于关闭状态时,启动或唤醒插针用于防止车辆电池耗尽。 注: 当车辆处于关闭状态(电池供电)时,可以使用 IG 信号正常关闭或进入低功率状态。它也可以用于在车辆启动时为 Edge Gateway 供电。 右侧视图 表. 6: 右侧视图 — 3002 功能 1 CANbus 端口 支持 CANbus 连接。 2 USB 2.0 端口 1 连接支持 USB 的设备。提供数据最高传输速度为 480 Mbps。 3 以太网端口二(非 PoE) 连接以太网 (RJ45) 电缆以进行网络访问。提供数据最高传输速 度为 10/100 Mbps。 1 USB 电源限制为 0.4 A/2 W。 表.
安装 Edge Gateway 3 警告: 开始执行本节中的任何步骤之前,请阅读系统附带的安全与管制信息。。 安全与管制信息 警告: Edge Gateway 必须由具备知识、技能且熟悉当地和/或国际电气规程和法规的人员安装。 警告: Edge Gateway 不适用于潮湿的环境。如果 Edge Gateway 是安装在潮湿的环境中,必须将它安装在配电箱或异物防护 (IP) 等级为 IP54、IP65 或更高等级的机箱内,具体取决于位置和环境。 警告: 为降低触电风险,连接到 DC+ 和 DC- 端子的电源必须由电源或变压器/整流器电路,其设计为双重绝缘。电源或电源 电路必须符合当地法规;例如在美国的 NEC 2 类 (SELV/有限能源电路,或 LPS 电路)。如果由电池供电,则不需要双重 绝缘。 警告: 安装 Edge Gateway 时,责任方或集成商应使用 12-57 VDC 或以太网供电 (PoE) 电源 37-57 VDC,以及作为客户端安装 一部分提供的最低 13 W 的电源。 警告: 确保为 Edge Gateway 供电的电源可靠地接地和过滤,使得峰间波纹电压组件低于输入直流电压的 1
警告: 小心选择安装位置,并确保最终输出电源不超过产品使用说明中所述的限制。违反这些规则会导致严重的联邦罚 款。 Instructions d'installation professionnelles Le personnel d'installation Ce produit est conçu pour des applications spécifiques et doit être installé par un personnel qualifié avec RF et connaissances connexes réglementaire.L'utilisateur ne doit pas tenter générale d'installer ou de modifier le réglage.
2. l'utilisateur de l'appareil doit accepter tout brouillage radioélectrique subi, même si le brouillage est susceptible d'en compromettre le fonctionnement. 根据加拿大工业法规,只能使用一种天线以及已获批准的发射器的增益最高值(或更低值)操作无线电发射器。为了减少对其 他用户的潜在无线电干扰,应该谨慎选择天线类型和增益,确保等效全向辐射功率 (E.I.R.P.) 不会超过发射器的已获批准的设 置。 此 A 类数字设备符合 Canadian ICES-003 标准。 Cet appareil numérique de la classe A est conforme à la norme NMB-003 du Canada. 本设备符合加拿大工业 RSS-210 标准操作受条件限制,此装置不会造成有害的干扰。 Cet appareil est conforme à la norme RSS-210 d'Industrie Canada.
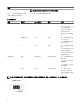
表. 8: Edge Gateway 3002 中支持的天线 支持的天线 信号 3002 是 是 是 是 是 注: 仅使用提供的天线或者符合最低规格的第三方天线。 注: 根据订购的配置,某些天线连接器可能未提供或被限制。 注: 移动宽带天线连接器二仅适用于 LTE 辅助;它不支持 3G 。 3.
4. 然后通过拧紧连接器的旋转磁头将天线固定,直至其稳固地将天线保留在首选位置中(垂直或竖直)。 注: 天线图像仅用于示例目的。实际外观可能与所提供的图像不同。 5. 将所有所需的电缆连接至 Edge Gateway 上相应的 I/O 端口。 6. 打开微型 SIM 或微型 SD 卡盖。 7.
8. 将微型 SD 卡插入底部微型 SD 卡槽。 注: 插入微型 SD 卡之前先卸下 SD 卡槽填充挡片。 注: 确保合上护盖后稳固地旋回检视门。 9.
注: 次要机柜单独销售。 10.
注: 更改电源之前先关闭系统。 11. 在任何未使用的端口上装回防尘帽。 12. 首次设置 Edge Gateway 时,完成操作系统设置。 有关更多信息,请参阅设置操作系统。 注: MAC 地址和 IMEI 编号位于 Edge Gateway 正面的标签上。请在安装时撕下标签。 注: Edge Gateway 附带 Windows 10 IoT Enterprise LTSB 2016 或 Ubuntu Core 16 操作系统。 注: Windows 10 IoT Enterprise LTSB 2016 的默认用户名和密码是 admin。 注: Ubuntu Core 16 的默认用户名和密码是 admin。 13.
激活移动宽带服务 小心: 启动 Edge Gateway 之前,插入一个微型 SIM 卡。 注: 确保服务提供商已激活微型 SIM 卡,然后再在 Edge Gateway 中使用。 1. 拧下螺钉打开微型 SIM 卡盖。 2. 将微型 SIM 卡插入顶部微型 SIM 卡槽。 3. 装回螺钉并关闭微型 SIM 卡盖。 4. 打开 Edge Gateway。 5. 连接至移动网络。 Windows 操作系统 a. 从任务栏中选择网络图标,然后单击 Cellular(蜂窝)。 b. 选择 Mobile Broadband Carrier(移动宽带运营商) → Advanced Options(高级选项)。 c. 记下 International Mobile Equipment Identity (IMEI)(国际移动设备识别码 [IMEI])和 Integrated Circuit Card Identifier (ICCID)(集成电路卡标识符 [ICCID])。 d. 输入 APN 编码和服务提供商要求提供的任何其他凭据。 Ubuntu 操作系统 a.
示例 (3G): network-manager.nmcli con add type gsm ifname cdc-wdm0 con-name 3G_GSMDEMO apn internet d. 连接至移动网络: 命令行: network-manager.nmcli con up 示例 (Verizon): network-manager.nmcli con up VZ_GSMDEMO 示例 (AT&T): network-manager.nmcli con up ATT_GSMDEMO 示例 (3G): network-manager.nmcli con up 3G_GSMDEMO 从移动网络断开连接: 命令行:network-manager.nmcli con down 示例 (Verizon): network-manager.nmcli con down VZ_GSMDEMO 示例 (AT&T): network-manager.
注: 安装托架仅随附将安装托架固定在 Edge Gateway 时所需要的螺钉。 1. 使用四颗 M4x4.5 螺钉将标准安装架固定至 Edge Gateway 的后面。 注: 以 8±0.5 千克-厘米(17.64±1.
2. 将 Edge Gateway 靠墙放置,并将标准安装架上的孔与墙壁上的孔对齐。托架上的螺钉孔直径为 3 毫米(0.
3.
4. 按标记在墙上钻四个孔。 5.
6.
7.
使用快速安装架安装 Edge Gateway 快速安装架由标准安装架和 DIN 导轨架组成。它使您能够轻松地安装和拆除 Edge Gateway。 注: 安装架仅附带将安装架固定在 Edge Gateway 时所需要的螺钉。 安装尺寸 26
安装说明 1.
2. 按标记在墙上钻四个孔。 3.
4.
5.
6. 将 DIN 导轨架上的螺钉孔与 Edge Gateway 后面的螺钉孔对齐。 7.
8.
9.
注: 有关拆除 DIN 导轨的更多信息,请参阅拆除 DIN 导轨。 将电缆控制条连接至标准安装架 1. 使用标准安装架或快速安装架将 Edge Gateway 安装在墙壁上。 2. 将电缆控制条放置在安装架上并固定至槽口。 小心: 仅在进行同轴电缆连接时,才使用顶部电缆控制条。请勿配合天线使用。 3. 将电缆控制条的螺钉孔与安装架上的螺钉孔对齐。 4. 拧紧将电缆控制条固定至固定支架的六颗 M3x3.5 毫米螺钉。 注: 以 5±0.5 千克-厘米(11.02±1.
5. 将电缆连接至 Edge Gateway. 6.
使用 DIN 导轨架将 Edge Gateway 安装在 DIN 导轨上。 注: DIN 导轨架包括将安装架固定到 Edge Gateway 上所需的螺钉。 1. 将 DIN 导轨架上的螺钉孔与 Edge Gateway 后面的螺钉孔对齐。 2.
3. 通过使用两个随附的 M4x5 螺钉,将 DIN 导轨固定支架固定到 Edge Gateway 上。 注: 以 8±0.5 千克-厘米(17.64±1.
4. 倾斜地将 Edge Gateway 置于 DIN 导轨上,然后拉动 Edge Gateway 向下压缩 DIN 导轨固定架顶部的弹簧。 5.
使用垂直安装架安装 Edge Gateway 注: 垂直安装架专为在 DIN 导轨中安装而设计。 注: 建议在 Edge Gateway 周围留出 63.50 毫米(2.50 英寸)的空间,确保达到最佳通风效果。确保在其中安装 Edge Gateway 的环境的温度不会超过 Edge Gateway 的操作温度。有关 Edge Gateway 操作温度的更多信息,请参阅 Edge Gateway 规格。 1. 将垂直安装架上的螺钉孔与 Edge Gateway 上的螺钉孔对齐。 2. 拧紧将 Edge Gateway 固定至垂直安装架上的四颗 M4x7 螺钉。 注: 以 8±0.5 千克-厘米(17.64±1.
3. 将 DIN 轨道安装架上的螺钉孔与垂直安装架上的螺钉孔对齐,然后拧紧两颗螺钉。 注: 以 8±0.5 千克-厘米(17.64±1.
4. 倾斜地将 Edge Gateway 置于 DIN 导轨上,然后向下推动 Edge Gateway,压缩 DIN 导轨安装架顶部的弹簧。 5.
6.
设置 ZigBee 加密解密器 小心: 如果 Edge Gateway 安装在机柜中,则不要连接 ZigBee 加密解密器。 1. 关闭 Edge Gateway。 2. 将 ZigBee 加密解密器连接到 Edge Gateway 上的任何外置 USB 端口。 3. 开启 Edge Gateway 并完成设置。 注: 有关 ZigBee 开发的更多信息,请参阅 www.silabs.
设置操作系统 5 小心: 为了放置突然断电造成系统损坏,使用操作系统正常关闭 Edge Gateway。 Edge Gateway 与以下其中一种操作系统一起提供: • Windows 10 IoT Enterprise LTSB 2016 • Ubuntu Core 16 注: 有关 Windows 10 操作系统的详细信息,请参阅 msdn.microsoft.com。 注: 有关 Ubuntu Core 16 操作系统的更多信息,请参阅 www.ubuntu.com/desktop/snappy。 Windows 10 IoT Enterprise LTSB 2016 启动并登录 — 远程系统配置 注: 您的计算机必须与 Edge Gateway 位于同一子网上。 1. 将网络电缆从 Edge Gateway 上以太网端口一连接到已启用 DHCP 的网络或提供 IP 地址的路由器。 注: 第一次引导至 Windows 可能需要约五分钟的系统配置时间。后续启动需要大约 50 秒。 2.
恢复 Windows 10 IoT Enterprise LTSB 2016 小心: 以下步骤将删除 Edge Gateway 上的所有数据。 您可以使用 USB 闪存驱动器还原 Windows 10 IoT Enterprise LTSB 2016。 前提条件 创建恢复 USB 闪存驱动器。有关更多信息,请参阅创建恢复 USB 闪存驱动器。 步骤 1. 将 USB 恢复闪存驱动器连接到 Edge Gateway。 2. 打开 Edge Gateway。 Edge Gateway 将自动从 USB 恢复闪存驱动器引导并将 Windows 还原回出厂映像。还原可能会需要约 25 分钟才能完成,并 且确认会在 USB 闪存驱动器上存储日志文件。一旦还原完成,系统将会关闭。 注: 确认日志文件名为 <服务标签>_<日期>_<时间>.
系统关闭和重新启动 单击 Start(开始) → Power(电源),然后单击 Restart(重新启动)或 Shutdown(关闭)以分别重新启动或关闭 Edge Gateway。 LAN 和 WLAN 网络配置 在 Search(搜索)框中,键入 Settings(设置)并打开 Settings(设置)窗口。选择 Network & Internet(网络和 Internet)以 配置网络。 蓝牙配置 在 Search(搜索)框中,键入 Settings(设置)并打开 Settings(设置)窗口。选择 Devices(设备),然后从左侧面板上的 菜单选择 Bluetooth(蓝牙)以配置网络。 WWAN (5815) 网络配置 注: 在 Edge Gateway 中使用微型 SIM 卡之前,先确保服务提供商已经激活此卡。有关更多信息,请参阅激活移动宽带服 务。 安装微型 SIM 卡之后,按照以下步骤进行操作: 1. 在 Search(搜索)框中,键入 Settings(设置)并打开 Settings(设置)窗口。 2.
启动并登录 — 静态 IP 系统配置 这允许您通过主机计算机(必须位于同一子网)连接 Edge Gateway。 注: Edge Gateway 上以太网端口二的静态 IP 地址在出厂时设置为以下值: • 1. 2. IP 地址:192.168.2.1 • 子网掩码:255.255.255.0 • DHCP 服务器:不适用 在主机计算机上,配置连接到同一子网下具有静态 IPv4 地址的 Edge Gateway 的以太网适配器。将 IPv4 地址设置为 192.168.2.x(其中 x 代表 IP 地址的最后一位,例如 192.168.2.2)。 注: 请勿将 IPv4 地址设置为与 Edge Gateway 相同的 IP 地址。使用 192.168.2.2 到 192.168.2.254 之间的 IP 地 址。 将子网掩码设置为 255.255.255.
根用户凭据 运行以下命令: admin@localhost:$ sudo su 返回: $ admin@localhost:~# sudo su – $ root@localhost:~# 识别系统服务标签 运行以下命令: admin@localhost:$ cat /sys/class/dmi/id/product_serial 打印系统标签。 关闭系统 运行以下命令: admin@localhost:$ sudo poweroff 系统成功关闭。 网络通信接口 Edge Gateway 3000 系列有一个以太网连接,一个 802.11b/g/n 无线连接和一个蓝牙网络连接。 以太网(端口 1、eth0) 假设您将支持互联网的以太网电缆插入端口 1,屏幕应与下面运行 ifconfig 命令后的屏幕类似。如果未配置 WLAN 和蓝牙, 它们将不会显示在网络设备列表中。 admin@localhost:~$ ifconfig 运行 ifconfig 命令后: eth0 lo Link encap:Ethernet HWaddr 74:e6:e2:e3:0f:12 inet addr:192.
在命令提示符处输入以下内容以查找可用访问点的列表。 $ network-manager.nmcli d wifi 运行以下命令并替换为您环境的 $SSID、$PSK 和 $WIFI_INTERFACE。 • 连接 $ sudo network-manager.nmcli dev wifi connect $SSID password $PSK ifname $WIFI_INTERFACE 或者 $ sudo network-manager.nmcli dev wifi connect $SSID password $PSK • 断开连接 $ sudo network-manager.nmcli dev disconnect $WIFI_INTERFACE 在命令提示符处输入以下内容以添加一个连接到系统。 $>: network-manager.nmcli con add con-name ifname wlan0 type wifi ssid 例如: $>: network-manager.
11. 关闭 bluetoothctl 控制台。 $ quit 您可以开始使用蓝牙键盘。 在 WLAN 和蓝牙模式之间切换 1. 卸下 WLAN/BT 驱动程序。 $ modprobe -r ven_rsi_sdio 2. 在 /etc/modprobe.d/rs9113.conf 中调整模式 3. 重新下载 WLAN/BT 驱动程序。 $ modprobe ven_rsi_sdio 4. 验证操作模式。请参阅操作模式值表。 $ cat /sys/module/ven_rsi_sdio/parameters/dev_oper_mode 表.
Dell 未提供用于控制或操作设备的现成软件。 运行以下命令以配置 RS-232 端口: 1. 从 BIOS(在 BIOS 脚本中)设置为 RS-232。 #Platcfg64E.efi 0x046F:0x0001 #Platcfg64E.efi 0x046F:0x0001 或者,使用 Dell Command | Configure (DCC) 应用程序以切换 BIOS 配置。 $ dcc.cctk -h --serial1 $ dcc.cctk --serial1 $ dcc.cctk --serial1=rs232 2. 设置串行端口模式。 $ sudo stty -F /dev/ttyXRUSB0 ispeed 115200 ospeed 115200 -echo -onlcr -ixon -ixoff $ sudo stty -F /dev/ttyXRUSB1 ispeed 115200 ospeed 115200 -echo -onlcr -ixon -ixoff 3.
或者,使用 Dell Command | Configure (DCC) 应用程序以切换 BIOS 配置 dcc.cctk -h --serial1 dcc.cctk --serial1 dcc.cctk --serial1=rs485 2. 设置串行端口模式。 $ sudo stty -F /dev/ttyXRUSB0 ispeed 115200 ospeed 115200 -echo -onlcr -ixon -ixoff $ sudo stty -F /dev/ttyXRUSB1 ispeed 115200 ospeed 115200 -echo -onlcr -ixon -ixoff 3. 在两个端口(设备上两个串行端口之间的有线 RS485 HD)之间传输或接收数据。 $ sudo su $ echo abcdefg > /dev/ttyXRUSB0 重复执行命令以发送数据。 4.
恢复 Ubuntu Core 16 在将操作系统恢复至出厂映像后,将删除系统上的所有数据。您可以使用以下方法之一,将 Ubuntu Core 16 操作系统还原为出 厂映像: • 从 USB 闪存驱动器还原 Ubuntu Core 16 • 从 Edge Gateway 上的恢复分区还原 Ubuntu Core 16 – 选项 1:从操作系统还原 – 选项 2:系统开机自检期间还原 选项 1:从操作系统还原 小心: 以下步骤将删除 Edge Gateway 上的所有数据 1. 远程或者通过 KVM 会话连接到 Edge Gateway。 2. 登录至操作系统。 3. 运行以下命令以触发本机 eMMC 恢复分区。 $ sudo efibootmgr -n $(efibootmgr | grep "factory_restore" | sed 's/Boot//g' | sed 's/ [^0-9A-B]*//g') ; reboot 选项 2:系统开机自检期间还原 小心: 这些步骤将删除 Edge Gateway 上的所有数据。 1.
注: 安装需要约 3 分钟才能完成。 5. Edge Gateway 关闭后,移除 USB 驱动器。 6. 再次启动 Edge Gateway 以继续安装。系统在安装过程中将多次重新引导,并且需要大约 10 分钟才能完成。 7. 安装完成后,将显示登录屏幕。 在登录屏幕上,输入默认的用户名和密码:admin。 Edge Gateway 现在可供使用。 注: 有关在 Edge Gateway 上远程访问 Ubuntu 的更多信息,请参阅启动并登录 – 远程系统配置 刷新新的 OS 映像 前提条件 • 一个空的 FAT32 格式化 USB 闪存驱动器,包含至少 4 GB 存储空间 • Ubuntu Desktop ISO 注: 您可以从 http://releases.ubuntu.com 下载最新版本的 Ubuntu Desktop ISO 文件。 • 从 Dell.com/support 发布的 Ubuntu Core 16 映像: img.xz • USB 键盘 • USB 鼠标 • 配有 Ubuntu 14.
• 对于 Windows:dell.com/support/home/us/en/19/drivers/osiso/win 2. • 对于 Ubuntu:dell.com/support/home/us/en/19/drivers/osiso/linux 在计算机上下载并安装 Dell OS Recovery Tool。 3. 启动 Dell OS Recovery Tool。 4. 在 User Account Control(用户帐户控制)提示框中单击 Y。 5. 将 USB 闪存盘连接到计算机。 6. 单击 Browse(浏览)并导航至要保存 Dell ISO 恢复映像文件的位置。 7. 选择 Dell ISO 恢复映像文件并单击 Open(打开)。 8. 单击 Start(开始)以开始创建可引导 USB 恢复介质。 9. 单击是继续。 10.
访问和更新 BIOS 6 访问 BIOS 设置 使用 Dell Command | Configure (DCC) 访问 BIOS 设置 Dell Command | Configure (DCC) 是 Edge Gateway 中出厂安装的应用程序,可帮助配置 BIOS 设置。它包括可以配置各种 BIOS 功能 的命令行界面 (CLI)。有关 DCC 的更多信息,请参阅 www.dell.com/dellclientcommandsuitemanuals。 • 在运行 Windows 的已连接计算机上,单击开始 → 所有程序 → Command Configure → Dell Command | Configure 向导 • 在运行 Ubuntu Core 的已连接计算机上,使用命令 dcc.cctk 访问 Dell Command | Configure 有关如何使用 Dell Command | Configure 应用程序的更多信息,请参阅 Dell Command | Configure 安装指南和用户指南,网址: www.dell.
为有关 USB 调用脚本的更多信息,请参阅 Edge Gateway USB script utility User's Guide(Edge Gateway USB 脚本公用程序用户指 南),网址:www.dell.com/support/home/us/en/19/product-support/product/dell-edge-gateway-3000-series-oem-ready/drivers。 在 Windows 系统上更新 BIOS 按照以下步骤来更新 BIOS: 1. 连接到 Edge Gateway 之后。 注: 执行以下选项之一,连接并登录到 Edge Gateway: • 远程系统配置 2. • 静态 IP 系统配置(仅适用于 Edge Gateway 3002 和 3003) 转至 www.dell.com/support。 3. 单击 Product support(产品支持),输入系统的服务标签,然后单击 Submit(提交)。 注: 如果您没有服务标签,请使用自动检测功能,或手动浏览找到系统型号。 4. 单击“驱动程序和下载”。 5.
注: 执行以下选项之一,连接并登录到 Edge Gateway: • 远程系统配置(仅适用于 Edge Gateway 3001 和 3002) • 静态 IP 配置(仅适用于 Edge Gateway 3002 和 3003) 2. 检查当前的 BIOS 详细信息。 $sudo uefi-fw-tools.fwupdmgr get-devices 3. 从 LVFS 服务检查可用更新。 $sudo uefi-fw-tools.fwupdmgr refresh 4. 从 www.dell.com/support 下载 BIOS。 $sudo uefi-fw-tools.fwupdmgr get-updates 5. 应用更新。 $sudo uefi-fw-tools.fwupdmgr update -v --allow-older --allow-reinstall 6. 检查 EFI 引导详细信息。 $ sudo efibootmgr –v 7.
BIOS 级别 2 BIOS 级别 3 项目 默认值 Enable USB Port2(启用 USB 端口 2):[Enable/Disable] ([启用/禁用]) Enabled(已启用) Enable WWAN(启用 WWAN):[Enable/Disable] ([启用/禁用]) Enabled(已启用) Enable WLAN/Bluetooth Limit (启用 WLAN/蓝牙限制): [Enable/Disable]([启用/禁 用]) Enabled(已启用) Enable CANBus(启用 CANBus):[Enable/Disable] ([启用/禁用]) Enabled(已启用) Enable ZigBee(启用 ZigBee):[Enable/Disable] ([启用/禁用]) Enabled(已启用) Enable Dedicated GPS Radio (启用专用 GPS 射频): [Enable/Disable]([启用/禁 用]) Enabled(已启用) Enable MEMs Sensor(启用 MEMs 传感器):[Enable/ D
BIOS 级别 2 BIOS 级别 3 项目 默认值 UEFI Capsule Firmware Updates UEFI Capsule Firmware Updates Enable UEFI Capsule Firmware Updates(启用 UEFI 压缩固件 更新):[Enable/Disable]([启 用/禁用]) Enabled(已启用) TPM 2.0 Security(TPM 2.0 安 全性) TPM 2.0 Security(TPM 2.0 安 全性) TPM 2.0 Security(TPM 2.
性能(BIOS 级别 1) 表. 15: 性能(BIOS 级别 1) BIOS 级别 2 BIOS 级别 3 项目 默认值 C-States Control Inter SpeedStep Enable Intel SpeedStep(启用 Intel SpeedStep):[Enable/ Disable]([启用/禁用]) Enabled(已启用) C-States Control C-States Control C-States(C 状态):[Enable/ Disable]([启用/禁用]) Enabled(已启用) Limit CPUID Value Limit CPUID Value Enable CPUID Limit(启用 CPUID 限制):[Enable/ Disable]([启用/禁用]) Disabled(已禁用) 默认值 电源管理(BIOS 级别 1) 表.
BIOS 级别 2 BIOS 级别 3 项目 默认值 Extend BIOS POST Time Extend BIOS POST Time [0 seconds/5 seconds/10 seconds]([0 秒/5 秒/10 秒]) 0 seconds(0 秒) Warnings and Errors Warnings and Errors [Prompt on Warnings and Errors/ Prompt on Warnings and Errors Continue on Warnings/Continue (提示警告和错误) on Warnings and Errors]([提示 警告和错误/出现警告时继续/ 出现警告和错误时继续]) 虚拟化支持( BIOS 级别 1) 表.
参考资料 除了本安装和操作手册外,您可以到网站 www.dell.com/support/manuals 上查看以下文档。 • • • • • • 《Dell Edge Gateway 规格》 《Dell Edge Gateway 服务手册》 《Dell Command | Configure 用户指南》 《Dell Command | Configure 参考指南》 《Dell Command | Monitor 用户指南》 《Dell Command | PowerShell 提供商用户指南》 此外,有关使用 Dell Data Protection | Encryption 的更多信息,请参阅 www.dell.
8 附录 天线规格 Edge Gateway 是一种专业安装的设备。无线电频率输出电源不得超过运行所在国家/地区中允许的最大限制。 小心: 未经授权的天线、修改或附件可能会损坏设备并违反国际规定。 注: 仅使用随附或认可的替换天线。 下表提供了不同天线位置的增益规格。 表. 21: 移动宽带主天线最大增益 (dBi) 天线位置 — 弯曲 天线位置 — 竖直 频率 (MHz) 3G (dBi) 4G (dBi) 3G (dBi) 4G (dBi) 704~806 不适用 2.6 不适用 2.9 824~894 1.2 1.6 2.8 2.6 880~960 0.9 1.6 2.0 1.9 1710~1880 2.4 3.8 1.7 3.0 1850~1990 3.1 3.8 3.3 3.2 1920~2170 3.4 3.9 3.3 3.2 表. 22: 移动宽带辅助天线最大增益 (dBi) 天线位置 — 弯曲 天线位置 — 竖直 频率 (MHz) 4G (dBi) 4G (dBi) 704~806 0.2 1.
表. 24: ZigBee 天线最大增益 (dBi) 天线位置 — 弯曲 天线位置 — 竖直 频率 (MHz) ZigBee (dBi) ZigBee (dBi) 2400~2500 0.4 1.7 从 DIN 导轨架卸下 1. 向下拉动 Edge Gateway,使其从 DIN 导轨架中释放出来。 2. 将 Edge Gateway 支架提离 DIN 导轨。 连接到 Edge Gateway Windows 10 IoT Enterprise LTSB 2016 启动并登录 — 远程系统配置 注: 您的计算机必须与 Edge Gateway 位于同一子网上。 1. 将网络电缆从 Edge Gateway 上以太网端口一连接到已启用 DHCP 的网络或提供 IP 地址的路由器。 注: 第一次引导至 Windows 可能需要约五分钟的系统配置时间。后续启动需要大约 50 秒。 2. 使用在 Edge Gateway 的前盖上提供的 MAC 地址,通过网络的 DHCP 服务器或网络分析程序获取 IP 地址。 3.
启动和登录 — 静态 IP 系统配置 注: 为了帮助远程设置 Edge Gateway,Edge Gateway 上以太网端口二的静态 IP 地址在出厂时设置为以下值: • IP 地址:192.168.2.1 • 子网掩码:255.255.255.0 • DHCP 服务器:不适用 您可以使用交叉电缆将 Edge Gateway 连接至同一子网上的 Windows 计算机。 1. 在 Windows 计算机上,在控制面板中搜索查看网络连接。 2. 在出现的网络设备列表中,右键单击用于连接到 Edge Gateway 的以太网适配器,然后单击属性。 3. 在 Networking(网络)选项卡中,单击 Internet Protocol Version 4 (TCP/IPv4)(Internet 协议版本 4 [TCP/IPv4]) → Properties (属性)。 选择使用以下 IP 地址,然后输入 192.168.2.x(其中 x 代表 IP 地址的最后一位数字,例如 192.168.2.2)。 4.