
API Guide


● Ensure that the new IOM has the same OS10 version as the faulty IOM. You can check the OS10 version by logging into the
OME-Modular Graphical User Interface (GUI).
NOTE: OS10 is factory-installed in the MX9116n FSE or MX5108n Ethernet Switch. If the faulty IOM has an upgraded
version of OS10, you must upgrade the new IOM to the same version. To upgrade an OS10 image, see Download OS10
image for upgrade.
Replace an IOM in Full-Switch VLT
To replace an IOM in Full-Switch mode and part of a VLT domain:
1. Physically remove the faulty IOM and insert the new IOM, see Remove and replace the IOM.
2. Verify the firmware version and configure the IOM settings, see Verify and configure IOM settings.
3. Connect the cables to the new IOM, see Connect the cables to the new IOM.
Replace an IOM in SmartFabric
To replace an IOM that is part of a SmartFabric:
1. Physically remove the faulty IOM and insert the new IOM, see Remove and replace the IOM.
2. Verify the firmware version and configure the IOM settings, see Verify and configure IOM settings.
3. Identify the master IOM connected in the PowerEdge MX chassis, see Identify the master IOM.
4. Initiate the replacement workflow from the master IOM using the module replacement command, see Initiate the module
replacement workflow. The module replacement command is a Linux command that must be run from the Linux shell.
5. Connect the cables to the new IOM, see Connect the cables to the new IOM.
Master and member IOMs: A single MX chassis supports four Ethernet IOMs, where one IOM is the master and the remaining
three are members. In a multiple chassis environment, of all the IOMs connected in a scalable fabric, one IOM is the master and
the remaining are members.
When an IOM is replaced, run the sfs_node_replace.py script to push the existing IOM configurations that are done
through the smart fabric mode GUI to the new IOM.
NOTE:
The configurations, fcoe deny unicast-solicit and fcoe delay adv-timer are not available even after
running the sfs_node_replace.py script. The configurations are optional and, you have to reconfigure each time when
a node is replaced.
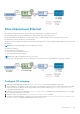
Remove and replace the faulty IOM
1. Identify the faulty IOM to replace.
2. Save the CLI configurations present in the faulty IOM.
3. Label each of the cables with the port numbers.
4. Remove the faulty IOM from the slot and disconnect the cables from the IOM.
5. Insert the new IOM into the empty slot.
NOTE: Do not reconnect the cables.
6. Confirm that the new IOM is recognized by OME-Modular.
NOTE: To confirm that the new IOM is listed in the correct Chassis and slot, log in to the OME-Modular GUI.
Verify and configure IOM settings
● Verify the firmware version on the new IOM. If required, upgrade the firmware on the new IOM. To view the pending
firmware upgrade, use the show image firmware command. For more information, see Install firmware upgrade.
● Configure the hostname and IP management protocols, such as SNMP and NTP on the new IOM. For more information, see
System management.
NOTE:
In SmartFabric Services mode, the OME-Modular GUI configurations specific to the faulty IOM apply to the new
IOM. When you remove the faulty IOM, the CLI configurations are lost. Reapply the configurations in the new IOM using
the OS10 CLI. SmartFabric Services mode supports all OS10 show commands and a subset of CLI configuration
commands. For more information about supported commands, see Operating modes.
322 PowerEdge MX Ethernet I/O modules