
Users Guide


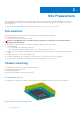
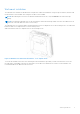
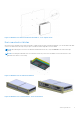

Table Of Contents
- Dell EMC Networking Virtual Edge Platform 1405 Series Getting Started Guide
- Contents
- About this Guide
- Site Preparations
- VEP1405 Series Installation
- Specifications
- Chassis physical design
- Safety standards and compliance agency certifications
- Product recycling and disposal
- Agency compliance
- USA Federal Communications Commission statement
- Industry Canada Statement
- Radiocommunication equipment compliance for Thailand
- Brasil – Aviso da Anatel
- European Union EMC directive conformance statement
- Japan VCCI compliance for Class A equipment
- Korean certification of compliance
- Mexico certification of compliance
- Taiwanese certification of compliance
- Singapore certification of compliance
- Support

Wall mount installation
The VEP1405 series includes the hardware that is required for wall mount installation. Using a torque screwdriver, affix the wall
mount brackets to the VEP1405 series using the four M3 screws included.
NOTE: When driving the screws into the bracket and VEP1405 series unit, verify that 5 lb-in is the achieved torque
setting.
NOTE: If mounting the VEP1405 series to the wall using the wall mount bracket provided, removal of the rubber feet from
the bottom of the VEP1405 series unit is not necessary.
The VEP1405 series of systems include a wall mount bracket with cross-shaped cutout for the mounting screws. The wall mount
bracket includes cross-shaped cutouts for the mounting screws.
Wall mount bracket with cross-shaped cutout for the mounting screws
Figure 3. VEP1405 series wall mount installation - cross-shaped cutout
To mount the VEP1405 series unit to the wall using the wall mount bracket provided, you must first anchor the screws into
the wall surface. Depending on the type of wall surface, use the M3 screw and anchor to ensure a secure installation. The
recommended M3 screw dimensions are as follows:
Site Preparations
7