
Users Guide
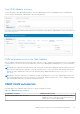
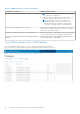

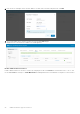
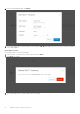
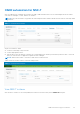
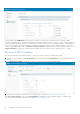

Table Of Contents
- OpenManage Network Integration for SmartFabric Services User Guide Release 2.0
- Change history
- Overview of OMNI, SFS, VxRail, and PowerEdge MX
- SmartFabric Services
- OpenManage Network Integration
- OMNI vCenter integration
- Access the OMNI stand-alone portal
- Access the OMNI Fabric Management Portal
- OMNI Appliance Management user interface
- OMNI automation support for PowerEdge MX SmartFabric
- OMNI automation support for NSX-T
- OMNI support for SmartFabric instances
- Lifecycle management
- Troubleshooting
- Logs and support data for troubleshooting
- Verify OMNI VM connectivity
- Unable to add SmartFabric instance in OMNI
- Missing networks on server interfaces
- Unable to launch OMNI UI
- OMNI plug-in does not show service instance
- Unable to register the vCenter in OMNI
- OMNI is unable to communicate with other devices
- Timestamp not synchronized in OMNI
- Reset OMNI VM password

In the left pane, under OMNI Home, select the NSX-T instance to view the list of networks that are created by OMNI
automation. OMNI displays the vCenter information that is related to the specific NSX-T instance. You can click the vCenter to
see the SmartFabric instances that are associated with that instance. When you click a SmartFabric instance, OMNI displays the
list of networks that are synchronized from NSX-T and the server interface profiles that are tagged to the NSX-T networks.
The NSX-T page displays direct links to Network and Service Interface configuration tabs of the SmartFabric instance. Click
Trigger automation to trigger the OMNI automation manually. This action synchronizes the changes in NSX-T to OMNI.
Edit Layer 3 NSX-T networks
After the networks are synchronized from NSX-T, complete the Layer 3 networks configuration in OMNI.
1. From NSX-T instance page, click Go to Networks. The click action goes to the Networks tab of the SmartFabric instance
directly.
2. Click Multi-Rack L3 VLAN to see the list of the NSX-T networks that are synchronized by OMNI.
3. Edit all the networks that are synchronized. To edit the Layer 3 settings, see Configure multi-rack L3 VLAN.
Click Go to Server Interface to go to the Server Interface configuration of the SmartFabric instance. Configure server
interface profiles and edit the networks from this page, see server interface profile.
88
OMNI automation support for NSX-T