
Users Guide


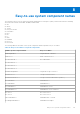


Table Of Contents
- Lifecycle Controller User's Guide
- Contents
- Introduction
- Using Lifecycle Controller
- Operating system deployment
- Monitor
- Hardware inventory view and export
- About view and export current inventory
- About view and export factory-shipped inventory
- Viewing hardware inventory — current or factory shipped
- Exporting hardware inventory — current or factory shipped
- Viewing or exporting hardware inventory after part replacement
- Viewing or exporting current inventory after resetting Lifecycle Controller
- Lifecycle Controller log
- Firmware update
- Configure
- System control panel access options
- Configuring iDRAC
- Configuring system time and date
- Configuring RAID
- Configuring RAID using software RAID
- Creating a secure virtual disk on a RAID controller
- Key encryption
- Local key encryption mode
- Breaking mirrored drives
- System setup — Advanced Hardware Configuration
- Collect system inventory on restart
- Configuring a local USB drive
- Configuring NFS and CIFS servers
- Conditions while configuring HTTP or HTTPS server
- Maintain
- Easy-to-use system component names
- Using the system setup and boot manager
- Troubleshooting and frequently asked questions

dell-emc-system-erase-poweredge-idrac9.pdf. During this operation, it deletes the hardware and software inventory data
related to the system. However, they are recreated during the next restart of the server. It also deletes the firmware and
previous versions, which will not be available for firmware rollback
NOTE:
● The Repurpose or Retire System feature does not allow deletion of iDRAC-related license information.
● PERC NV cache is displayed only if PERC card is available on the server.
Use this feature to delete any sensitive data and configuration-related information when you need to:
● Retire a managed system.
● Reuse a managed system for a different application.
NOTE:
● If BIOS (reset default and clear NVRAM) is selected, then the system powers off the second time after LC wipe is
complete.
● After the system is repurposed or retired, the Lifecycle controller UI logs LC log event HWC0017: Unable to start
Lifecycle Controller because Lifecycle Controller cannot communicate with iDRAC. Because
of internal issues this error code is expected when iDRAC is not ready."
Deleting server information
1. Start Lifecycle Controller. For more information, see Starting Lifecycle Controller.
2. In the left pane, click Hardware Configuration, and then click Repurpose or Retire System.
3. On the Select Components page, select the features and components to delete from Server Features and Storage
Components.
NOTE: The supported erase options for each storage device are displayed on the screen.
NOTE: Storage disk erase may take a longer time depending on the disk size and speed.
4. Click Next.
A summary of the features and components selected for deletion is displayed.
5. Read the information about the Summary page and click Finish.
6. The host server turns off when the operation is completed, iDRAC will reset.
When the iDRAC is backed up, you must manually turn on the host server. If you select BIOS component for System Erase, a
flag is set to reset the BIOS to default during POST and the server turns off again.
Hardware diagnostics
It is recommended that you run diagnostics using the Hardware Diagnostics utility, as part of a regular maintenance plan to
validate whether or not the system and the attached hardware are functioning properly. As the diagnostics utility has a physical
(as opposed to logical) view of the attached hardware, it can identify hardware problems that the operating system and other
online tools cannot identify. You can use the hardware diagnostics utility to validate the memory, I/O devices, CPU, physical disk
drives, and other peripherals.
Performing hardware diagnostics
To perform hardware diagnostics:
1. Start Lifecycle Controller. For more information, see https://www.dell.com/support
2. In the left pane of Lifecycle Controller, click Hardware Diagnostics.
3. In the right pane, click Run Hardware Diagnostics.
The diagnostics utility is launched.
4. Follow the instructions on the screen.
When the tests are complete, results of the diagnostics tests are displayed on the screen. To resolve the problems reported
in the test results, search dell.com/support.
52
Maintain