Dell EMC XC Series Appliances and XC Core Systems Best Practices for Running VMware ESXi 6.5 or Later Clusters on XC Series Appliances and XC Core Systems April 2021 Rev. 1.
Notes, cautions, and warnings NOTE: A NOTE indicates important information that helps you make better use of your product. CAUTION: A CAUTION indicates either potential damage to hardware or loss of data and tells you how to avoid the problem. WARNING: A WARNING indicates a potential for property damage, personal injury, or death. © 2017 - 2021 Dell Inc. or its subsidiaries. All rights reserved. Dell, EMC, and other trademarks are trademarks of Dell Inc. or its subsidiaries.
Contents Chapter 1: Revision history............................................................................................................4 Chapter 2: Introduction.................................................................................................................5 Chapter 3: Boot devices................................................................................................................ 6 Essential information about the boot devices..............................................
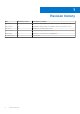
1 Revision history Date Document revision Description of changes April 2021 1.5 Updated the Apply updates in a VMware vSphere environment section. January 2021 1.4 Updated the Apply updates in a VMware vSphere environment section. July 2020 1.3 Updated the Configure DRS section. August 2018 1.2 Updated content to include XC Core. March 2018 1.1 Updated for second release to add appliances.
2 Introduction This best practice guidance is aimed at Dell EMC XC Series Appliances and XC Core Systems configured to boot VMware ESXi from either a SATADOM or a Boot Optimized Server Storage (BOSS) card boot device. This document provides recommendations for maintaining the stability and performance of the platform and workloads, while also preserving the operational lifetime of the boot device.
3 Boot devices The Dell EMC XC Series Appliances and XC Core Systems support either SATADOM or BOSS (PCIe cards M.2 Drive) as its boot device. The boot device depends on the generation of your appliance. The 13 th generation appliances use SATADOM, and the 14 th generation appliances use BOSS. Use the below table to determine which boot device is on your appliance. Table 1.
NOTE: A common cause for VMs being run from the boot device is misconfiguration during any add-node or redeployment operation. When adding or redeploying an ESXi node to the cluster, ensure that the Virtual Hard Disks (VMDKs) and Virtual Machines locations are configured so that they are directed to the Nutanix Cluster Container location.
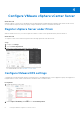
4 Configure VMware vSphere vCenter Server About this task VMware vSphere vCenter Server should have the following minimum settings defined in a Nutanix environment. In this section, we will outline the steps necessary to properly configure a VMware cluster for a Nutanix environment. Register vSphere Server under Prism With the release of AOS 5.0, you can now perform common vCenter Server operations directly from the Prism UI.
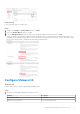
About this task Use the following steps to configure DRS: Steps 1. Navigate to Configure > vSphere DRS and then click Edit. 2. Select the vSphere DRS check box to enable. 3. From the DRS Automation drop-down menu, leave the default migration threshold at 3 and click OK. This is the default configuration in a fully automated configuration as it is recommended for the Nutanix deployments.
Setting Use option Admission Control Refer to vSphere HA Admission Control Settings for Nutanix Environment before enabling this feature vSphere HA restart Priority for all CVMs Disabled VM Monitoring for all CVMs Disabled Datastore with PDL Disabled Datastore with APD Disabled 2. Verify that the cluster is now configured as shown below. 3.
For further details on EVC, see VMware KB 1003212.
5 Apply updates in a VMware vSphere environment Update the drivers and keep them maintained because component firmware may require a matching driver to function optimally. Use the VMware Update Manager (or other methods to update host drivers) and then update the firmware using LCM. If a single driver update or security patch is needed, use a validated version of VMware ESXi Dell customized ISO.
Perform the upgrade Steps 1. Within Prism, click the gear icon in the upper right corner of the interface and select Upgrade Software. 2. On the Hypervisor tab, upload the JSON file, and the ESXi bundle and then click Upload Now. 3. Pre-upgrade is an optional process to validate the configuration on the CVM on which you are connected to before proceeding. These checks also run as part of the upgrade procedure.
4. When the upload process completes, click Upgrade > Upgrade Now, then click Yes to confirm. 5. Enter in the VMware vCenter Server credentials when prompted and click Upgrade. The Upgrade Software dialog box shows the progress of your selection, including status of pre-installation checks and uploads, through the Progress Monitor. All VMs running on the node will be migrated to another node in the cluster before the node is placed into maintenance mode.
6 Deployment best practices Virtual disk provisioning Dell EMC recommends using thin provisioning disks in an XC Series environment, as thick eager-zero virtual disks offer no performance benefits over a thin virtual disk. For further information, see Nutanix KB 1591 (Log in required). SYSLOG Except for VMware NSX implementations, the configuration of a remote SYSLOG server is not an absolute requirement; however, there are benefits and use cases for such an implementation.
A Appendix Additional resources and references Support.dell.com is focused on meeting your needs with proven services and support. Referenced or recommended Dell EMC publications For Dell EMC XC Series Appliances and XC Core Systems product documentation, go to Dell.com/xcseriesmanuals. Referenced or recommended Nutanix publications ● ● ● ● ● ● ● ● 16 Nutanix Cluster Check (NCC) 2.2.