
Users Guide

Broadcom OCM-VM-LPe-UG124-101
90
Emulex OneCommand Manager for VMware vCenter User Guide
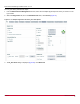
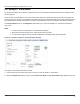
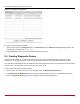
Figure 69: Diagnostic Dump Tab (No Dump File Directory Specified)
4. Enter a location in the Dump File Directory field in the Dump Details area to set the dump file directory. The Delete
Existing Dump Files, Start Dump, and Show Dump Files buttons are enabled.
NOTE: If the location is not specified, a prefix of /vmfs/volumes is added to the location.
5. To specify up to 20 files to retain using the Dump File Retention counter, enter the number of files and click Update.
6. Click Start Dump to initiate a diagnostic dump on the selected port.
Click Delete Existing Dump Files to remove existing dump files for the selected port. Click Show Dump Files to display
the retained dump files. Click Modify Dump Directory to change the dump directory location.
CAUTION! Disruption of service can occur if a diagnostic dump is run during I/O activity.
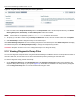
9.10 Viewing Diagnostic Dump Files
You can view diagnostic dump file names using OneCommand Manager for VMware vCenter. The dump files are stored on
the host’s data store, and the client can be used to download dump files by browsing the host data store.
To view the diagnostic dump, perform these steps:
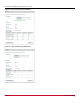
1. On the Diagnostic Dump tab, click Show Dump Files. The Diagnostic Dump Files window opens displaying the
diagnostic dump files currently on your system (Figure 70). These files are available in the dump directory configured
from the Diagnostic Dump tab. You can extract these files using the client.