
Users Guide
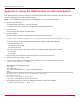
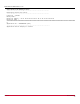
Table Of Contents
- Table of Contents
- Chapter 1: Introduction
- Chapter 2: Installation
- Chapter 3: Configuration
- 3.1 ESXi Command Line Tool Transition
- 3.2 FC Driver Configuration
- 3.2.1 Configuration Methods for FC Driver Parameters
- 3.2.2 Emulex ExpressLane Support
- 3.2.3 FC-SP-2 Authentication (DH-CHAP) Support
- 3.2.4 Trunking Support
- 3.2.5 Dynamically Adding LUNs
- 3.2.6 Dynamically Adding Targets
- 3.2.7 FC Driver Module Parameters
- 3.2.8 Creating an FC Remote Boot Disk
- 3.2.9 Managing Devices through the CIM Interface
- 3.2.10 Installing the Emulex CIM Provider
- 3.2.11 Creating, Deleting, and Displaying vPorts
- 3.2.12 Configuring VVols
- 3.2.13 Adjusting the LUN Queue Depth
- 3.3 Configuring NVMe over FC on a NetApp Target
- 3.4 Configuring NVMe over FC on an Initiator System
- Chapter 4: Troubleshooting the FC Driver
- Chapter 5: Troubleshooting the NVMe Driver
- Appendix A: esxcli Management Tool
- Appendix B: lpfc Driver BlockGuard Functionality
- Appendix C: Using the VMID Feature on a Brocade Switch
- Appendix D: Using the VMID Feature on a Cisco Switch
- Appendix E: NPIV Configuration
- Appendix F: License Notices

Broadcom DRVVM-UG128-100
109
Emulex Drivers for VMware ESXi User Guide
Appendix D: Using the VMID Feature on a Cisco Switch
This appendix describes the setup required for the Broadcom ECD VMID feature to work on a Cisco switch. VMID requires
a VMID-supported target and initiator to work.
NOTE: The Broadcom ECD VMID feature is not supported on the LPe12000-series adapters.
1. Set up the Cisco switch.
a. Install firmware version 8.2 or later on the switch.
b. The Broadcom ECD VMID feature is not enabled by default on Cisco switches. Run the following command once to
configure VMIS globally on your switch:
switch(config)# feature vmis
2. Set up the target.
Use an FC target that supports the VMID feature.
3. Set up the initiator.
Set up the driver parameters to enable VMID on your ESXi host.
For example:
# esxcli system module parameters set -p "lpfc_max_vmid=8 lpfc_vmid_priority_tagging=1" -m lpfc
lpfc_max_vmid is the driver parameter that indicates the number of VMID VMs supported.
– The minimum value is 4.
– The maximum value is 255.
– The default value is 8.
lpfc_vmid_priority_tagging is the driver parameter that enables Cisco VMID support on ESXi. The possible
values are:
– 0 = Disabled (default).
– 1 = Priority tagging for targets that support it in their PLOGI LS_ACC response.
– 2 = Priority tagging for all targets, whether they support PLOGI LS_ACC.
4. After you have set the parameters, reboot the system for the changes to take effect.
5. Map a LUN from the FC target to a VM.
6. You can view the VMID of the VM whose LUN you mapped in Step 5 using the following command:
# esxcli elxfc vmid get -n vmhba<X>
Output similar to the following is shown:
lpfc VMID page: on
VMID priority ranges:
[x1 - xff], qos: x0
VEM ID: 10:00:00:90:fa:c7:aa:b8:20:00:00:90:fa:c7:aa:b8
ID00 READs:000000000005e853 WRITEs:000000000005e879
UUID:
35302030372032352037332033382036652032392036612d3063203237203466203361203463203363203838206561
String (50 07 25 73 38 6e 29 6a-0c 27 4f 3a 4c 3c 88 ea)
CS_CTL VMID: x1
Last access time: 2018-05-14T09:49:42
Compressed: 50072573386e296a0c274f3a4c3c88ea