
Users Guide
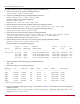
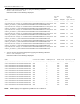
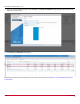
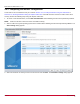
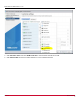
Table Of Contents
- Table of Contents
- Chapter 1: Introduction
- Chapter 2: Installation
- Chapter 3: Configuration
- 3.1 ESXi Command Line Tool Transition
- 3.2 FC Driver Configuration
- 3.2.1 Configuration Methods for FC Driver Parameters
- 3.2.2 Emulex ExpressLane Support
- 3.2.3 FC-SP-2 Authentication (DH-CHAP) Support
- 3.2.4 Trunking Support
- 3.2.5 Dynamically Adding LUNs
- 3.2.6 Dynamically Adding Targets
- 3.2.7 FC Driver Module Parameters
- 3.2.8 Creating an FC Remote Boot Disk
- 3.2.9 Managing Devices through the CIM Interface
- 3.2.10 Installing the Emulex CIM Provider
- 3.2.11 Creating, Deleting, and Displaying vPorts
- 3.2.12 Configuring VVols
- 3.2.13 Adjusting the LUN Queue Depth
- 3.3 Configuring NVMe over FC on a NetApp Target
- 3.4 Configuring NVMe over FC on an Initiator System
- Chapter 4: Troubleshooting the FC Driver
- Chapter 5: Troubleshooting the NVMe Driver
- Appendix A: esxcli Management Tool
- Appendix B: lpfc Driver BlockGuard Functionality
- Appendix C: Using the VMID Feature on a Brocade Switch
- Appendix D: Using the VMID Feature on a Cisco Switch
- Appendix E: NPIV Configuration
- Appendix F: License Notices

Broadcom DRVVM-UG128-100
32
Emulex Drivers for VMware ESXi User Guide
9. Verify the sizes of the created volumes by typing the following command:
volume show -vserver <vserver_name>
Information similar to the following is displayed.
10. Create a namespace on each of the volumes you created in Step 8 by typing the following command:
vserver nvme namespace create -vserver <vserver_name> -path <namespace_path> -size <namespace_size>
-ostype vmware -block-size 512B
The namespace size must be smaller than the volume on which the namespace was created. Refer to the output
obtained in Step 9 for the available space on each volume. For best results, configure a namespace size of 4 GB or more.
11. Create a subsystem by typing the following command:
vserver nvme subsystem create -vserver <vserver_name> -subsystem <subsystem_name> -ostype vmware
Repeat this command for each subsystem you want to create.
12. Obtain the host NQN by typing the following command:
esxcli nvme info get
Information similar to the following is displayed:
Host NQN: nqn.2014-08.net.broadcom.dhcp:nvme:dhcp-10-123-178-157
13. Add a host to each subsystem you created by typing the following command:
vserver nvme subsystem host add -vserver <vserver_name> -subsystem <subsystem_name> -host-nqn
<host_nqn>
14. Verify the subsystem information on the virtual server by typing the following command:
vserver nvme subsystem show -vserver <vserver_name>
Information similar to the following is displayed:
NOTE: To obtain the host NQN for ESXi 7.0, type the following command:
esxcli nvme info get
Information similar to the following is displayed:
Host NQN: nqn.2014-08.net.broadcom.dhcp:nvme:dhcp-10-123-178-157
15. Map each namespace to its subsystem by typing the following command:
vserver nvme subsystem map add -vserver <vserver_name> -subsystem <subsystem_name> -path
<namespace_path>
Vserver Volume Aggregate State Type Size Available Used%
------------- ---------- ---------- ---------- ----- ----- ---------- -------
vserver_name vol_name1 aggr1 online RW 5GB 4.75GB 0%
vserver_name vol_name2 aggr2 online RW 5GB 4.75GB 0%
vserver_name vol_name3 aggr3 online RW 1GB 972.5MB 0%
3 entries were displayed
Vserver Subsystem Target NQN
------- ------------ --------------------------------------------------------
nvme_test
nvme_ss1 nqn.1992-08.com.netapp:sn.1f86d926a7cf11e9bb0e00a0985e3c87:subsystem.nvme_ss1
nvme_ss2 nqn.1992-08.com.netapp:sn.1f86d926a7cf11e9bb0e00a0985e3c87:subsystem.nvme_ss2
2 entries were displayed.