Emulex® Boot for the Fibre Channel and NVMe over FC Protocols User Guide Release 12.
Broadcom, the pulse logo, Connecting everything, Avago Technologies, Avago, the A logo, Brocade, Emulex, LightPulse, OneCommand, and OneCapture are among the trademarks of Broadcom and/or its affiliates in the United States, certain other countries, and/or the EU. The PowerPC name and logo are registered trademarks of IBM Corp. and used under license therefrom. Copyright © 2003–2020 Broadcom. All Rights Reserved. The term “Broadcom” refers to Broadcom Inc. and/or its subsidiaries.
Emulex Boot for the Fibre Channel Protocol User Guide Table of Contents Chapter 1: Introduction ...................................................................................................................... 6 1.1 Emulex Boot Code Files ...........................................................................................................................................6 1.2 Abbreviations ............................................................................................................
Emulex Boot for the Fibre Channel Protocol User Guide 4.6.5 Enabling or Disabling EDD 3.0 .......................................................................................................................38 4.6.6 Enabling or Disabling the Start Unit Command ..............................................................................................38 4.6.7 Enabling or Disabling the Environment Variable.............................................................................................39 4.
Emulex Boot for the Fibre Channel Protocol User Guide 6.6 Adding Boot Devices ..............................................................................................................................................63 6.7 Deleting Boot Devices ............................................................................................................................................64 6.8 Changing the Boot Device Order.....................................................................................
Emulex Boot for the Fibre Channel Protocol User Guide Chapter 1: Introduction This guide describes installing, updating, enabling, and configuring Emulex® FC boot code. This guide also describes the Emulex BFS implementation and its operation with distinct hardware and operating system requirements. BFS is the booting of a server directly from an operating system image located on a SAN by way of an Emulex adapter using Emulex FC and FC-NVMe boot code.
Emulex Boot for the Fibre Channel Protocol User Guide 1.2 Abbreviations The following table lists the acronyms and abbreviations used in this document.
Emulex Boot for the Fibre Channel Protocol User Guide Chapter 2: Booting from SAN This section provides instructions for installing and using all types of boot code provided by Emulex. When booting from SAN, the storage device is typically identified by its WWPN and a LUN for an FC boot disk, and by an NQN and Namespace for an NVMe disk. By extending the server system BIOS, BFS capability is provided by the Boot code contained on an Emulex adapter in the server.
Emulex Boot for the Fibre Channel Protocol User Guide 2.1.2 Configuring Boot from SAN on Windows Server (UEFI) To configure boot from SAN, perform these steps: 1. If necessary, update the boot code on the adapter (see Chapter 3, Updating and Enabling Boot Code). 2. If necessary, enable the boot code on the adapter (see Chapter 3, Updating and Enabling Boot Code). 3. Enable the adapter to boot from SAN (see Section 6.4, Setting Boot from SAN). 4. Add boot devices (see Section 6.6, Adding Boot Devices). 6.
Emulex Boot for the Fibre Channel Protocol User Guide 6. Select the disk and follow the system prompts in the Windows installation. 7. After the installation is complete, a Boot Option variable called Windows Boot Manager is populated with a Media Device path pointing to the Windows bootloader utility. The Windows Boot Manager option is inserted as the first boot option in the boot order list. The CD/DVD boot is the second device in the boot order list.
Emulex Boot for the Fibre Channel Protocol User Guide 2.1.4 Configuring Boot from SAN for NVMe over FC on a Windows Server BFS for NVMe over FC in Windows is supported only on the following operating systems: Windows Server 2016 Windows Server 2019 To configure BFS for NVMe over FC on a Windows Server, perform the following steps: 1. Follow the instructions in Section 6.15, NVMe over FC Boot Settings, to configure NVMe over FC boot and to add an NVMe boot device using the UEFI HII.
Emulex Boot for the Fibre Channel Protocol User Guide 3. Enable the adapter to boot from SAN. For x86 Boot code, see Section 4.3, Enabling an Adapter to BFS, and for UEFI Boot code, see Section 6.4, Setting Boot from SAN. 4. If you want to use a topology other than the default, you must change the topology setting before configuring boot devices. For x86 Boot code, see Section 4.7.1, Changing the Topology, and for UEFI Boot code, see Section 6.9.1, Changing the Topology. 5. Configure boot devices.
Emulex Boot for the Fibre Channel Protocol User Guide 2.2.3 Configuring Boot from SAN for NVMe over FC on Linux BFS for NVMe over FC in Linux is supported only on the following operating systems: SLES 12 SP5 SLES 15 SP1 and later REHL 7.8 and later RHEL 8.1 and later To configure BFS for NVMe over FC on Linux, perform the following steps: 1. Follow the instructions in Section 6.15, NVMe over FC Boot Settings, to configure NVMe over FC boot and to add an NVMe boot device using the UEFI HII.
Emulex Boot for the Fibre Channel Protocol User Guide b. Mount a partition on the USB device by typing the following command: # mount /dev/sda1 /mnt c. Copy the elx-nvmefc-dm--n.tar.gz file you obtained in Step 2 to the mounted partition by typing the following command: # cp elx-nvmefc-dm--n.tar.gz /mnt 5. Attach the operating system installation media to the server, and reboot or power on the server using the UEFI Boot Menu. 6.
Emulex Boot for the Fibre Channel Protocol User Guide 2.2.3.1 Continuing a SLES Installation This section describes the remainder of steps required to complete the SLES operating system installation. 1. Return to the operating system installation GUI by pressing Ctrl+Alt+F7. 2. Select the product to install and click Next. 3. Proceed with the operating system installation.
Emulex Boot for the Fibre Channel Protocol User Guide 11. Return to the operating system installation GUI by pressing Ctrl+Alt+F6. 12. Click Reboot to complete the operating system installation. After the installation is complete, the system reboots using the newly installed media. NOTE: The operating system installer has a known issue in which the installer fails to set a UEFI boot entry. To work around this issue, perform the following steps: 1. Press F11 to enter the UEFI Boot Menu. 2.
Emulex Boot for the Fibre Channel Protocol User Guide For example: #localcli nvme fabrics discover -a vmhba66 -W=20:2c:00:a0:98:c1:fe:52 w=20:6d:00:a0:98:c1:fe:52 11. Type the following commands to verify if the new subsystem and namespace are discovered: #localcli nvme controller list #localcli nvme namespace list 12. Press ALT+F2 to return to the installation GUI and continue the installation process. 13.
Emulex Boot for the Fibre Channel Protocol User Guide 2.3.1.1 Determining LUNs to Select for BFS To determine which LUNs to select, perform these steps: 1. Open a terminal window and leave it open. 2. In the terminal window, select the LUN you will use as the SAN boot disk (not the local drive) using the luxadm probe command. This command shows all the available LUNs. Record this LUN information, which is used throughout this procedure.
Emulex Boot for the Fibre Channel Protocol User Guide 2.3.3 Installing Solaris from a Network Image The system must have a DVD drive and must be part of the site's network and naming service. If you use a naming service, the system must already be in a service, such as NIS, NIS+, DNS, or LDAP. If you do not use a naming service, you must distribute information about this system by following your site's policies. NOTE: This procedure assumes that the system is running the Volume Manager.
Emulex Boot for the Fibre Channel Protocol User Guide b. Verify that the nfsd daemon is running, or start the nfsd daemon. If the install server is running the current Solaris release or a compatible version, type the following command. # svcs -l svc:/network/nfs/server:default If the nfsd daemon is online, continue to Step c. If the nfsd daemon is not online, start it. # svcadm enable svc:/network/nfs/server c. Share the install server. # shareall 11. Change directories to root (/). # cd / 12.
Emulex Boot for the Fibre Channel Protocol User Guide 5. Boot to the original local disk to set up the newly defined FC disk. Type the following command: boot where is the complete path or the alias of the original boot disk. 6. Run the format utility by typing the following command: format 7. Select the target disk to become the new boot disk (for example, c1t1d0). 8. Select the partition option and partition the disk as desired. 9.
Emulex Boot for the Fibre Channel Protocol User Guide 17. Reboot the system. sync sync halt reset-all 18. Boot to disk. boot disk The system should boot to the FC disk. 19. View the current dump device setting. dumpadm 20. Change the dump device to the swap area of the FC drive. dumpadm -d /dev/dsk/c1t1d0s1 where /dev/dsk/c1t1d0s1 is a sample path to the swap area of the FC drive.
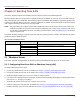
Emulex Boot for the Fibre Channel Protocol User Guide Chapter 3: Updating and Enabling Boot Code Use the Emulex utilities to update boot code to a newer version and enable boot code. The utility that you use depends on the operating system and, in some cases, the driver type or system architecture. Table 3 indicates the utilities you can use to install and update boot code. NOTE: The Emulex OneCommand® Manager application has been renamed as the Emulex HBA Manager application.
Emulex Boot for the Fibre Channel Protocol User Guide Chapter 4: Emulex LightPulse FC BIOS utility Before using the Emulex LightPulse FC BIOS utility, ensure that the boot code is loaded and enabled on the adapter as described in Section 3, Updating and Enabling Boot Code. NOTE: This section reflects the most recent release of the Emulex LightPulse FC BIOS utility. Some selections might not be available if you are using an older version of the utility.
Emulex Boot for the Fibre Channel Protocol User Guide Press Enter to select a menu option, to select a changed value, to select a row in a window, or to change a configuration default. Press Esc to go back to the previous menu. 4.2 Starting the Emulex LightPulse FC BIOS Utility To start the Emulex LightPulse FC BIOS Utility, perform these steps: 1. Turn on the computer and press and hold down Alt or Ctrl and press E immediately (within 4 seconds of the Emulex bootup message).
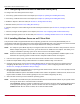
Emulex Boot for the Fibre Channel Protocol User Guide Figure 2: Main Configuration Menu The Link Status indicates the state of the physical link. For instructions on how to bring the link up, see Section 4.4, Scanning for Target Devices. Under normal circumstances, you would first configure boot devices using the Emulex LightPulse FC BIOS utility (see Section 4.5, Configuring Boot Devices).
Emulex Boot for the Fibre Channel Protocol User Guide 4.3 Enabling an Adapter to BFS To enable an adapter to BFS, perform these steps: 1. From the main configuration menu (Figure 2), select Enable/Disable Boot from SAN and press Enter. NOTE: Adapters are disabled by default. BFS must be enabled on one adapter to use remote boot functionality. After you enable an adapter, the status of the Boot BIOS changes to enabled as shown in Figure 3.
Emulex Boot for the Fibre Channel Protocol User Guide 4.5 Configuring Boot Devices This option supports FC_AL (public and private loop) and point-to-point. When operating in loop (FC_AL) topology, the system automatically determines whether you are configured for a public or private loop. The BIOS looks for an FL_Port first. If a fabric loop is not detected, the BIOS looks for a private loop. For the Configure Boot Devices option, the eight boot entries are zero by default (D key).
Emulex Boot for the Fibre Channel Protocol User Guide Figure 5: Device Selection List Example (Array) Window NOTE: To minimize the amount of time needed to locate the boot device, select the drive with the lowest AL_PA as the boot device when connected to devices on an FC-AL. 3. Select 00 and press Enter to clear the selected boot entry, or select the WWPN or D_ID of a device to configure. A window similar to Figure 6 is displayed. Figure 6: Starting LUN Offset Window 4.
Emulex Boot for the Fibre Channel Protocol User Guide Figure 7: LUN Listing Window You can define 256 LUNs per target. As shown in Figure 7, only 8 LUNs per page are shown, from the starting LUN offset, up to 256 consecutive LUNs. 5. Use the arrow key up and down to select the LUN you want to set up as a boot device. The Boot Devices window is displayed (Figure 8 and Figure 9). You can choose to boot the device using WWPN or D_ID.
Emulex Boot for the Fibre Channel Protocol User Guide Figure 9: Boot Devices Window Using WWPN 6. Use the up arrow and down arrow keys (Figure 9) to select the boot method you want. If you select to boot the device by WWPN, the WWPN of the selected entry is used to configure the boot device (Figure 10). If the D_ID is selected, then the D_ID is used to configure the boot device (Figure 11).
Emulex Boot for the Fibre Channel Protocol User Guide Figure 11: Primary Boot Device Setup Window Listed by D_ID 7. Press Enter to select the change. 8. Press Esc until you exit the Emulex LightPulse FC BIOS utility. 9. Reboot the system for the new boot path to take effect.
Emulex Boot for the Fibre Channel Protocol User Guide 4.6 Configuring Advanced Adapter Parameters The Emulex LightPulse FC BIOS utility has numerous options that can be modified to provide for different behavior. Use the BIOS utility to perform the following tasks: Change the default AL_PA of the adapter. Change the PLOGI retry timer. Enable or disable spinup delay. Set autoscan. Enable or disable EDD 3.0. Enable or disable the start unit command.
Emulex Boot for the Fibre Channel Protocol User Guide To change the default AL_PA, perform these steps: 1. From the main configuration menu (Figure 2), select Configure Advanced Adapter Parameters. The advanced adapter parameters configuration menu is displayed (Figure 12). 2. Select Change Default ALPA of this Adapter and press Enter. Information similar to Figure 13 is displayed.
Emulex Boot for the Fibre Channel Protocol User Guide 4. Press Esc until you exit the Emulex LightPulse FC BIOS utility. 5. Reboot the system. 4.6.2 Changing the PLOGI Retry Timer This option is useful for Tachyon-based RAID arrays. In rare situations, a Tachyon-based RAID array resets itself and the port goes offline temporarily. When the port returns to operation, the Port Login scans the loop to discover this device.
Emulex Boot for the Fibre Channel Protocol User Guide 4.6.3 Enabling or Disabling the Spinup Delay This option allows you to enable or disable the disk spinup delay. The factory default setting is disabled. If at least one boot device has been defined, and the spinup delay is enabled, the BIOS searches for the first available boot device. If a boot device is present, the BIOS boots from it immediately.
Emulex Boot for the Fibre Channel Protocol User Guide 4.6.4 Setting Auto Scan This option allows you to attempt to boot from the first found disk reported by the switch on the SAN. The factory default is disabled. If more than one adapter with the same PCI bus number exists in the system, and each has a boot drive attached, the first PCI-scanned adapter is the boot adapter. The following auto scan options are available: Autoscan disabled – default.
Emulex Boot for the Fibre Channel Protocol User Guide 4.6.5 Enabling or Disabling EDD 3.0 EDD 3.0 provides additional data to the operating system bootloader during the INT-13h function 48h (get device parameters) call. This information includes the path to the boot device and disk size. The default setting for EDD 3.0 is enabled. NOTE: If EDD 3.0 is disabled, EDD 2.1 is enabled. To enable or disable EDD 3.0, perform these steps: 1.
Emulex Boot for the Fibre Channel Protocol User Guide 2. Select Enable or Disable Start Unit Command and press Enter. The Start Unit Command window (Figure 18) is displayed. Figure 18: Start Unit Command Window 3. Select the desired start unit command setting. 4. Press Enter to accept the new setting. 5. Press Esc until you exit the Emulex LightPulse FC BIOS utility. 6. Reboot the system. 4.6.
Emulex Boot for the Fibre Channel Protocol User Guide Figure 19: Environment Variable Window 3. Select the desired setting. 4. Press Enter to accept the new setting. 5. Press Esc until you exit the Emulex LightPulse FC BIOS utility. 6. Reboot the system. 4.6.8 Enabling or Disabling Auto Boot Sector This option automatically defines the boot sector of the target disk for the migration boot process, which applies only to HP MSA1000 arrays.
Emulex Boot for the Fibre Channel Protocol User Guide Figure 20: Auto Boot Sector Window 3. Select the desired setting. 4. Press Enter to accept the new setting. 5. Press Esc until you exit the Emulex LightPulse FC BIOS utility. 6. Reboot the system. 4.7 Configuring Adapter Firmware Parameters The Emulex LightPulse FC BIOS utility has numerous options that can be modified to provide for different behavior.
Emulex Boot for the Fibre Channel Protocol User Guide Figure 21: Adapter Firmware Configuration Menu Default settings are acceptable for most installations. To reset all values to their defaults, from the main configuration menu (Figure 2), select Reset Adapter Defaults and press Enter. 4.7.1 Changing the Topology NOTE: Only point-to-point and FC-AL topologies are supported on the LPe31000-series, LPe32000-series, and LPe35000-series adapters.
Emulex Boot for the Fibre Channel Protocol User Guide NOTE: On LPe16000-series adapters, both direct-attach and fabric point-to-point are supported. On LPe31000-series, LPe32000-series, and LPe35000-series adapters, you can configure the following topologies: Point-to-Point FC-AL NOTE: On LPe31000-series,LPe32000-series, and LPe35000-series adapters, for FC-AL, only direct-attach is supported. To select the adapter topology, perform these steps: 1.
Emulex Boot for the Fibre Channel Protocol User Guide Figure 23: Topology Menu for LPe31000-Series, LPe32000-Series, and LPe35000-Series Adapters 4.7.2 Enabling or Disabling the Brocade FA-PWWN NOTE: The Emulex OneCapture™ utility has been renamed as the Emulex HBA Capture utility. NOTE: The following information pertains to FA-PWWN: This feature is not available for LPe12000-series adapters. The Brocade FA-PWWN and trunking features are mutually exclusive.
Emulex Boot for the Fibre Channel Protocol User Guide Figure 24: Brocade FA-PWWN Window 3. Select the desired setting. 4. Press Enter to accept the new setting. 5. Press Esc until you exit the Emulex LightPulse FC BIOS utility. 6. Reboot the system. 4.7.3 Selecting Trunking Trunking enables you to combine multiple physical FC links to form a single logical link (aggregated port).
Emulex Boot for the Fibre Channel Protocol User Guide If you are using an adapter that does not support trunking, the Select Trunking option is not be available. NOTE: Changing the trunking mode resets the adapter to factory default settings. You must configure the HBA and boot parameters after changing the trunking mode for BFS to work.
Emulex Boot for the Fibre Channel Protocol User Guide 4.7.3.1 Viewing Trunking Configuration NOTE: When trunking is enabled, Boot from SAN must be enabled and the system must be rebooted for the physical port status to be up and for the link speed to be shown. 1. From the adapter listing window (Figure 1), select the adapter for which you want to view trunking information and press Enter. 2. From the main configuration menu (Figure 2), select Scan for Target Devices to bring the links up for the trunk.
Emulex Boot for the Fibre Channel Protocol User Guide 4.7.4 Changing the Link Speed NOTE: Supported link speeds are specific to the adapter model and the optics installed. Examples of LPe31000-series and LPe32000-series adapters are shown in Figure 28. The default link speed is Auto Select, which automatically selects the link speed based on the adapter model.
Emulex Boot for the Fibre Channel Protocol User Guide Figure 28: Link Speed Menu for LPe32000-Series and LPe35000-Series Adapters 3. Use the up arrow and down arrow keys to select the desired link speed you would like to use. 4. Press Enter to accept the new link speed. 5. Press Esc until you exit the Emulex LightPulse FC BIOS utility. 6. Reboot the system. 4.7.
Emulex Boot for the Fibre Channel Protocol User Guide Figure 29: 16G Forward Error Correction Window 3. Select the desired setting. 4. Press Enter to accept the new setting. 5. Press Esc until you exit the Emulex LightPulse FC BIOS utility. 6. Reboot the system.
Emulex Boot for the Fibre Channel Protocol User Guide 4.8 Resetting the Adapter to Default Values NOTE: Resetting the adapter to default values clears all entries made while configuring the boot device, as detailed in Section 4.5, Configuring Boot Devices. The Emulex LightPulse FC BIOS utility enables you to reset boot code parameters to their factory default settings. These defaults are listed in Table 5.
Emulex Boot for the Fibre Channel Protocol User Guide To reset parameters to their factory default values, perform these steps: 1. On the main configuration menu (Figure 2), select Reset Adapter Defaults and press Enter. A window similar to Figure 30 asks if you want to reset to the default settings. Figure 30: Reset Adapter Defaults Window 2. Press Y. All settings revert to their factory default values. 4.9 Using Multipath BFS Multi-boot BIOS is in compliance with the BBS.
Emulex Boot for the Fibre Channel Protocol User Guide Chapter 5: OpenBoot OpenBoot commands are supported on the SPARC systems. 5.1 Attribute Commands The following commands show the boot device ID, boot list, OpenBoot versions, and so on. 5.1.1 .boot-id Syntax .boot-id Description Shows the current boot device ID. Parameters None 5.1.2 devalias Syntax .devalias Description Shows the boot list. Parameters None 5.1.3 .fcode Syntax .
Emulex Boot for the Fibre Channel Protocol User Guide 5.1.6 probe-scsi-all Syntax ..probe-scsi-all Description Shows the current SCSI and FC devices. Parameters None 5.1.7 show-devs Syntax .show-devs Description Shows a list of the devices found. Parameters None 5.1.8 .topology Syntax .topology Description Shows the current topology. Parameters None 5.2 Functional Commands The following commands remove boot IDs, reset default values, set link speed, and so on. 5.2.
Emulex Boot for the Fibre Channel Protocol User Guide 5.2.4 set-link-speed NOTE: In LPe12000-series adapters, the link speed setting is overwritten by the FC driver and does not take effect during a regular boot into the local operating system. Therefore, the link speed OpenBoot setting works for the actual boot, but it is overwritten after the operating system loads. Syntax set-link-speed Description Sets the current link-speed setting. Changes and sets the link speed.
Emulex Boot for the Fibre Channel Protocol User Guide 5.2.9 OpenBoot Signature A target ID can be bound to either D_ID or WWPN and saved in an adapter NVRAM. It can also be saved in an environmental variable boot-device.
Emulex Boot for the Fibre Channel Protocol User Guide Chapter 6: Configuring Boot Using the UEFI HII You can configure boot functions using the UEFI HII. If you have several adapters in your system, the UEFI system firmware or boot code uses the highest version present on your adapters. NOTE: UEFI boot supports booting from a 4K native disk. 6.
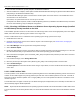
Emulex Boot for the Fibre Channel Protocol User Guide Figure 31: Adapter List 3. Select the adapter you want to configure and press Enter. The main configuration menu are displayed (Figure 32).
Emulex Boot for the Fibre Channel Protocol User Guide Figure 32: Main Configuration Menu 6.3 Configuring Boot in the UEFI HII The UEF HII allows you to perform the following tasks to configure UEFI Boot code: Set BFS (see Section 6.4, Setting Boot from SAN). Scan for Fibre devices (see Section 6.5, Scanning for Fibre Devices). Add and delete boot devices (see Section 6.6, Adding Boot Devices and Section 6.7, Deleting Boot Devices). Change boot device order (see Section 6.
Emulex Boot for the Fibre Channel Protocol User Guide 6.4 Setting Boot from SAN BFS must be enabled if you want to configure the adapter for FC or NVME over FC Boot. To set BFS, perform these steps: 1. From the adapter list (Figure 31), select the adapter whose BFS setting you want to change and press Enter. 2. From the main configuration menu (Figure 32), select Set Boot from SAN and press Enter. A popup (Figure 33) allows you to enable or disable BFS. Figure 33: Boot from SAN Popup 3.
Emulex Boot for the Fibre Channel Protocol User Guide Figure 34: New Boot from SAN Setting 4. Save changes as instructed by the UEFI HII on your system, or press Esc to exit and save changes when prompted.
Emulex Boot for the Fibre Channel Protocol User Guide 6.5 Scanning for Fibre Devices NOTE: The following information pertains to scanning for Fibre devices: After you enter the UEFI HII, any dynamic changes made to the SAN are not reflected unless the system is reset or the adapter is reconnected. For trunking SAN changes, the system must be reset. Re-enter the utility and perform a scan. The adapter link is brought up by either performing a scan for Fibre devices or by adding boot devices.
Emulex Boot for the Fibre Channel Protocol User Guide 6.6 Adding Boot Devices NOTE: After you enter the UEFI HII, any dynamic changes made to the SAN are not reflected unless the system is reset or the adapter is reconnected. NOTE: The adapter link is brought up by either adding a boot device or by performing a scan for Fibre devices. To add a boot device, perform these steps: 1. From the adapter list (Figure 31), select the adapter to which you want to add a boot device and press Enter. 2.
Emulex Boot for the Fibre Channel Protocol User Guide Figure 37: Commit and Discard Changes Prompt 5. Select Commit Changes and press Enter. 6.7 Deleting Boot Devices To delete boot devices, perform these steps: 1. From the adapter list (Figure 31), select the adapter from which you want to delete a boot device and press Enter. 2. From the main configuration menu (Figure 32), select Delete Boot Device and press Enter. The Delete Boot Device window is displayed (Figure 38).
Emulex Boot for the Fibre Channel Protocol User Guide Figure 38: Delete Boot Device Window 3. Select the boot device you want to delete and press Enter.
Emulex Boot for the Fibre Channel Protocol User Guide Figure 39: Selected Boot Device is Highlighted 4. A pop up with and is displayed as shown in Figure 39. Select and press Enter. NOTE: You can delete multiple Boot devices. 5. Select Commit Changes and press Enter.The boot device is removed and the main configuration menu (Figure 32) is displayed. 6.
Emulex Boot for the Fibre Channel Protocol User Guide Figure 40: Change Boot Device Order Window 3. Select Boot Device Order. The current boot device order is displayed (Figure 41).
Emulex Boot for the Fibre Channel Protocol User Guide 4. Press Enter. The cursor moves to the list of boot devices (Figure 42). Figure 42: Boot Device Order Selected 5. Select the device whose boot order you want to change. Use the + or - keys to change the order of the selected device and press Enter. The new boot device order is displayed. 6. Select Commit Changes and press Enter to confirm the changes.
Emulex Boot for the Fibre Channel Protocol User Guide 6.9 Configuring HBA and Boot Parameters The UEFI HII enables you to configure the following HBA parameters: Parameter Note Topology -- PLOGI retry timer -- Force link speed -- Maximum LUNs per target -- Boot target scan method -- Delay device discovery Delay device discovery applies only to LPe12000-series adapters. Enable or disable Brocade FA-PWWN Brocade FA-PWWN is not supported on LPe12000-series adapters.
Emulex Boot for the Fibre Channel Protocol User Guide Figure 44: Configure HBA and Boot Parameters Window (LPe16000-series, LPe31000-series, and LPe32000-series HBAs) Figure 45: Configure HBA and Boot Parameters Window (LPe35000-series HBAs) Broadcom BT-FC-UG128-100 70
Emulex Boot for the Fibre Channel Protocol User Guide 6.9.1 Changing the Topology NOTE: Point-to-point and FC-AL topologies are supported on the LPe31000-series, LPe32000-series, and LPe35000series adapters. By default, the LPe12000-series and LPe16000-series adapters use auto topology with loop first. If you want to use a topology other than the default, you must change the topology setting before configuring boot devices. For FC-AL, each adapter has a default AL_PA of 01 (hexadecimal).
Emulex Boot for the Fibre Channel Protocol User Guide Figure 46: Topology Popup for LPe16000-series Adapters Broadcom BT-FC-UG128-100 72
Emulex Boot for the Fibre Channel Protocol User Guide Figure 47: Topology Popup for LPe31000-Series, LPe32000-Series, and LPe35000-Series Adapters 4. Select a topology and press Enter. The window is refreshed with the new value. NOTE: The presence of a fabric is detected automatically in the case of point-to-point topology. 5. Select Commit Changes and press Enter.
Emulex Boot for the Fibre Channel Protocol User Guide 6.9.2 Changing the PLOGI Retry Timer This option allows you to set the interval for the Port Login retry timer. This option is especially useful for Tachyon-based RAID arrays. Under rare occasions, a Tachyon-based RAID array resets itself, and the port goes offline temporarily in the loop. When the port comes to life, the Port Login retry interval scans the loop to discover this device.
Emulex Boot for the Fibre Channel Protocol User Guide 6.9.3 Changing the Link Speed Use this feature to change, or force, the link speed between ports instead of auto negotiating. Supported link speeds are specific to the adapter model and the optics installed. The menu displays only the options that are valid for the selected adapter. NOTE: In LPe12000-series adapters, the Link Speed setting is overwritten by the FC driver and does not take effect during a regular boot to the local operating system.
Emulex Boot for the Fibre Channel Protocol User Guide 4. Select a link speed and press Enter. The screen is refreshed with the new value. 5. Select Commit Changes and press Enter. 6.9.4 Changing the Maximum LUNs per Target The maximum number of LUNs represents the maximum number of LUNs that are polled during device discovery. You can see the LUNs listed under the Add Boot Device menu. The minimum value is 1, the maximum value is 4096. The default is 256.
Emulex Boot for the Fibre Channel Protocol User Guide 6.9.5 Changing the Boot Target Scan Method You can configure up to eight boot entries for fabric point-to-point, public loop, or private loop configurations. You can select one of the following boot scan options: Boot Path from NVRAM Targets – Boot scan discovers only LUNs that are saved to the adapter’s NVRAM. Select up to eight attached devices to use as potential boot devices.
Emulex Boot for the Fibre Channel Protocol User Guide Figure 51: Boot Target Scan Method Menu Popup 4. Select a boot scan setting and press Enter. The screen is refreshed with the new value. If you have a large SAN and set the boot path to Boot Path Discovered Targets, discovery takes a long time. 5. Select Commit Changes and press Enter. 6.9.6 Changing the Device Discovery Delay NOTE: This option is available only for LPe12000-series adapters.
Emulex Boot for the Fibre Channel Protocol User Guide To change the delay device discovery value, perform these steps: 1. From the adapter list (Figure 31), select the adapter whose device discovery delay settings you want to change and press Enter. 2. From the main configuration menu (Figure 32), select Configure HBA and Boot Parameters and press Enter. 3. In the Configure HBA and Boot Parameters window, select Delay Device Discovery and press Enter. Figure 52: Delay Device Discovery Screen 4.
Emulex Boot for the Fibre Channel Protocol User Guide 6.9.7 Configuring the Brocade FA-PWWN NOTE: The following information pertains to the Brocade FA-PWWN: This feature is not available for LPe12000-series adapters. The Brocade FA-PWWN and trunking features are mutually exclusive. You can enable either FA-PWWN or Trunking, but not both. D_Port and FA-PWWN cannot be enabled simultaneously. When you enable Brocade FA-PWWN D_Port is disabled automatically.
Emulex Boot for the Fibre Channel Protocol User Guide 5. Make your selection and press Enter. The new setting is displayed. 6. Select Commit Changes and press Enter. 7. Reboot the system. After Brocade FA-PWWN is enabled, the Port WWPN obtains the configured FA-PWWN from the switch. 6.9.8 Configuring the Brocade Boot LUN NOTE: The following information pertains to Brocade Boot LUN: This feature is not available for LPe12000-series adapters.
Emulex Boot for the Fibre Channel Protocol User Guide Figure 54: Brocade Boot LUN Popup change 4. Make your selection and press Enter. The utility displays the new setting. 5. Select Commit Changes and press Enter. 6. Reboot the system. After the Brocade Boot LUN feature is enabled, the HBA obtains the boot target and LUN from the switch.
Emulex Boot for the Fibre Channel Protocol User Guide 6.9.9 Configuring 16G Forward Error Correction FEC improves the reliability of FC links through the recovery from bit errors that occur in high-speed networks. FEC helps minimize or avoid data-stream errors that can lead to application performance degradation or outages. This option enables or disables FEC for 16Gb/s link speed. For link speeds 32Gb/s and higher, FEC is always enabled. The default setting is enabled.
Emulex Boot for the Fibre Channel Protocol User Guide 6.9.10 Selecting Trunking Trunking enables you to combine multiple physical FC links to form a single logical link (aggregated port). The aggregated port’s maximum link speed is the sum of the maximum link speeds of the individual physical links comprising the aggregated port. For example, an aggregated port comprised of two physical links running at 32Gb/s each have a potential logical (aggregate) link speed of 64Gb/s.
Emulex Boot for the Fibre Channel Protocol User Guide 4. The Trunking popup appears. In LPe35002 adapters, the options available for selection are as follows (Figure 56). – Disabled – 2-Lane In LPe35004 adapters, the options available for selection are as follows: – Disabled – 2-Lane – 4-Lane Figure 56: Trunking Selection Menu in LPe35002 Adapters 5. Select the trunking mode from the available options. Disable mode disables trunking for the adapter. 6. Make your selection and press Enter.
Emulex Boot for the Fibre Channel Protocol User Guide 6.9.10.1 Viewing Trunking Configuration NOTE: When trunking is enabled, BFS must be enabled and the system must be rebooted for the physical port status to be up and for the link speed to be shown. Select the main configuration menu (Figure 32). The link speed and physical link status are shown under the Trunking mode (Figure 57).
Emulex Boot for the Fibre Channel Protocol User Guide 6.10 Resetting Emulex Adapters to Their Default Values NOTE: The following information pertains to resetting default values: The reconnect feature is not applicable while configuring the Brocade FA-PWWN, configuring the Brocade Boot LUN, and selecting trunking, as all these procedures require a system reboot. Resetting the adapter to its default settings clears all entries made while configuring the boot device, as detailed in Section 4.
Emulex Boot for the Fibre Channel Protocol User Guide To set Emulex adapters to their default settings, perform these steps: 1. From the adapter list (Figure 31), select the adapter whose default settings you want to change and press Enter. 2. From the main configuration menu (Figure 32), select Set Emulex Adapters to Default Settings and press Enter. The Set Emulex Adapter to Default Settings window appears (Figure 58). 3. Select Set Adapter Defaults and press Enter.
Emulex Boot for the Fibre Channel Protocol User Guide 6.11 Displaying Adapter Information The Adapter Information window displays the following information about the selected adapter: PCI information for the HBA HBA revision ID Link status BFS status Link speed Topology Firmware version UEFI Boot version Trunking mode (LPe35000-series adapters only) To display adapter information, perform these steps: 1.
Emulex Boot for the Fibre Channel Protocol User Guide 6.12 Legacy-Only Configuration Settings Using the UEFI HII, you can set parameters that are specific to the x86 boot driver, which is also referred to as the Legacy boot driver. To change legacy-only configuration settings, perform these steps: 1. From the adapter list (Figure 31), select the adapter whose legacy settings you want to change and press Enter. 2.
Emulex Boot for the Fibre Channel Protocol User Guide Reconnect unloads and reloads the driver. This allows any changes to take effect immediately without requiring a reboot. The Reconnect feature also requires a UEFI 2.5-compliant BIOS to enable this functionality. If the server BIOS is not UEFI 2.5-compliant, this option is unavailable.
Emulex Boot for the Fibre Channel Protocol User Guide Figure 62: Request RESET or RECONNECT to Make Changes Active Window – Reconnect 3. Do one of the following: To request a reset: a. Set Request RESET to YES to notify the system BIOS that you want to perform a system reset. b. Exit the UEFI HII and return to the system BIOS set up screens. A popup window prompts you to reset the system. Any changed Emulex adapter settings become active during the subsequent reboot.
Emulex Boot for the Fibre Channel Protocol User Guide 6.14 Emulex Firmware Update Utility The Emulex UEFI Boot driver supports firmware updates by implementing the UEFI Firmware Management Protocol. NOTE: If a secure version of firmware (version 11.0 or later) is installed on an LPe31000-series or LPe32000-series adapter and you want to update to an earlier unsecure version of firmware, you must remove the secure firmware jumper block before performing the update.
Emulex Boot for the Fibre Channel Protocol User Guide Figure 64: Select File or Folder Window 5. Navigate to the folder that contains the firmware image. 6. Select the firmware file and press Enter. The Start Update window appears (Figure 65).
Emulex Boot for the Fibre Channel Protocol User Guide Figure 65: Start Update Window 7. Select Start Downloading and press Enter. When the operation is complete, the Update Status will indicate the completion status. 6.15 NVMe over FC Boot Settings Enabling NVMe over FC BFS allows the driver to scan for both NVMe and FCP devices. The limit for the total number of devices scanned on the Fabric is 256 for FC and 256 for NVMe.
Emulex Boot for the Fibre Channel Protocol User Guide To configure NVMe over FC BFS, perform the following steps: 1. From the adapter list (Figure 31), select the adapter port for which you want to configure NVMe over FC BFS and press Enter. 2. From the main configuration menu (Figure 32), select Emulex NVMe over FC Boot Settings. Press Enter. The Emulex NVMe over FC Boot Settings window appears (Figure 66). Figure 66: Emulex NVMe over FC Boot Settings Window 3.
Emulex Boot for the Fibre Channel Protocol User Guide Figure 67: NVMe over FC Boot Popup 5. Make your selection, press Enter. The utility displays the new NVMe over FC Boot setting (Figure 66). 6. Save the changes with Commit Changes. 6.15.2 Adding an NVMe over FC Boot Device To add an NVMe over FC Boot device, perform the following steps: 1. From the adapter list (Figure 31), select the adapter to which you want to add an NVMe over FC boot device and press Enter. 2.
Emulex Boot for the Fibre Channel Protocol User Guide Figure 68: Discovered NVMe over FC Controller List Window The screen displays the discovered controllers and the firmware version of each controller. 4. Select a controller and press Enter. The Discovered NVMe over FC Subsystem NQN List window is displayed (Figure 69).
Emulex Boot for the Fibre Channel Protocol User Guide Figure 69: Discovered NVMe over FC Subsystem NQN List Window 5. Make a selection and press Enter. The Discovered NVMe over FC Namespace List window is displayed (Figure 70).
Emulex Boot for the Fibre Channel Protocol User Guide Figure 70: Discovered NVMe over FC Namespace List Window Either the EUID64, NGUID, or UUID is displayed next to the Namespace. 6. Select the Namespace that you wish to use as your boot device and press Enter. The NVMe over FC Namespace Boot Device window is displayed (Figure 71).
Emulex Boot for the Fibre Channel Protocol User Guide Figure 71: NVMe over FC Namespace Boot Device Window 7. Select Commit Changes to save the changes. 6.15.3 Deleting an NVMe over FC Boot Device To delete a previously added NVMe over FC boot device, perform the following steps: 1. From the adapter list (Figure 31), select the adapter whose NVMe over FC Boot device you want to delete and press Enter. 2. From the main configuration menu (Figure 32), select Emulex NVMe over FC Boot Settings. Press Enter.
Emulex Boot for the Fibre Channel Protocol User Guide Figure 72: Delete NVMe Over FC Boot Devices Window The scrollable list displays the Subsystem NQN and Namespace ID of each saved boot entry. You can choose to keep or delete a previously configured NVMe boot device. 4. Press Enter after highlighting the next to the Subsystem NQN and Namespace ID of the entry whose FC boot devices you want to delete. The corresponding help text displays the WWPN and WWNN of the selected entry.
Emulex Boot for the Fibre Channel Protocol User Guide 5. Select DELETE and press Enter. 6. Select Commit Changes and press Enter. The NVMe FC boot device is removed and the Emulex NVMe over FC Boot Settings window is displayed (Figure 66). 6.15.4 Scanning for NVMe over FC Devices To scan for NVMe over FC devices, perform the following steps: 1. From the adapter list (Figure 31), select the adapter for which you want to scan NVMe over FC devices and press Enter. 2.
Emulex Boot for the Fibre Channel Protocol User Guide 6.16 Enabling or Disabling the HPE Shared Memory Feature (HPE Systems Only) During a POST, this setting enables or disables the HPE Shared Memory feature, as defined in the Option Card Sensor Data Reporting specification. NOTE: This menu is for HPE systems only and does not appear on other systems. NOTE: The HPE Shared Memory feature is available only on Gen9 systems. To enable or disable the HPE Shared Memory feature, perform these steps: 1.
Emulex Boot for the Fibre Channel Protocol User Guide Figure 74: HPE Shared Memory Feature Popup 3. Make your selection and press F10 to save it.
Emulex Boot for the Fibre Channel Protocol User Guide Chapter 7: Troubleshooting Circumstances exist in which your system might operate in an unexpected manner. This section describes several of these circumstances and offers one or more workarounds for each situation. 7.1 x86 Boot The following table lists x86 Boot issues and their resolutions.
Emulex Boot for the Fibre Channel Protocol User Guide 7.2 OpenBoot The following table lists OpenBoot issues and their resolutions. Table 9: OpenBoot Troubleshooting Issue Situation The system cannot mount or perform an fsck /etc/ vfstab on an FC boot disk (Solaris driver) During the boot process, the Make sure that persistent binding is implemented correctly. system cannot mount or perform an fsck /etc/ vfstab on an FC boot disk.
Emulex Boot for the Fibre Channel Protocol User Guide 7.3 UEFI Boot The following table lists UEFI Boot issues and their resolutions. Table 10: UEFI Boot Troubleshooting Issue Situation Link is down due to Unsupported Optic Installed or Unsupported Optic These messages appear Replace any unsupported optics with supported optics. while scanning for targets or configuring boot devices in the UEFIHII or during a POST.