
Users Guide
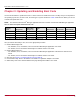
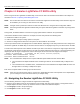
Table Of Contents
- Table of Contents
- Chapter 1: Introduction
- Chapter 2: Booting from SAN
- Chapter 3: Updating and Enabling Boot Code
- Chapter 4: Emulex LightPulse FC BIOS utility
- 4.1 Navigating the Emulex LightPulse FC BIOS Utility
- 4.2 Starting the Emulex LightPulse FC BIOS Utility
- 4.3 Enabling an Adapter to BFS
- 4.4 Scanning for Target Devices
- 4.5 Configuring Boot Devices
- 4.6 Configuring Advanced Adapter Parameters
- 4.6.1 Changing the Default AL_PA
- 4.6.2 Changing the PLOGI Retry Timer
- 4.6.3 Enabling or Disabling the Spinup Delay
- 4.6.4 Setting Auto Scan
- 4.6.5 Enabling or Disabling EDD 3.0
- 4.6.6 Enabling or Disabling the Start Unit Command
- 4.6.7 Enabling or Disabling the Environment Variable
- 4.6.8 Enabling or Disabling Auto Boot Sector
- 4.7 Configuring Adapter Firmware Parameters
- 4.8 Resetting the Adapter to Default Values
- 4.9 Using Multipath BFS
- Chapter 5: OpenBoot
- Chapter 6: Configuring Boot Using the UEFI HII
- 6.1 Prerequisites
- 6.2 Starting the UEFI HII
- 6.3 Configuring Boot in the UEFI HII
- 6.4 Setting Boot from SAN
- 6.5 Scanning for Fibre Devices
- 6.6 Adding Boot Devices
- 6.7 Deleting Boot Devices
- 6.8 Changing the Boot Device Order
- 6.9 Configuring HBA and Boot Parameters
- 6.9.1 Changing the Topology
- 6.9.2 Changing the PLOGI Retry Timer
- 6.9.3 Changing the Link Speed
- 6.9.4 Changing the Maximum LUNs per Target
- 6.9.5 Changing the Boot Target Scan Method
- 6.9.6 Changing the Device Discovery Delay
- 6.9.7 Configuring the Brocade FA-PWWN
- 6.9.8 Configuring the Brocade Boot LUN
- 6.9.9 Configuring 16G Forward Error Correction
- 6.9.10 Selecting Trunking
- 6.10 Resetting Emulex Adapters to Their Default Values
- 6.11 Displaying Adapter Information
- 6.12 Legacy-Only Configuration Settings
- 6.13 Requesting a Reset or Reconnect
- 6.14 Emulex Firmware Update Utility
- 6.15 NVMe over FC Boot Settings
- 6.16 Enabling or Disabling the HPE Shared Memory Feature (HPE Systems Only)
- Chapter 7: Troubleshooting

Broadcom BT-FC-UG126-100
21
Emulex Boot for the Fibre Channel Protocol User Guide
5. Boot to the original local disk to set up the newly defined FC disk. Type the following command:
boot <local_disk>
where <local_disk> is the complete path or the alias of the original boot disk.
6. Run the format utility by typing the following command:
format
7. Select the target disk to become the new boot disk (for example, c1t1d0).
8. Select the partition option and partition the disk as desired.
9. Select the label option and write a volume label to the target disk.
For help with the format utility, refer to the man page, man format.
10. Install the boot on partition 0 of the target disk. (Type this command on one line.)
installboot /usr/platform/ `uname -i`/lib/fs/ufs/bootblk /dev/rdsk/clt1d0s0
11. Create a file system for each partition that contains a mounted file system.
newfs -v /dev/rdsk/clt1d0s0 (becomes root)
newfs -v /dev/rdsk/clt1d0s6 (becomes usr)
newfs -v /dev/rdsk/clt1d0s7 (becomes export/home)
12. Create temporary mount points for the new partitions.
mkdir root2
mkdir usr2
mkdir export2
13. Mount, copy, and then unmount the usr2 file system.
mount /dev/dsk/clt1d0s6 /usr2
c0t0d0s6 ufsdump 0f - /dev/rdsk/c0t0d0s6 | (cd /usr2; ufsrestore rf -)
umount /usr2
14. Copy the export/home file system.
mount /dev/dsk/clt1d0s7 /export2
ufsdump 0f - /dev/rdsk/c0t0d0s7 | (cd /export2; ufsrestore rf -)
umount /export2
15. Perform a copy.
mount /dev/dsk/clt1d0s0 /root2
ufsdump 0f - /dev/rdsk/c0t0d0s0 | (cd /root2; ufsrestore rf -)
16. Edit /root2/etc/vfstab, changing the controller number, target number, and LUN number to point to the new FC
boot disk. For example, if the FC boot disk is c1t1d0, replace all local disk entries of c0t0d0 with c1t1d0.
Currently the file shows:
/dev/dsk/c0t0d0s1 (swap)
/dev/dsk/c0t0d0s0 and /dev/rdsk/c0t0d0s0 (root)
/dev/dsk/c0t0d0s6 and /dev/rdsk/c0t0d0s6 (usr)
/dev/dsk/c0t0d0s7 and /dev/rdsk/c0t0d0s7 (export)
Edit the file to show:
/dev/dsk/c1t1d1s1 (swap)
/dev/dsk/clt1d0s0 and /dev/rdsk/c1t1d0s1 (root)
/dev/dsk/clt1d0s6 and /dev/rdsk/c1t1d0s6 (usr)
/dev/dsk/clt1d0s7 and /dev/rdsk/c1t1d0s7 (export)