
Users Guide
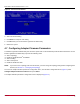
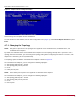
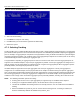
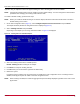
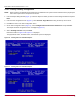
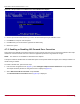
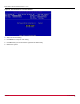
Table Of Contents
- Table of Contents
- Chapter 1: Introduction
- Chapter 2: Booting from SAN
- Chapter 3: Updating and Enabling Boot Code
- Chapter 4: Emulex LightPulse FC BIOS utility
- 4.1 Navigating the Emulex LightPulse FC BIOS Utility
- 4.2 Starting the Emulex LightPulse FC BIOS Utility
- 4.3 Enabling an Adapter to BFS
- 4.4 Scanning for Target Devices
- 4.5 Configuring Boot Devices
- 4.6 Configuring Advanced Adapter Parameters
- 4.6.1 Changing the Default AL_PA
- 4.6.2 Changing the PLOGI Retry Timer
- 4.6.3 Enabling or Disabling the Spinup Delay
- 4.6.4 Setting Auto Scan
- 4.6.5 Enabling or Disabling EDD 3.0
- 4.6.6 Enabling or Disabling the Start Unit Command
- 4.6.7 Enabling or Disabling the Environment Variable
- 4.6.8 Enabling or Disabling Auto Boot Sector
- 4.7 Configuring Adapter Firmware Parameters
- 4.8 Resetting the Adapter to Default Values
- 4.9 Using Multipath BFS
- Chapter 5: OpenBoot
- Chapter 6: Configuring Boot Using the UEFI HII
- 6.1 Prerequisites
- 6.2 Starting the UEFI HII
- 6.3 Configuring Boot in the UEFI HII
- 6.4 Setting Boot from SAN
- 6.5 Scanning for Fibre Devices
- 6.6 Adding Boot Devices
- 6.7 Deleting Boot Devices
- 6.8 Changing the Boot Device Order
- 6.9 Configuring HBA and Boot Parameters
- 6.9.1 Changing the Topology
- 6.9.2 Changing the PLOGI Retry Timer
- 6.9.3 Changing the Link Speed
- 6.9.4 Changing the Maximum LUNs per Target
- 6.9.5 Changing the Boot Target Scan Method
- 6.9.6 Changing the Device Discovery Delay
- 6.9.7 Configuring the Brocade FA-PWWN
- 6.9.8 Configuring the Brocade Boot LUN
- 6.9.9 Configuring 16G Forward Error Correction
- 6.9.10 Selecting Trunking
- 6.10 Resetting Emulex Adapters to Their Default Values
- 6.11 Displaying Adapter Information
- 6.12 Legacy-Only Configuration Settings
- 6.13 Requesting a Reset or Reconnect
- 6.14 Emulex Firmware Update Utility
- 6.15 NVMe over FC Boot Settings
- 6.16 Enabling or Disabling the HPE Shared Memory Feature (HPE Systems Only)
- Chapter 7: Troubleshooting

Broadcom BT-FC-UG128-100
47
Emulex Boot for the Fibre Channel Protocol User Guide
4.7.3.1 Viewing Trunking Configuration
NOTE: When trunking is enabled, Boot from SAN must be enabled and the system must be rebooted for the physical port
status to be up and for the link speed to be shown.
1. From the adapter listing window (Figure 1), select the adapter for which you want to view trunking information and press
Enter.
2. From the main configuration menu (Figure 2), select Scan for Target Devices to bring the links up for the trunk.
3. Press Esc to return to the main configuration menu.
4. On the main configuration menu (Figure 2), select Configure Advanced Firmware Parameters and press Enter.
The adapter firmware configuration menu is displayed (Figure 21).
5. Select Trunking Selection and press Enter.
Information similar to Figure 26 or Figure 27 is displayed.
The physical link status, trunk link status, and trunk link speed are displayed.
Figure 26: Trunking Menu for LPe35002 Adapters
Figure 27: Trunking Menu for LPe35004 Adapters