
Administrator Guide

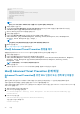

<plist version="1.0">
<dict>
<key>ServerHost</key>
<string>server.organization.com</string>
<key>ServerPort</key>
<string>8888</string>
<array>
</dict>
</plist>
노트:
포트는 Core 서버 서비스 포트이며 구성 가능합니다. 기본 포트 번호는 8888입니다.
5. 파일을 저장하고 닫습니다.
6. 각 대상 컴퓨터에서 Mac용 Endpoint Security Suite Enterprise 패키지 설치 프로그램을 임시 폴더에 복사하고 수정된
com.dell.esse.plist 파일을 /Library/Preferences에 복사합니다.
7. 메시지가 표시되면 사용자의 자격 증명을 입력합니다.
8. 터미널 창을 실행합니다.
9. 다음과 같은 설치 프로그램 명령을 사용하여 패키지의 명령줄 설치를 수행합니다.
sudo installer -pkg /Volumes/Endpoint\ Security\ Suite\ Enterprise\ for\ Mac/Endpoint\
Security\ Suite\ Enterprise.pkg -target /
노트:
-pkg 경로는 .dmg 파일에서 발견된 .pkg 설치 프로그램에 대한 경로입니다.
10. Enter 키를 누릅니다.
11. ESSE 고급 위협 방지 설치 확인을 참조하십시오.
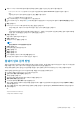
Mac용 Advanced Threat Prevention 명령줄 제거
명령줄을 사용하여 Advanced Threat Prevention 클라이언트를 제거하려면 아래 단계를 따르십시오.
1. 터미널 창을 실행합니다.
2. 다음과 같은 제거 명령을 사용하여 패키지의 명령줄 제거를 수행합니다.
sudo /Volumes/Endpoint\ Security\ Suite\ Enterprise\ for\ Mac/Utilities/Uninstall\ Endpoint\
Security\ Suite\ Enterprise.app/Contents/MacOS/Uninstall\ Endpoint\ Security\ Suite\
Enterprise --noui
노트: 명령의 끝에는 --noui 스위치가 포함되어 있습니다.
3. Enter 키를 누릅니다.
이제 Mac용 Advanced Threat Prevention가 제거되어 컴퓨터를 정상적으로 사용할 수 있습니다.
Mac용 Advanced Threat Prevention 문제 해결
Advanced Threat Prevention를 위한 SSL 인증서 또는 정책 확인 비활성
화
클라이언트의 서버 인증서가 누락되었거나 자체 서명된 경우, 클라이언트 측면에 있는 SSL 인증서만 비활성화해야 합니다.
사용자 환경에서 자체 서명된 인증서를 실행할 경우 PolicyCheck를 비활성화합니다.
사용자 환경에 자체 서명된 인증서가 있고, 인증서를 Mac의 키체인으로 가져오지 않은 경우 DisableCertTrust 및 DisablePolicyCheck를
모두 False로 설정합니다.
1. 클라이언트에서 터미널 창을 실행합니다.
2. DellCSFConfig.app에 대한 경로 입력:
cd /Volumes/Endpoint\ Security\ Suite\ Enterprise\ for\ Mac/Utilities/DellCSFConfig.app/
Contents/MacOS/
3. DellCSFConfig.app 실행:
sudo DellCSFConfig.app/Contents/MacOS/DellCSFConfig
기본 설정 시 다음이 표시됩니다.
Current Settings:
40 작업