Dell Endpoint Security Suite Enterprise for Mac Administrator Guide v2.9 March 2021 Rev.
Notes, cautions, and warnings NOTE: A NOTE indicates important information that helps you make better use of your product. CAUTION: A CAUTION indicates either potential damage to hardware or loss of data and tells you how to avoid the problem. WARNING: A WARNING indicates a potential for property damage, personal injury, or death. © 2012-2021 Dell Inc. All rights reserved.
Contents Chapter 1: Introduction................................................................................................................. 5 Overview................................................................................................................................................................................5 FileVault Encryption............................................................................................................................................................
Using Boot Camp.........................................................................................................................................................33 How to Retrieve a Firmware Password................................................................................................................. 35 Client Tool.....................................................................................................................................................................
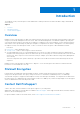
1 Introduction The Endpoint Security Suite Enterprise for Mac Administrator Guide provides the information needed to deploy and install the client software. Topics: • • • Overview FileVault Encryption Contact Dell ProSupport Overview Endpoint Security Suite Enterprise for Mac offers Advanced Threat Prevention at the operating system and memory layers and encryption, all centrally-managed from the Dell Server.
2 Requirements Client hardware and software requirements are provided in this chapter. Ensure that the deployment environment meets the requirements before continuing with deployment tasks. Topics: • • Encryption Client Advanced Threat Prevention Encryption Client Encryption Client Hardware Minimum hardware requirements must meet the minimum specifications of the operating system.
● FAT32 ● exFAT ● HFS Plus (MacOS Extended) formatted media with Master Boot Record (MBR) or GUID Partition Table (GPT) partition schemes. See Enable HFS Plus. NOTE: External media must have 55 MB available, plus open space on the media that is equal to the largest file to be encrypted, to host Encryption External Media. Windows Operating Systems (32- and 64-bit) Supported to Access Encrypted Media ● Microsoft Windows 7 SP1 - Enterprise - Professional - Ultimate ● Microsoft Windows 8.1 - Windows 8.
Advanced Threat Prevention Software The following table details supported software. Operating Systems (64-bit kernels) ● Mac OS X Mavericks 10.9.5 ● Mac OS X Yosemite 10.10.5 ● macOS Sierra 10.12.6 NOTE: Mac OS X Mavericks 10.9.5, Mac OS X Yosemite 10.10.5, and macOS Sierra 10.12 are supported with Advanced Threat Prevention only, not the Encryption client. ● macOS High Sierra 10.13.6 NOTE: Refer to Encryption Client Software for specific macOS High Sierra versions supported with the Encryption client.
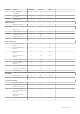
Features Policies Windows macOS Linux Auto Quarantine (Abnormal) x x x Auto Upload x x x Policy Safe List x x x Memory Protection x x x Stack Pivot x x x Stack Protect x x x Overwrite Code x n/a RAM Scraping x n/a Malicious Payload x Memory Actions Exploitation Process Injection Remote Allocation of Memory x x n/a Remote Mapping of Memory x x n/a Remote Write to Memory x x n/a Remote Write PE to Memory x n/a n/a Remote Overwrite Code x n/a Remote Unm
Features Policies Windows macOS Linux Maximum archive file size to scan x x x Exclude Specific Folders x x x Copy File Samples x Application Control Change Window x Folder Exclusions x x Agent Settings Enable auto-upload of log files x Enable Desktop Notifications x x x Script Control 10 Active Script x Powershell x Office Macros x Block Powershell console usage x Approve scripts in these folders (and subfolders) x Logging Level x Self Protection Level x Auto Update
3 Tasks for the Encryption Client Topics: • • • • • • • • • • Install/Upgrade the Encryption Client Activate the Encryption Client View Encryption Policy and Status System Volumes Recovery Removable Media Collect Log Files for Endpoint Security Suite Enterprise Uninstall the Encryption Client for Mac Activation as Administrator Encryption Client Reference Install/Upgrade the Encryption Client This section guides you through the the Encryption client for Mac installation/upgrade and activation process.
● If your deployment uses a non-default configuration, ensure that you know the port number for the Security Server. It is needed for client software installation and activation. ● Ensure that the target computer has network connectivity to the Security Server and Policy Proxy. ● Ensure that you have a domain user account in the Active Directory installation configured for use with the Dell Server. The domain user account is used for client software activation.
For kext consent, one or both of these dialogs display. System Extension Blocked System Extension Blocked a. Click OK. b. Click OK. c. To approve these extensions, select System Preferences > Security & Privacy. d. Click Allow next to System software from developer Credant Technologies (Dell, Inc, formerly Credant Technologies). e. Click OK. Complete these steps if the system extension for mounting FDEEM volumes could not be loaded. a. Click Open System Preferences. b. Click OK. c.
NoAuthenticateUsers [In this sample code, users from a specific domain name can log in without being prompted to activate against the Dell Server.] dsAttrTypeStandard:AuthenticationAuthority ;Kerberosv5;;*@domainName.com;domainName.com* NoAuthenticateUsers [In this sample code, specific users can log in without being prompted to authenticate against the Dell Server.
ignore [For handling Mac OS Extended media. Possible values are ignore, provisioningRejected, or unshieldable. ignore - the media is usable (default). provisioningRejected - retains the value in the Dell Server policy, EMS Access to unShielded Media. unshieldable - If the EMS Access to unShielded Media policy is set to Block, the media is ejected. If the EMS Access to unShielded Media policy is not set to Block, it is usable as provisioningRejected. The key and value are case sensitive.
Activate the Encryption Client The activation process associates network user accounts in the Dell Server to the Mac computer and retrieves each account's security policies, sends inventory and status updates, enables recovery workflows, and provides comprehensive compliance reporting. The client software performs the activation process for each user account it finds on the computer as each user logs in to their user account.
The Management Console lists Mac policies in these technology groups: ● Mac Encryption ● Removable Media Encryption Policies that you set depend on the encryption requirements of your enterprise. This table lists the policy options. Mac Encryption > Dell Volume Encryption For High Sierra and higher, both of these policies must be enabled. For Sierra and earlier, see previous versions of the documentation.
State Description Needs repair before encryption begins The volume failed Disk Utility verification. To repair a volume, follow the instructions in Apple Support article HT1782 (http:// support.apple.com/kb/HT1782). Encryption preparation complete. Pending restart Encryption begins after restart. Encryption policy conflict The disk cannot be brought under policy because it is encrypted with an incorrect setting. See Encrypt Using FileVault for Mac.
Badge Volume Type and Status A non-boot volume configured for encryption. The Security and Privacy badge denotes a FileVault-protected partition. Multiple drives and no encryption. NOTE: The volume icon without a badge indicates that nothing has been done to the disk. This is not a boot disk. 5. Click the Removable Media tab to view the status of the volumes targeted for encryption. The following table lists examples of volume configurations for removable media.
The Shield Detail area displays information about the client software, including encryption sweep start and end times for this computer. To view effective polices, in the Actions area, click View Effective Policies. 6. Click the Security Policies tab. From this tab, you can expand the types of policies and change individual policies. a. When finished, click Save. b. In the left pane, click Management > Commit. NOTE: The number that displays by Pending Policy Changes is cumulative.
10. Enter a description of the changes in the Comment box and click Commit Policies. 11. To see the policy setting on the local computer after the Dell Server sends the policy, in the Policies pane of Dell Encryption Enterprise Preferences, click Refresh. Encryption Process The encryption process varies depending on the state of the boot volume when encryption is enabled.
Modify Policy to Add FileVault Users FileVault secures the data on a disk by automatically encrypting it. In a managed FileVault boot volume, to allow multiple users to unlock the disk, you can modify a policy in the Management Console and use your dictionary of OpenDirectory record names and values to then allow users to add themselves to the FileVault disk. 1. In the Management Console's advanced Mac Global Settings policies, scroll to the FileVault 2 PBA User List policy. 2.
Assume Management of an Existing FileVault-Encrypted Volume If the computer already has a FileVault-encrypted volume and FileVault encryption is enabled in the Management Console, Dell Encryption can assume management of the volume. If Dell Encryption detects that the boot volume is already encrypted, the Dell Encryption Enterprise dialog displays. To allow Dell Encryption to assume management of the volume, follow these steps. 1. Select either Personal Recovery Key or Bootable Account Credentials.
6. Click OK. NOTE: Keys in the recovery bundle for this drive are now obsolete. You must download a new recovery bundle from the Management Console. User Experience For maximum security, the client software disables the Automatic Login feature of Mac OS X computers. Additionally, the client software automatically enforces the Mac OS X feature require password after sleep or screen saver begins. Also, a configurable amount of time is allowed in sleep/screen saver mode before enforcing authentication.
size can be =, <=, >=, <, > is of the form decimal integer with an optional suffix from {K, M, G, T} aligned on 1000, not 1024.
The recovery file .csv is downloaded. 7. Boot the target computer from a pre-created external recovery volume. You can accomplish this by either launching the Startup Disk pane in System Preferences and selecting the recovery volume, or by holding down the Option key while you restart this computer and selecting the recovery volume in the preboot Startup Manager. or Boot the computer targeted for recovery into Target Disk Mode.
Prerequisites ● An external bootable drive ● The Device ID/Unique ID of the computer targeted for recovery. In most cases, you can find the computer targeted for recovery in the Management Console by searching for the owner's user name and viewing the devices encrypted for that user. The format of the Device ID/Unique ID is "John Doe's MacBook.Z4291LK58RH". ● The Dell installation media Management Console - Save the recovery bundle 1. Open the Management Console. 2.
1. Either write down the key or click Print recovery key. 2. Click Close. 3. Boot the volume you want to recover, using the preboot Startup Manager if necessary. The computer displays icons for multiple users or requests a password. 4. Select a user if applicable, then click ? at the login screen. 5. Click the arrow that displays. 6. Type the recovery key and press Enter. 7. At the dialog, enter a new password for the user.
5. In the Utilities folder, run the Dell Recovery Utility. The Dell Recovery Utility > Select Volumes dialog displays. 6. Select the FileVault volume to recover and click Continue. The Choose recovery bundle dialog displays. 7. Select the recovery bundle and click Open. If more than one recovery key exists for that disk, the Select Recovery Record screen displays. 8. In the Escrow Date column, select the most recent date for the Keychain recovery type, and click Continue.
Removable Media Supported Formats FAT32, exFAT, or HFS Plus (Mac OS Extended) formatted media with Master Boot Record (MBR) or GUID Partition Table (GPT) partition schemes are supported. You must enable HFS Plus. NOTE: Mac currently does not support CD/DVD burning for Encryption External Media. However, access to CD/DVD drives is not blocked, even if the EMS Block Access to UnShieldable Media policy is selected. Enable HFS Plus To enable HFS Plus, add the following to the .plist file.
2. Empty the trash. As you free space, Encryption External Media automatically encrypts additional files. 3. If you delete any files or folders, be sure to re-empty the trash. Audit Messages Audit messages are sent to the Dell Server. For Endpoint Security Suite Enterprise for Mac, to view audit messages: 1. As a Dell administrator, log in to the Management Console. 2. In the left pane, click Populations > Enterprise or Endpoints. 3. Select the Advanced Threat Events tab.
Messages display the status of the uninstallation. The Encryption client for Mac is now uninstalled, and the computer can be used normally. Activation as Administrator The Client Tool offers the administrator new methods for activating the client software on a Mac computer and examining the client software. Two methods of activation are available: ● Activation using administrator credentials ● Temporary activation that emulates the user without leaving footprints on that computer.
● MacBook7.* ● MacBookAir2.* ● MacBookPro7.* ● MacPro5.* ● XServe3.* For example, iMac10.1, iMac11.1 and iMac11.2 support Optional Firmware Password Protection (as indicated by the *), but iMac12.1 or later does not. NOTE: When the FirmwarePasswordMode key option is set to Optional, it only disables client enforcement of firmware password protection. It does not remove any existing firmware password protection. You can remove any existing firmware password using the Mac OS X Firmware Password Utility.
You must ensure Windows is installed before deploying client policies enabling encryption. After the client begins the encryption process, it disallows disk partition operations required by Boot Camp. Recovery of Endpoint Security Suite Enterprise for Windows on Boot Camp To recover Endpoint Security Suite Enterprise for Windows running in a Boot Camp volume, you must also create a Boot Camp volume on an external drive.
18. When prompted to reboot, click Yes. 19. The system reboots, and you can log into Windows. How to Retrieve a Firmware Password Even if the client computer is configured for firmware password enforcement, it may not be needed for recovery. If the computer to recover is bootable, set the boot target in the Startup Disk system preferences pane.
Table 1. Client Tool Commands (continued) Command Purpose Syntax With the client tool you can activate a different local user than the one logged in and associate the domain credentials with that user. client -a Activate temporarily Activates a Mac client without leaving a footprint.
Table 1. Client Tool Commands (continued) Command Purpose Syntax Results 0 (account information) = Success 6 = User not found Version Request the Mac client's version -v The version of the Mac client displays: Example: 8.x.x.xxxx * The account running the Client Tool is used for the localAccount unless another is specified. The Plist Option The -plist option prints the results of the command with which it is combined.
4 Tasks Topics: • • • • • • • Install Advanced Threat Prevention for Mac Verify the Advanced Threat Prevention Installation Collect Log Files for Endpoint Security Suite Enterprise View Advanced Threat Prevention Details Provision a Tenant Configure Advanced Threat Prevention Agent Auto Update Advanced Threat Prevention Troubleshooting Install Advanced Threat Prevention for Mac This section guides you through the Advanced Threat Prevention installation.
2. Double-click the Endpoint Security Suite Enterprise package installer. The following message displays: This package runs a program to determine if the software can be installed. 3. Click Continue. 4. Read the Welcome text and click Continue. 5. Review the license agreement, click Continue, and then click Agree to accept the terms of the license agreement. 6. In the Server Host field, enter the fully qualified hostname of the Dell Server to manage the target user, such as server.organization.com.
7. In the Server Port field, enter 8888 and click Continue. Once a connection is established, the connectivity indicator changes from red to green. NOTE: The port is the Core Server service port, which is configurable. The default port number is 8888. 8. In the Installation screen, click Install. 9. When prompted, enter the administrator account credentials (required by the Mac OS X Installer application), then click Install Software. 10. When installation is complete, click Close.
Command Line Installation for Advanced Threat Prevention To install the Advanced Threat Prevention client using the command line, follow the steps below. 1. From the Dell installation media, mount the Endpoint-Security-Suite-Enterprise-.dmg file. The Endpoint Security Suite Enterprise for Mac package opens. 2. From the Utilities folder, copy the com.dell.esse.plist file to the local drive. 3. Open the .plist file. 4.
ServerHost server.organization.com ServerPort 8888 NOTE: The port is the Core Server service port, which is configurable. The default port number is 8888. 5. Save and close the file. 6. For each targeted computer, copy the Endpoint Security Suite Enterprise for Mac package installer to a temporary folder and the modified com.dell.esse.plist file to /Library/Preferences. 7.
Current Settings: ServerHost = deviceserver.company.com ServerPort = 8888 DisableCertTrust = False DisablePolicyCheck = False DumpXmlInventory = False DumpPolicies = False 4. Type -help to list the options. 5. To disable SSL Certificate Trust on the client, change DisableCertTrust to True. 6. To disable the Policy Signing Check on the client, change DisablePolicyCheck to True. Add XML Inventory and Policy Changes to the Logs Folder To add the inventory.xml or policies.xml files to the Logs folder: 1.
Collect Log Files for Endpoint Security Suite Enterprise In System Preferences > Dell Encryption Enterprise > System Volumes, a Collect Logs button at the bottom right allows an administrator to pre-generate logs for support. This action may impact performance while logs are collected. DellLogs.zip contains the logs for Mac Encryption Enterprise and Advanced Threat Prevention. For information about how to collect the logs, see http://www.dell.com/support/article/us/en/19/SLN303924.
Threats tab The Threats tab displays all threats discovered on the device and the action taken. Threats are a category of events that are newly detected as potentially unsafe files or programs and require guided remediation. The Category column can include the following.
● Terminate - The process call is blocked if an application attempts to call a memory violation process. The application that made the call is terminated. The following exploit types are detected: ● Stack Pivot ● Stack Protect ● Scanner Memory Search ● Malicious Payload For more information about Exploit policies, see AdminHelp, available in the Management Console. Events tab NOTE: An event is not necessarily a threat.
Provision a Tenant 1. As a Dell administrator, log in to the Management Console. 2. In the left pane of the Management Console, click Management > Services Management. 3. Click Set Up Advanced Threat Protection Service. Import your Advanced Threat Prevention licenses if failure occurs at this point. 4. The guided set up begins once the licenses are imported. Click Next to begin. 5. Read and agree to the EULA and click Next. 6.
Tasks
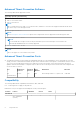
The following diagram illustrates the Advanced Threat Prevention agent communication process.
5 Glossary Security Server - Used for activations of Dell Encryption. Policy Proxy - Used to distribute policies for client software. Management Console - Dell Server's administrative console for the entire enterprise deployment. Shield - Occasionally, you may see this name in the documentation and in the user interfaces. "Shield" is a name used to represent Dell Encryption.