
Deployment Guide


9. In Configure Hostname, use the backspace key to remove the default hostname. Enter a unique hostname and select OK.
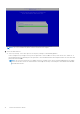
10. In Configure Network Settings, choose either option below, then select OK.
● (Default) Use DHCP (IPv4)
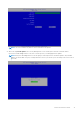
● (Recommended) InUse DHCP, press the space bar to remove the X and manually enter these addresses, as applicable:
Static IP
Network Mask
Default Gateway
DNS Server 1
DNS Server 2
DNS Server 3
Either IPv6 or IPv4 can be selected for a static configuration.
●
NOTE: When using a static IP, you must also create a host entry in the DNS server.
11. At the time zone confirmation prompt, select OK.
12. When the message displays to indicate that first boot configuration is completed, select OK.
13. Configure SMTP Settings.
14. Import an Existing Certificate or Enroll a New Server Certificate.
15. Update Security Management Server Virtual.
16. Install an FTP client that supports SFTP on port 22, and Set up File Transfer (FTP) Users.
Security Management Server Virtual installation tasks are complete.
Open Management Console
Open the Management Console at this address: https://server.domain.com:8443/webui/
The default credentials are superadmin/changeit.
For a list of supported web browsers, see Management Console Prerequisites.
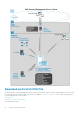
Install and Configure Proxy Mode
Proxy mode provides a front end (DMZ mode) option for use with the Dell Server. If you intend to deploy Dell components in the
DMZ, ensure that they are properly protected against attacks.
To perform this installation, you need the fully qualified hostname of the DMZ server.
1. In the Dell installation media, navigate to the Security Management Server directory. Unzip (DO NOT copy/paste or drag/
drop) Security Management Server-x64 to the root directory of the server where you are installing Security Management
Server Virtual.
Copying/pasting or dragging/dropping produces errors and an unsuccessful installation.
2. Double-click setup.exe.
3. Select the language for installation, then click OK.
4. If prerequisites are not already installed, a message displays to inform you of which prerequisites will be installed. Click
Install.
5. Click Next in the Welcome dialog.
6. Read the license agreement, accept the terms, then click Next.
7. Enter the 32-character Product Key and then click Next. The Product Key is located in the
EnterpriseServerInstallKey.ini file.
8. Select Front End Install and click Next.
9. To install the front end server to the default location of C:\Program Files\Dell, click Next. Otherwise, click Change
to select another location, then click Next.
10. You have a choice of digital certificate types to use.
NOTE: It is highly recommended that you use a digital certificate from a trusted certificate authority.
14 Detailed Installation Guide