Dell Endpoint Security Suite Enterprise Advanced Threat Prevention Quick Start Guide v2.9 December 2020 Rev.
Notes, cautions, and warnings NOTE: A NOTE indicates important information that helps you make better use of your product. CAUTION: A CAUTION indicates either potential damage to hardware or loss of data and tells you how to avoid the problem. WARNING: A WARNING indicates a potential for property damage, personal injury, or death. © 2012-2020 Dell Inc. All rights reserved. Dell, EMC, and other trademarks are trademarks of Dell Inc. or its subsidiaries.
Contents Chapter 1: Introduction................................................................................................................. 4 Contact Dell ProSupport....................................................................................................................................................4 Chapter 2: Get Started..................................................................................................................5 Provision a Tenant...................................
1 Introduction Before you perform tasks explained in this guide, the following components must be installed: ● Endpoint Security Suite Enterprise - refer to Endpoint Security Suite Enterprise Advanced Installation Guide or Endpoint Security Suite Enterprise Basic Installation Guide ● Security Management Server or Security Management Server Virtual Server - refer to Security Management Server Installation and Migration Guide or Security Management Server Virtual Server Quick Start and Installation Guide This
2 Get Started This chapter details the recommended steps to begin administering Advanced Threat Prevention.
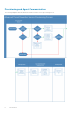
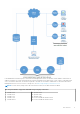
Provisioning and Agent Communication The following diagrams illustrate Advanced Threat Prevention service provisioning process.
The following diagram illustrates the Advanced Threat Prevention agent communication process. The following diagram illustrates Dell Server architecture and communication.
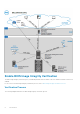
Enable BIOS Image Integrity Verification The BIOS Image Integrity Verification policy is enabled by default when the master switch for Advanced Threat Prevention is enabled. For an overview of BIOS Image Integrity Verification process, refer to BIOS Image Integrity Verification Process. Verification Process The following diagram illustrates the BIOS image integrity verification process.
If the Enable BIOS Assurance policy is selected in the Management Console, the Cylance tenant validates a BIOS hash on endpoint computers to ensure that the BIOS has not been modified from the Dell factory version, which is a possible attack vector. If a threat is detected, a notification is passed to the Dell Server and the IT administrator is alerted in the Remote Management Console. For an overview of the process, see BIOS Image Integrity Verification Process.
Dell Computer Models supported with BIOS Image Integrity Verification ● ● ● ● ● ● ● ● ● Latitude E5470 Latitude E5570 Latitude E7270 Latitude E7470 Latitude Rugged 5414 Latitude Rugged 7214 Extreme Latitude Rugged 7414 OptiPlex 3040 OptiPlex 3240 ● ● ● ● ● ● ● ● ● Precision Workstation Precision Workstation Precision Workstation Precision Workstation Venue 10 Pro 5056 Venue Pro 5855 Venue XPS 12 9250 XPS 13 9350 XPS 9550 3620 7510 7710 T3420 Configure Advanced Threat Prevention Agent Auto Update In the
1. 2. 3. 4. In the left pane, click Populations > Administrators. Search or select the row that displays the user name of the appropriate administrator to display User Detail. View or modify administrator roles in the right pane. Click Save. NOTE: Dell recommends assigning administrator roles at the Group level rather than at the User level. To view, assign, or modify administrator roles at the Group level, follow these steps: 1. 2. 3. 4. In the left pane, click Populations > User Groups.
You can select priority levels of notifications to include in the dashboard notifications area or email notifications lists. Notifications of the remaining priority levels are not included in the dashboard or email notifications lists. Select Clear selected items to reset the selections in this list. All notifications will display (unless filtered elsewhere).
3 Policies This chapter details policy management for Advanced Threat Prevention. ● Enable Advanced Threat Prevention ● Recommended Policy Settings ● Commit Policy Modifications For the complete list of Advanced Threat Prevention policies and their descriptions, refer to AdminHelp, available in the Management Console. Enable Advanced Threat Prevention The Advanced Threat Prevention policy is toggled Off by default and must be toggled On to enabled Advanced Threat Prevention policies.
4 Threats This chapter details how to identify and manage threats encountered in an enterprise environment following the installation of Advanced Threat Prevention.
Label Severity Detail MemoryViolationTerminated Warning Indicates that an executable or script was found to be actively running and in violation of the Memory Protection or Script Control policy. The executable or script was subsequently terminated. Typically this denotes the correlating Memory Protection or Script Control policy outlined was set to Terminate.
● Agents - Provides information about devices running the Advanced Threat Prevention client as well as the option to export the information or remove devices from the list. ● Global List - Lists files in the Global Quarantine and Safe List and provides the option to move files to these lists. ● Options - Provides a way to integrate with Security Information Event Management (SIEM). ● Certificate - Allows certificate upload. After upload, certificates display on the Global List tab and can be Safe listed.
2. Apply a filter to the Production Status column to display all Safe files. 3. Apply a filter to the Classification column to only show Trusted - Local threats. Trusted - Local files have been analyzed by Cylance and found to be safe. Safelist these items after review. If you have a lot of files in the filtered list, you may need to prioritize using more attributes. For example, add a filter to the Detected By column to review threats found by Execution Control.
● Safe - Add a file to the safe list. The file is permanently treated as safe across all devices. NOTE: Occasionally, a "good" file may be reported as unsafe (this could happen if the features of that file strongly resemble those of malicious files). Waiving or safelisting the file can be useful in these instances. ● Edit Global List - Add or remove files from the global quarantine list. ● Waive - Add a file to the Waived list on a computer. This file is allowed to execute on the computer.
5 Disconnected Mode Disconnected mode allows a Dell Server to manage Advanced Threat Prevention endpoints without client connection to the Internet or external network. Disconnected mode also allows the Dell Server to manage clients without Internet connection or a provisioned and hosted Advanced Threat Prevention service. The Dell Server captures all event and threat data in Disconnected mode.
● Safe List These policies are sent to the Advanced Threat Prevention client only if the Dell Server detects a Disconnected Mode install token, which is prefixed with "DELLAG." Refer to AdminHelp for examples of these policies. To view files that Advanced Threat Prevention identifies as potential threats, navigate to Enterprise > Advanced Threat Events tab. This tab contains a list of events information for the entire enterprise and action taken, such as Blocked or Terminated.
6 Troubleshooting Recover Advanced Threat Prevention Recover Service You will need your backed up certificate to recover Advanced Threat Prevention service. 1. In the left pane of the Management Console, click Management > Services Management. 2. Click Recover Advanced Threat Prevention Service. 3. Follow the guided service recovery and upload the Advanced Threat Prevention certificate when prompted.
Use this registry setting for testing/debugging only, as this registry setting controls log verbosity for other components, including the Encryption client and Encryption Management Agent. ● Compatibility Mode allows applications to run on the client computer while Memory Protection or Memory Protection and Script Control policies are enabled. Enabling compatibility mode requires adding a registry value on the client computer. To enable compatibility mode, follow these steps: 1.