Dell Data Protection | Endpoint Security Suite Enterprise for VDI with Citrix® Dell Engineering February 2017
Revisions Date Description July 2016 Initial release August 2016 Update section 6 Endpoint Security Suite Enterprise and Appendix January 2017 Include non-persistent VDI changes THIS DOCUMENT IS FOR INFORMATIONAL PURPOSES ONLY, AND MAY CONTAIN TYPOGRAPHICAL ERRORS AND TECHNICAL INACCURACIES. THE CONTENT IS PROVIDED AS IS, HARDWARE SELECTIONS CONTAINED WITHIN ARE FROM THE BASIS OF BEST WITHOUT EXPRESS OR IMPLIED WARRANTIES OF ANY KIND. Copyright © 2016 Dell Inc. All rights reserved.
Contents 1 2 3 Introduction .................................................................................................................................................................................. 5 1.1 Purpose ............................................................................................................................................................................. 5 1.2 Scope....................................................................................................
5.6 Endpoint Security Suite Enterprise Install .................................................................................................................. 26 Client Install .................................................................................................................................................................... 27 Client Manual and Silent Install ..................................................................................................................................
1 Introduction 1.1 Purpose This document addresses the configuration and implementation considerations for the key components required to deliver Advanced Threat Prevention, Policy-Based Encryption and Removable Media Encryption in a Citrix persistent or non-persistent Virtual Desktop Infrastructure environment. 1.
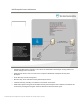
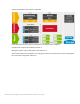
2 Solution Architecture Overview 2.1 Introduction The Endpoint Security Suite Enterprise software delivers an out-of-the-box Advanced Threat Prevention (ATP), Policy-Based Encryption (PBE) and Removable Media Encryption (EMS) solution for virtual desktops that provide antivirus and encryption that other solution may not be able to offer. Endpoint Security Suite Enterprise is a turnkey solution that comes ready to integrate into your Citrix VDI environment.
Dell Enterprise Server Architecture DDP Remote Management Console: This is where the administrator will configure security policies and domain settings for the environment. Dell Enterprise Server: Refer to section 2.3 for component breakdown of Endpoint Security Suite Enterprise. Active Directory: Domain management. Microsoft SQL Server: Database used by Dell Enterprise Server. Certificate Authority: Handling of certificates in the domain environment.
2.3 Dell Enterprise Server Architecture This is the actual back-end Dell Server installation, which is made up of the following components. Compliance Reporter Provides an extensive view of the environment for auditing and compliance reporting. Core Server Used for policy and license management as well as providing updates and registration. Key Server Service that negotiates, authenticates, and encrypts client connection using Kerberos API’s. Requires SQL database to access the key data.
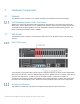
3 Hardware Components 3.1 Network The following sections contain the core network components for Endpoint Security Suite Enterprise. Dell Networking S4048 (10Gb ToR Switch) Optimize your network for virtualization with a high-density, ultra-low-latency ToR switch that features 48 x 10GbE SFP+ and 6 x 40GbE ports (or 72 x 10GbE ports in breakout mode) and up to 720Gbps performance. The S4048-ON also supports ONIE for zero-touch installation of alternate network operating systems.
Separate Management and Compute Configuration. In this environment we have separate management and compute nodes configured. Compute Node: Only has VDI desktops hosted on it. Management Node: Only has management VMs hosted on it. See the table below for the breakdown of the management VMs for the environment and their configurations, this covers both configurations outline here.
Combined management and compute All the management VMs are place on a single node with the VDI desktops. Management VMs configurations.
4 Software Components 4.1 Software Inventory This details the installation of the Endpoint Security Suite Enterprise software and dependencies in the environment. There are a number of components that make up the Endpoint Security Suite Enterprise software and these will be outlined below and their function. Software Description Version Server OS Microsoft Windows 2012 R2 Std. Ed. MSSQL Microsoft SQL Server 2014 Std. Ed.
Microsoft SQL Server This is the database software that the Endpoint Security Suite Enterprise will use to update and query and track the Endpoint Security Suite Enterprise environment. Note: Experience with the installation of Microsoft SQL Server is assumed and therefore not covered in this document. System Center Virtual Machine Manager This is the virtual machine manager being used. Due to the Citrix environment using Machine Creation Services of the desktop images.
Copy the extractedLocation\EnterpriseServerInstallKey.ini file from the extracted file location to C:\Windows Navigate to: extractedLocation\DDP-Enterprise-Server-9.6.xxx\Dell\EnterpriseServer\x64 1. Install Right click Setup.exe. Select Run as administrator from menu. 2. Install Wizard Select the language for installation. Click OK.
3. Dependencies Dependencies that are required will be listed for installation. Click Install, wait for components to install this may take a while to run. 4. Welcome Welcome wizard that will guide you through the installation process. Click Next.
5. License Agreement This is the license agreement review by using the scroll bar located on the right hand side or alternatively Click Print to print agreement. Click I accept the terms in the license agreement Click Next. 6. Product Key Enter the Product Key, if you copied the EnterpriseServerInstallKey.ini as outlined in step 1, at start of this section in the install guide, this will auto populate the Product Key information. Otherwise open the EnterpriseServerInstallKey.
7. Installation Type Select Back End Install (Full Enterprise Server Installation) Click Next. 8. Destination Folder You may change to another install location by clicking the Change… button otherwise accept the default location to install into. Click Next.
9. Backup Location Make sure to backup this information. You can change the location by clicking the Change… button Click Next. Note: The folder structure created by the installer during this installation step (example shown below) must remain unchanged. Note: Experience with File System Backups are assumed and therefore not covered in this document.
10. Certificate You have the choice of selecting what type of digital certificate to import into the server. Click Create a self-signed certificate and import in to key store. Click Next. 11. Create Self-Signed Certificate Fill in Information as needed. Click Next.
12. Install SSOS Certificate Click “Create a self-signed certificate and import it to key store,” Click Next. 13. Create Self-Signed Certificate You can elect to fill in additional information. But the required must be filled in. Click Next.
14. Back End Server Install Setup Check the ports being used. Click Edit Ports… 15. Edit Back End Ports This lists the ports that are used for Endpoint Security Suite Enterprise. Also refer to the Endpoint Security Suite Enterprise architecture diagram in Section 2.2 to make sure that the firewalls in your environment can accommodate the ports listed for Endpoint Security Suite Enterprise. Click OK. Click Next.
16. Database Server This is where you will configure the database connection for your environment to work. Click Browse to select the server on which to install the database. Server: someSQLDBName. Port: 1433 –default port unless this has been changed in environment. Select the authentication method for the installer to use to set up the Dell Data Protection database. After installation, the installed product does not use the credentials specified here.
The Question relates to the fact that the database does not contain the catalog that has been specified. Shown above is an example table name we used. Click Yes. 17. Service Startup Account Information Select the authentication method for the product to use. This step connects an account to the product. Windows authentication using the credentials below - Enter the credentials for the product to use, and click Next.
18. Ready to Install This is where you will proceed with the installation of the software, at this point you can use the back button to step back through, to check if you need to change any settings. Click Install. 19. InstallShield Wizard Completed Check the box Launch Remote Management Console. Click Finish.
5 Client Installation Endpoint Security Suite Enterprise client installation is performed on the master image for both persistent and non-persistent VDI solutions. 5.1 Advanced Threat Prevention (ATP) Install Note: ATP can be installed on persistent or non-persistent desktops 1. Create Master VM and install applications user will need. Install the Endpoint Security Suite Enterprise client at this point as described in section 5.7.1 and 5.7.3 following. 2.
4. Verify USB redirection in user’s session. 5. In Citrix Studio enable the following policy or add to existing policy. Policy name: USB Redirection this must be enabled for Removable Media Encryption to work. 6. Verify USB redirection in user’s session. From Citrix pull down menu located at top of VDI session, the following Icons should be visible. If the devices marked above do not appear in session menu then USB redirection is not enabled or session needs to be updated. 7.
Client Install For VDI installations, the Endpoint Security Suite Enterprise client install installs the Encryption client and Advanced Threat Prevention agent. All other software including any VDI agents must already be installed. The Endpoint Security Suite Enterprise client install and setup of registry entries must be the last task performed on the master image before deployment. The master image should not be restarted before deployment.
2. Extraction Install will continue to the Welcome screen. 3. Welcome On the Welcome screen, click Next.
4. License Agreement Review the license agreement by using the scroll bar located on the right hand side. Click Print to print agreement. Click I accept the terms of the license agreement. Click Next. 5. Dell Enterprise Server Setup This is where you will point the client to the Server you have installed in the previous section. Dell Enterprise Server Name: enterDDPEEServerNameFQDN The Dell Device Server URL will auto-populate. Click Next.
6. Choose Destination Location You can change the destination location by clicking Change…, we proceeded with the Default destination. Click Next. 7. Select Features Select Advanced Threat Protection. Click Next.
8. Ready to Install the Program You can use the back button to check or change setting before proceeding. Click Install. The installation will take some time to complete.
9. Installation Wizard Complete Default action is: Yes, I want to restart my computer now, Select No, I will restart my computer later Click Finish Do not restart or shutdown the VM at this stage. It is necessary to insert the registry entries that indicate that the client is running in a VDI environment. Client Manual and Silent Install This details the manual process to extract and install the components as needed, this covers in particular the ATP install. 1.
The following example installs the basic Dell Client Security Framework component, without the SED Management client or BitLocker Manager (silent installation, no reboot, installed in the default location of C:\Program Files\Dell\Dell Data Protection).EMAgent_XXbit_setup.exe /s /v"FEATURE=BASIC CM_EDITION=1 SERVERHOST=server.organization.com SERVERPORT=8888 SECURITYSERVERHOST=server.organization.
Windows Registry Editor Version 5.00 [HKEY_LOCAL_MACHINE\SYSTEM\CurrentControlSet\Control\Session Manager\Environment] "Dell_isVDI"=dword:1 "Dell_VDI"=dword:102 Non-Persistent VDI For master images that will be used for non-persistent VDI solutions, add the following entry to the registry on the VM immediately after installing the Endpoint Security Suite Enterprise client. Shut down the master image once the registry change has been made. Windows Registry Editor Version 5.00 [HKEY_LOCAL_MACHINE\SYSTEM\Curr
6 Endpoint Security Suite Enterprise Management Console 6.1 Remote Management Console The Remote Management Console is where you will configure licenses, enable and configure policies, and manage the environment. You must first configure the Domain and Licenses before continuing onto configuring the policies. The domain only needs to be configured once. Licenses can be added as needed for your environment.
2. Language Preference Click Set Language Preferences button. 3. Change your language preferences Click Add a language. 4. Add a Language Click English.
5. English Click English (United States). 6. Change language preference Click first language and select Move Down from menu bar so that English (United States) is first in the list as shown below.
Domain Configuration On the server where Dell Server is installed, login and open a web browser. 1. Enter https://serverNameFQDN:8443/webui/Login Use the following default username and password to access the management site. Username: superadmin Password: changeit Note: Dell advises you to change the password at your earliest convenience. 2. Domain This is where you will configure the Domain information. Select Domain from the left pane, and click Add. 3.
Host Name: domainName Port: 389 or 3268 Distinguished Name: will auto populate User Name: account to read AD – Password: passwordForAccount Alias: domainName – Click Add Click Add Domain 4. Domain Details Once the domain is configured, check the status before continuing. Make sure that Status is Good. If not, investigate immediately.
6.1.3 Licenses 1. Licenses You will need to add licenses to use in your environment. Note: License details are beyond the scope of this document. Contact your Dell Sales Representative or ProSupport for assistance. Click Choose File. 2. Choose File to Upload Highlight the license file, and click Open.
3. Upload License If license upload is successful, you will get the above dialog box, Click OK. 6.2 Policy Configuration ATP Policy Configuration 1. ATP Policy Configuration Click Enterprise in the left pane. Under Windows Threat Protection, select Advanced Threat Protection.
2. Security Policies Go to advanced settings to configure additional settings. Click Show Advanced Settings. 3. Settings Check Memory Action: Memory Protection Enabled. Add files to Exclude Specific Folders (includes subfolders) Example may be C:\DDPE Note: This document does not cover what Files, Folders need to be protected or excluded. Refer to Endpoint Security Suite Enterprise Support for VDI for policy settings for persistent and nonpersistent VDI clients. Click On to enable protection.
4. Commit Note: If single or multiple changes are made, you will need to save these changes for each policy and then commit these changes for them to be updated. Click Commit in the left pane. Dell recommends that you to add a comment about policies you have changed and reasons for the changes. Click Commit Policies. 5. Verify ATP is Enabled After policy changes are committed, Advanced Threat Protection should show a Red flag and Green Check Mark.
ATP Client Verification 1. Client verification on client desktop. Logon to client desktop and look for the above icon. Double-clickthe DDP Console icon. 2. ATP Client Click the Advanced Threat Protection tile as highlighted above. 3.
To check that Advanced Threat Prevention is ienabled for client. Protection Status: Protected Advanced Threat Protection: Enabled Memory Protection: Enabled Policy Based Encryption Configuration 1. Policy Based Encryption Configuration Click Enterprise in the left pane. Under Windows Encryption, select Policy-Based Encryption. 2.
Refer to Endpoint Security Suite Enterprise Support for VDI for policy settings for persistent and nonpersistent VDI clients. Set Policy-Based Encryption to On. Click Save. 3. Commit Policy Click Commit in the left pane. Dell recommends that you to add a comment about policies you have changed and reasons for the changes. Click Commit Policies. 4. Verify policy is active After policy changes are committed, Policy-Based Encryption should show a Red flag and Green Check Mark.
PBE Client Verification 1. Verify PBE on Client Open File Explorer and navigate to the user’s home directories. Note: The Citrix (P:) is the Personal vDisk for persistent virtual machines drive letter may change in customers environment. Double-click on drive “Citrix (P:)” 2. Encrypted files Note: Key icons show that the files are encrypted.
3. Properties Right click any file that shows the encryption icon in the user’s documents. Click Properties. 4. Encryption Properties. Click the Encryption tab. 5. File Encrypted properties This indicates that the file is encrypted.
6. Folder encryption When accessing the path C:\users\, the encryption icon indicates that Desktop, Documents and Downloads are encrypted folders. 7. File View When accessing the path C:\users\ \Documents folders, you will notice that the encryption icons are missing. Right-click on the book2 excel spread sheet and select Properties.
8. File Properties Select the Encryption tab. 9. Encryption Properties You will notice that the fields are blank, and not like our earlier example where the fields are populated. Note: This is due to this being a file system junction that has been created for redirection of the Users home folders to point to the Personal vDisk (PvD).
EMS Policy Configuration 1. Removable Media Policy Configuration Click Enterprise in the left pane. Select Removable Media Encryption. 2. Windows Media Encryption Refer to Endpoint Security Suite Enterprise Support for VDI for policy settings for persistent and nonpersistent VDI clients. Set Windows Media Encryption to On. Click Save.
3. Commit Click Commit in the left pane. Dell recommends that you to add a comment about policies you have changed and reasons for the changes. Click Commit Policies. 4. Verify Removable Media After policy changes are committed, Windows Media Encryption should show a Red flag and Green Check Mark.
5. When the removable media is plugged into the client, an Unprotected Media Found dialog displays. Click “Yes”. This will create a vault on the removable media. If you select No, you will be able to access the removable media but will not be able to add any files or folders to the media. 6. Enter New Password New Password: thisIsYourPassword Retype Password: thisIsYourPassword Click OK.
7. Shielding External Device Note: Files already on the device will not be encrypted. Only new files that are added to the media will be encrypted. Wait for the process to complete before continuing.This may take a while. 8. External Media Device Protected Click OK. At this point, you can proceed to copy file to external media, and the files will automatically be encrypted. 9.
7 Appendix 7.1 List of features supported by Endpoint Security Suite Enterprise Feature Persistent/Non-Persistent VDI Physical PC System Data Encryption Not supported Supported Policy-Based Encryption Supported Supported Removable Media Encryption Supported Supported Self-Encrypted Disk Not supported If hardware is available.
7.2 Prevent Master Image Activation prior to deployment or pool update (Recompose) The following actions will prevent the master image from activating if the master image is restarted or updated before a recompose. This also will prevent conflicts on the Dell Server. Turn off Encryption client activation by choosing Policy-Based Encryption on the Enterprise Menu. Choose Show advanced settings, clear the “Allow Activations” check box, and click Save.
7.3 Recommended VDI Policies Please see the following location for Dell Data Protection | Endpoint Security Suite Enterprise addendum. http://www.dell.com/support/home/us/en/04/product-support/product/dell-dp-endpt-security-suiteenterprise/manuals?rvps=y 7.