
Deployment Guide
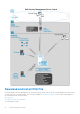
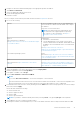
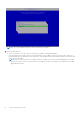
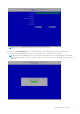
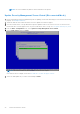
Table Of Contents
- Dell Security Management Server Virtual Quick Start and Installation Guide v11.1.1
- Contents
- Quick Start Guide
- Detailed Installation Guide
- About Security Management Server Virtual
- Contact Dell ProSupport
- Requirements
- Download and Install OVA File
- Open Management Console
- Install and Configure Proxy Mode
- Basic Terminal Configuration Tasks
- Advanced Terminal Configuration Tasks
- Maintenance
- Troubleshooting
- Post-Installation Configuration
- Management Console Administrator Tasks
- Ports

1. Navigate to the Drivers and downloads page for the appropriate product listed above.
2. Click Drivers & downloads.
3. Select the appropriate VMware ESXi version.
4. Download the appropriate bundle.
To install the OVA file:
Before you begin, ensure that all system and virtual environment Requirements are met.
1. Do one of the following:
VMware In the Dell installation media, locate Security Management
Server Virtual v11.x.x Build x.ova and double-click to import
into VMware.
Follow the on-screen instructions.
NOTE: If the import fails when using VMware, then
the web client is the suggested path for importing
the OVA file. For more information, see https://
kb.vmware.com/s/article/2151537.
Hyper-V
Follow instructions for Windows
10 https://docs.microsoft.com/en-us/virtualization/hyper-
v-on-windows/about/.
Requirements:
● Generation 1 virtual machine
● Security Management Server Virtual comes in VHDX
format. A disk should not be defined, and the disk should
be added to the virtual machine after it is created within
Hyper-V.
See https://docs.microsoft.com/en-us/
windows-server/virtualization/hyper-v/get-started/create-
a-virtual-machine-in-hyper-v.
Server-based Operating Systems Follow
instructions: https://docs.microsoft.com/en-us/windows-
server/virtualization/hyper-v/get-started/install-the-hyper-
v-role-on-windows-server.
ESXi
Follow instructions:https://kb.vmware.com/s/article/
2109708
OVA import process:
See https://docs.vmware.com/en/VMware-vSphere/6.7/
com.vmware.vsphere.html.hostclient.doc/GUID-FBEED81C-
F9D9-4193-BDCC-CC4A60C20A4E_copy.html.
2. Power on Security Management Server Virtual.
3. Select the language for the license agreement, and select Display EULA.
4. Read the agreement, and select Accept EULA.
5. If an update is available, select Accept.
6. Select Connected Mode or Disconnected Mode.
NOTE:
If you select Disconnected Mode, it can never be changed to Connected mode.
Disconnected mode isolates the Dell Server from the Internet and an unsecured LAN or other network. All updates must
be performed manually. For more information about Disconnected mode and policies, refer to AdminHelp.
7. In Set delluser Password, enter the current (default) password, delluser, then enter a unique password, re-enter the unique
password, and select Apply.
Passwords must include the following:
● At least 8 characters
● At least 1 uppercase letter
● At least 1 digit
● At least 1 special character
NOTE: It is possible to retain the default password by selecting Cancel, or by pressing Escape on the keyboard.
8. Select close to enter into configure hostname window.
9. In Configure Hostname, use the backspace key to remove the default hostname. Enter a unique hostname and select OK.
Detailed Installation Guide
13