
Users Guide


Type the VLAN IDs, IP addresses, netmask, and gateway for ESXi, Virtual SAN, vSphere vMotion,
vCenter Server, and VM Networks from Rows 8–24.
• Passwords
Type ESXi hosts and vCenter Server passwords from Row 25. Type the Active Directory (optional)
domain, username and password from Row 26.
• Globals
Type your time zone and your existing NTP and DNS server(s) from Rows 27–29. For logging, enter
the IP address and hostname for Log Insight or for an existing third-party syslog server (optional) in
your network (Row 31). Type the name, port, username, and password for your proxy server (optional)
from Row 30.
• Qualified EVO:RAIL Partner Integrated Solution (optional)
Type one or two IP addresses from Row 32 for the VMs required by a Dell integrated solution.
Initial configuration walk-through
Use the information from your EVO:RAIL Network Configuration Table when you do the following:
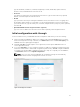
1. Browse through the EVO:RAIL IP address (for example, https://192.168.10.200:7443). If you view a
browser message about security certificates, click Advanced, and then click Proceed anyway. The
EVO:RAIL welcome splash page is displayed.
2. Click Yes, Let’s Go!. Read through the license agreement, and accept the EVO:RAIL End-User
License Agreement (EULA).
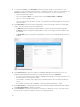
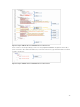
3. If you click Customize, you can configure hostnames, IP addresses, VLAN IDs, and passwords. Most
fields have default values to make initial configuration quick and easy. Just Go configures EVO:RAIL
according to the default JSON configuration file and go to Step 11. To upload your own JSON file,
click
Customize, and then click Upload Configuration.
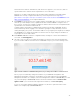
NOTE: There is no save option in EVO:RAIL. All configuration changes are automatically
validated and saved when changing between fields or screens.
Figure 10. Configure hostnames
31