
Users Guide


9. Click Validate. EVO:RAIL verifies the configuration data, and checks for conflicts. After validation is
successful, click Build Appliance.
10. This step is only necessary if you change the IP address of vCenter Server!
If you set a new IP address for vCenter Server or EVO:RAIL in step 5 before you proceed, you must
manually change the IP address of your client workstation or laptop to a new address on the same
subnet as the new management IP address. For example, if the new management IP address is
10.10.10.200, you can set your client laptop IP address to 10.10.10.210 return to the browser
window and click
Take me to it! . If you encounter a browser message about certificates, click
Proceed anyway.
If you click the browser window before you reconfigure your client laptop, browser does not find
EVO:RAIL. If you close the browser window and later want to go to EVO:RAIL, type the IP address
you configured earlier that is https://10.10.10.200:7443)
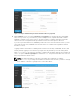
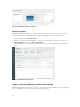
Figure 9. New IP address for management, if you change the IP address of vCenter Server
11. Finishing up: Building your appliance!
EVO:RAIL implements data services, creates the new ESXi hosts, and configures the vCenter Server.
When you view the Hooray! screen, click the IP address to continue to EVO:RAIL Management. You
should also bookmark this IP address in your browser for later use.
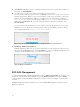
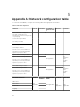
Figure 10. Finished configuration
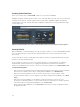
EVO:RAIL Management
To view and manage VMs, EVO:RAIL Management consists of VMS and Create VM in the left pane. Users
visualize the status and tasks in the EVO:RAIL system with Health and Tasks in the left pane. Config
controls logging, licensing, updating, and language selection. To view these features, click icons in the
left pane.
EVO:RAIL Management handles automatic scale-out with Add EVO:RAIL Appliance whenever a new
appliance is detected.
22