
Users Guide


according to the default JSON configuration file and go to Step 11. To upload your own JSON file,
click Customize, and then click Upload Configuration.
NOTE: There is no save option in EVO:RAIL. All configuration changes are automatically
validated and saved when changing between fields or screens.
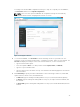
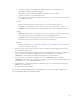
Figure 11. Configure hostnames
4. To customize EVO:RAIL, click Hostnames to define a naming scheme for your ESXi hosts. The
hostname consists of an ESXi hostname prefix , a Separator, an Iterator, and a Top-level domain. The
Preview field displays an example of the result of the first ESXi host, see the screenshot here.
• Type the ESXi hostname prefix.
• Select the Separator (None or a - dash), and the Iterator (Alpha, Num X, or Num 0X).
• Type the Top-level domain name.
• Type the vCenter Server hostname. The top-level domain is automatically applied to the vCenter
Server hostname.
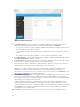
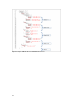
5. Click Networking to specify IP and/or VLAN details for each network type: ESXi hosts, Virtual SAN,
vSphere vMotion, vCenter Server, and VM Networks.
• In ESXi hosts, type the starting and ending address for IP pool, netmask, and default gateway.
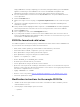
• In vMotion, type the starting and ending address for IP pool, the vSphere vMotion VLAN ID, and
the netmask.
• In Virtual SAN, type the starting and ending address for IP pool, the Virtual SAN VLAN ID, and the
netmask.
33