
Users Guide


11. Click Validate. EVO:RAIL verifies the configuration data, checking for conflicts. After validation is
successful, click Build Appliance.
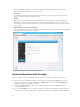
12. This step is only necessary if you change the IP address of vCenter Server from the default value.
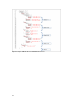
If you set a new IP address for vCenter Server or EVO:RAIL in step 6, you see the following screen:
Figure 13. New IP address for EVO:RAIL Management, if you change the IP address of vCenter Server
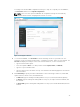
Before you proceed, manually change the IP address of your EVO:RAIL Configuration and
Management workstation or laptop to a new address on the same subnet as the new EVO:RAIL
Management IP address. (For example, if the new management IP address is 10.10.10.200, you could
set your client laptop to 10.10.10.210). Return to the browser window and click Continue with
appliance build. If you see a browser message about certificates, click Proceed anyway.
If you lose connectivity during the appliance build process, browse to port 7443 on the new IP
address. (for example, https://10.10.10.200:7443).
CAUTION: If EVO:RAIL cannot connect to the new IP address that you configured, you get a
message to fix your network and try again.
CAUTION: If you are not able to connect to the new IP address after 20 minutes, EVO:RAIL
reverts to its original configuration and re type your custom configuration.
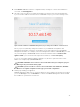
13. Finishing up: Building your appliance!
EVO:RAIL implements data services, creates the ESXi hosts, and configures the vCenter Server. When
you see the Hooray! screen, click IP address to continue to EVO:RAIL Management. Also bookmark
this IP address in your browser for future use.
35