
White Papers


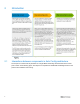

Table Of Contents
- 1 Zero-Touch Overview
- 2 Introduction
- 2.1 Interactions between components in Auto Config architecture
- 2.2 DHCP provisioning options
- 2.3 DHCP—current and new configuration options
- 2.4 Prerequisites for enabling Auto Config
- 2.5 iDRAC interfaces to enable Auto Config
- 2.5.1 Enabling Auto Config using RACADM (local or remote)
- 2.5.2 Enabling Auto Config using Redfish
- 2.5.3 Enabling Auto Config using iDRAC UI
- 2.6 Using Auto Config in an IPv6 Network
- 2.7 Server Configuration Profiles
- 3 Performing Firmware Repository Update During Auto Config
- 4 Performing Operating System Deployment During Auto Config
- 5 Configuring Windows and Linux DHCP servers to support Auto Config
- 5.1 Auto Config Server Configuration Profile String Format for DHCP Option 43 and DHCPv6 Option 17
- 5.2 Configuring Windows DHCP server option 43
- 5.3 Configuring Windows DHCP server option 60
- 5.4 Configuring Windows DHCPv6 server options 16 and 17
- 5.5 Configuring a Linux DHCP server
- 5.6 Configuring a Linux DHCPv6 Server
- 6 File naming behavior with iDRAC Auto Config
- 7 Workflow Examples
- 8 Troubleshooting Auto Config issues
- 9 Conclusion
- A Technical support and resources

10
2.3 DHCP—current and new configuration options
The following table describes the action the iDRAC takes when the Auto Config setting is modified from one
state to another:
Auto Config State Transitions
Current Setting
New Setting
Disable
Enable Once
Enable Once after
Reset
Disable
Do nothing
Restart DHCP
process. Disable
on completion.
Wait for iDRAC
reset, then Enable
Once.
Enable Once
Disable
No change
Wait for iDRAC
reset, then Enable
Once.
Enable Once after
Reset
Disable
Restart DHCP
process. Disable
on completion.
No change
2.4 Prerequisites for enabling Auto Config
Before enabling the Auto Config feature, ensure that the following are already set up in the test
environment:
• Create a supported network share (NFS, CIFS, HTTP, or HTTPS) on the same subnet as the iDRAC
and DHCP server. Test the network share to ensure it can be accessed and that the firewall and user
or share permissions have been set up correctly.
• The Server Configuration profile is exported to the supported network share. For more information,
see Getting Server Configuration Profiles
in this technical white paper. Also, ensure that all the
necessary changes in the profile are made to ensure that proper settings are applied when the Auto
Config process is initiated.
• Firmware update on import: The Server Configuration profile can include a reference pointer to a
firmware repository stored on the same network share as the profile file itself. When the profile is
imported, iDRAC updates the firmware. The iDRAC ensures that the server matches the firmware
versions within the repository, including downgrades. For more details on firmware updates within
profile imports, see Performing firmware update during Auto Config
in this technical white paper.
Note: Requires iDRAC9 firmware versions 3.18.18.18 and later.
• The DHCP server is set up, and the DHCP configuration is updated as required for iDRAC to call
DHCP server and run Auto Config feature. For more information, see
Configuring Windows and Linux
DHCP servers to support Auto Config.
Note: The procedure to fulfill these prerequisites is described later in this white paper. Also, a workflow is
provided for validation of the Auto Config environment.