
Install Guide


5 NAS Service Configuration
After completing the EqualLogic FS7500 hardware installation, you can configure a NAS service.
Steps for Configuring a NAS Service
Follow these steps for configuring a NAS service:
1. Gather the information needed to complete the NAS service configuration. See Gathering the NAS Service
Configuration Information on page 49.
2. Complete Table 17 on page 53.
3. Use the Group Manager GUI to discover each FS7500 Controller that you want to include in the NAS
service and then start the Configure NAS Service wizard. See Discovering Controllers and Configuring a
NAS Service on page 54.
When the NAS Service Configuration wizard completes, the group begins to configure the NAS service. The
NAS Service Configuration – Progress window appears, enabling you to track the progress of the service
configuration.
The PS Series group remains fully operational during the NAS service configuration.
After you successfully configure a NAS service, you can create multiple NAS file systems. See Chapter 6, NAS
Storage Allocation.
Gathering the NAS Service Configuration Information
Before beginning the NAS service configuration, obtain the following:
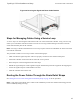
• Service tag for each FS7500 Controller you want to add to the NAS service.
You must add controllers (NAS nodes) to a NAS service in pairs. The service tag identifies a controller. The
service tag appears on the pullout card on the front of the controller (see Figure 3 on page 8), and in the
LCD screen on the front panel of a powered-on controller.
Reading the service tag number from the card is the simplest way to collect the controller information.
However, if the service tag pull-out card is missing or the information is not printed on it, you can get the
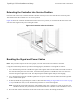
service tag information from the LCD. See Using the LCD Screen to Display Service Tag Information on
page 50.
• Initial size of the NAS reserve and the storage pool from which to consume the space.
49