
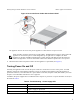
Owners Manual


The controller powers on automatically, which can take several minutes. (For LED states during power-on, see
Appliance Back-Panel Features on page 2). After the controller is powered on, reattach the controller through
the Group Manager GUI or CLI. For information, see the Dell EqualLogic Group Manager Administrator's
Manual.
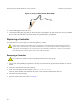
Installing an SFP+ Tranceiver
1. Position the transceiver so that its key is oriented correctly to the port.
2. Gently insert the transceiver into the port until it is firmly seated and the latching mechanism clicks. If the
transceiver does not slide in easily, make sure the key is in the correct position.
3. Align a network cable with the transceiver port and insert the cable. Cables are keyed so they can only be
inserted correctly.
4. Bring the appliance back online to check the connections.
Replacing a Power Supply
The FS7600 NAS appliance contains two hot-swappable 717W AC power supply modules. If one supply fails,
you can replace it while the appliance remains online.
Although the appliance continues to function with only one working power supply, Dell recommends that
you replace a failed power supply as soon as possible. The second power supply ensures continued
operation and high availability in the event of a power or power supply failure.
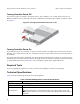
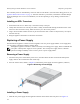
Removing a Power Supply
1. Disconnect the power cord from the power source, then disconnect the other end from the failed power
supply. Remove the cord from the strain relief strap.
2. Press the release latch (callout 1 in Figure 9) and slide the power supply out of the appliance (callout 2).
Figure 9: Removing a Power Supply
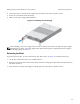
Installing a Power Supply
1. Slide the new power supply into the appliance until the release latch clicks into place. See Figure 10.
12
Dell EqualLogic FS7600 Hardware Owner's Manual 2 Replacing Components