
Setup Guide


PS Series 3000 QuickStart Steps for Setting Up and Using an Array
2
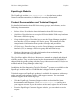
At a minimum, a group consists of one array with one network connection,
but you can configure three network interfaces for maximum array bandwidth.
Data and network I/O are automatically load balanced across disks and
interfaces—with no impact on data availability.
PS Series Group With Multiple Members
You can easily increase group capacity and bandwidth by adding arrays. When an
array is added to a group, it obtains the group configuration from the existing
members. Once you choose a RAID policy for the member, the pool is
automatically expanded, and volume data and network I/O are load balanced
across the pool members’ disks and network connections. Volumes continue
to be accessible through the same iSCSI targets, and no host modifications are
necessary. Management overhead remains the same, regardless of the group size.
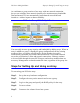
Steps for Setting Up and Using an Array
To start using your PS Series array:
Step 1. Set up the array hardware configuration.
Step 2. Configure the array on the network and create a group.
Step 3. Log in to the group and specify the RAID policy for the array.
Step 4. Create a volume.
Step 5. Connect to the volume from a host system.