
Owners Manual


PS3000 Series Hardware Maintenance Maintaining Disks
2–6
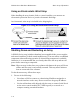
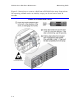
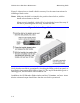
Figure 2-4 shows how to install a disk in an array. Use the same instructions for
installing a blank carrier.
Notes: Make sure the disk is oriented in the position shown below, with the
handle release button to the left.
When correctly installed, a disk will be level with the front of the array. If
the disk is protruding from the array, reinstall the disk.
Figure 2-4: Installing a Disk
Verify that the new disk is operational by checking the LEDs on the front panel, as
described in Interpreting Disk LEDs on page 2-1. The top LED should be green or
flashing green, and the bottom LED should be off.
In addition, the GUI Member Disks window and the CLI
member select show
disks
command output should show that the new disk is operational.