
Owners Manual


PS3000 Series Hardware Maintenance Maintaining Power Supply/Cooling Modules
4–2
Identifying Power Supply and Cooling Module Failures
A failure on a power supply and cooling module can be indicated by the
following:
• A power supply and cooling module LED is orange. See Interpreting Power
Supply and Cooling Module LEDs on page 4-1.
• Message on the console, in the event log, or in the Group Manager GUI
Alarms panel describes a power supply and cooling module failure.
• GUI Member Enclosure window or the CLI
member select show
enclosure
command shows a power supply and cooling module failure.
Power supply and cooling module 0 refers to the module on the right side of the
array back panel (when facing the back of the array). Power supply and cooling
module 1 refers to the module on the left side. See Figure 1-2 on page 1-1 for
details.
Removing a Power Supply and Cooling Module
If a power supply and cooling module fails, you must replace the module as soon
as possible, although an array can operate with only one working module. To
ensure proper cooling, do not remove a failed module until you are ready to
replace it.
You can remove a power supply and cooling module from an array without
affecting array operation if the second module is installed and functioning.
Otherwise, if possible, cleanly shut down the array before removing the module,
as described in Shutting Down and Restarting an Array on page 1-4.
Caution: After installing a power supply and cooling module, wait until the new
module initializes before removing the other module. New module
initialization can take from one to ten seconds. Completion is indicated
by the green power LED and event log messages stating that fans have
returned to their normal speed.
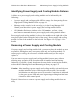
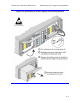
Figure 4-2 shows how to remove a power supply and cooling module from an
array.