
Users Guide
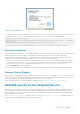
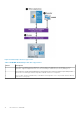
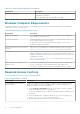
Table Of Contents
- About This Guide
- Dell EqualLogic Auto-Snapshot Manager/Microsoft Edition Version 5.4 User's Guide
- Introduction to ASM/ME
- Functions Provided By ASM/ME
- Supported Applications
- HIT Groups and Multiple Machine Management
- ASM/ME Smart Copies
- Smart Copy Types
- Smart Copy Operations for Template and Thin Clone Volumes
- Robust Data Recovery
- Thin-Provisioning a Volume
- SAN Data Copy Offload
- Scripts and Command Generation
- Alerts and Event Notification
- Remote Installations
- Failover Cluster Support
- ASM/ME and the Virtual Snapshot Service
- Functions Provided By ASM/ME
- Configure ASM/ME
- PS Series Group Requirements
- Windows Computer Requirements
- Required Access Controls
- VSS/VDS Service Access to the Group
- Access to Volumes and Snapshots
- iSCSI Target Connections
- Volume Mount Point and Drive Letter Assignments
- Mount Point Constraints in Cluster Environments
- ASM/ME Settings
- ASM/ME Graphical User Interface
- Start the ASM/ME GUI
- Tree Panel
- Tree Panel Behavior in Failover Cluster Environments
- Tree Panel Nodes
- Tree Panel Icons
- Group SharePoint Farm Nodes, Clusters, or Host Nodes
- About Aliases
- Customize Color Themes
- HIT Groups
- General ASM/ME Operations
- About Volumes
- Operations on Failover Clusters
- About Collections
- About Schedules
- About Smart Copies
- Restoring Data
- View Multipath Information
- View I/O Details
- Using ASM/ME with Exchange
- View Exchange Applications in ASM/ME
- Exchange Operations
- Overview of Exchange Smart Copies
- Exchange eseutil.exe Utility
- Recovery Considerations for Exchange
- Checksum Verification and Soft Recovery
- Run Checksum Verification and Soft Recovery Immediately
- Run Checksum Verification and Soft Recovery After Smart Copy Creation
- Schedule a Global Verification Task for Checksum Verification and Soft Recovery
- Run Checksum Verification and Soft Recovery on a Remote Host
- View Checksum Verification and Soft Recovery Status
- Checksum Verification and Soft Recovery Logging and Notification
- Create Exchange Smart Copies
- Schedule Smart Copies for Exchange Components
- Recover Exchange Data
- Using ASM/ME with SQL Server
- Using ASM/ME with Hyper-V
- Using ASM/ME with SharePoint
- SharePoint Installation Considerations
- Plan to Install on a SharePoint Farm
- Example of ASM/ME Installed on a SharePoint Farm
- Example of a SharePoint Farm with a SQL Cluster
- Install ASM/ME on a SharePoint Farm
- About Changes to an Existing SharePoint Farm
- Remove a HIT Group Host From a SharePoint Farm
- Add a Writer Host to a SharePoint Farm
- Change a Writer Host in a SharePoint Farm
- Change the Writer Host and Disable the VSS Writer in a SharePoint Farm
- Respond to Changes in a SharePoint Farm
- View SharePoint Farm Components in ASM/ME
- SharePoint Smart Copies
- Restore Options for SharePoint Smart Copies
- Availability of SharePoint Data Restoration Operations
- Mount a SharePoint Smart Copy
- Restore Selected Databases from a SharePoint Smart Copy
- Restore a Database In-Place From a SharePoint Smart Copy
- Restore a Database From a SharePoint Smart Copy as a New Database
- Restore an SSA From a SharePoint Smart Copy
- Using the Command Line Interface
- Introduction to ASMCLI
- How to Use ASMCLI Commands
- General Command Syntax
- ASMCLI Command Summary
- Command Parameters
- ASMCLI Commands and Their Syntax
- ASMCLI -alert
- ASMCLI -breaksmartcopy
- ASMCLI -cloneReplica
- ASMCLI -configureASM
- ASMCLI -configureCHAP
- ASMCLI -createCollection
- ASMCLI -delete
- ASMCLI -deleteCollection
- ASMCLI -enumerateiSCSIPortals
- ASMCLI -enumerateSmartCopies
- ASMCLI -help
- ASMCLI -list
- ASMCLI -modifyCollection
- ASMCLI -mount
- ASMCLI -Properties
- ASMCLI -restore
- ASMCLI -selectiveRestore
- ASMCLI -shutdownsystray
- ASMCLI -shutdownverifier
- ASMCLI -smart
- ASMCLI -unmount
- ASMCLI -verify
- ASMCLI -version
- Use a Script to Create Smart Copies
- Recover a Clustered Volume From a Clone
- Index

A PS Series group uses access control records to restrict computer access to a volume or its snapshots. A record (up to 16 for a
volume and its snapshots) can restrict access according to IP address, initiator name, CHAP user name (and password), or any
combination of the three. A computer must meet all the requirements in a record to access the volume or snapshot. By default,
a volume and its snapshots share a list of access control records. A record can apply to the volume, the volume snapshots, or
both. For example, you could create one record that allows access only to the volume and create another record that allows
access only to the volume snapshots.
The following methods ensure computer access to a volume or its snapshots:
● Storage Manager for SANs—When you create a volume with Storage Manager for SANs, it automatically sets up matching
access controls in the PS Series group and on the computer. No further action is needed to ensure computer access to the
volume or its snapshots.
● CHAP accounts—When you create a volume with the Group Manager GUI or CLI, you must manually set up one or more
access control records that enable computer access to the volume or its snapshots. Also, when you use CHAP to restrict
computer access, you must set up a local CHAP account or configure a RADIUS server that already has the CHAP account
configured. See the Dell EqualLogic Group Manager Administrator’s Guide for more information about setting up access
control records and creating local CHAP accounts.
If CHAP is required for computer access to the volume, you can supply the CHAP user name and password in the iSCSI
initiator control panel when logging in to the volume. If CHAP is required for computer access to volume snapshots (for
importing), you must use the ASM/ME or the Remote Setup Wizard to specify the CHAP user name and password. The
computer automatically uses this CHAP user name and password when importing any Smart Copies from the PS Series
group. See About PS Group Access Settings for more information.
When a computer imports a Smart Copy, it must be able to log in without user intervention.
iSCSI Target Connections
Use the iSCSI initiator console to log in to a PS Series group volume or snapshot (iSCSI target). For discovery, the group IP
address must be configured as the iSCSI target discovery address.
To log in to a volume, the computer must match an access control record that is configured in the group, as described in Access
to Volumes and Snapshots. If access to the volume is being authenticated with CHAP, enter the correct CHAP user name and
password in the iSCSI initiator console when logging in to the volume. After you are logged in to a volume, the volume appears
as a regular iSCSI disk.
Volume Mount Point and Drive Letter Assignments
To make a volume accessible to the computer, you can use Windows utilities to assign either a drive letter or a mount point to it.
A mount point is a drive attached to an empty folder on an NTFS or ReFS volume. A mount point functions the same as a normal
drive, but is given a label or name instead of a drive letter. Although Windows allows you to mount a volume on multiple mount
points, you should mount a Smart Copy only on a single mount point.
NOTE: Unmounting a volume or Smart Copy using ASM/ME unmounts all existing mount points.
To assign a drive letter or mount point using Windows Server:
1. Select the Windows Disk Management Utility.
2. Right-click the volume.
3. Follow the wizard to assign a drive letter or mount point
Windows also supports a command-line utility called mountvol.exe for assigning mount points and drive letters to a
volume. See your Windows documentation for details.
Mount Point Constraints in Cluster Environments
In a cluster, the use of drive letters for a volume operation (such as mounting a snapshot or creating an RGS) is subject to the
following restrictions:
● ASM/ME excludes drive letters that are used by (potentially) failed-over disks.
● ASM/ME excludes the drive letter assigned to the quorum disk.
18
Configure ASM/ME