
Users Guide

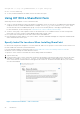
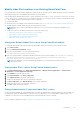


Table Of Contents
- Dell EqualLogic Host Integration Tools for Microsoft Edition Version 5.4 Installation and User's Guide
- About This Guide
- Introduction to Host Integration Tools
- Installation
- Obtain the Installation Kit
- Installation Considerations
- Install Host Integration Tools for Microsoft
- Install HIT/Microsoft on a Windows Server Core Machine
- Install HIT on a Windows Server Core Cluster
- About Remote Host Installations
- Install HIT on a Failover Cluster
- About Silent Installations
- Using HIT With a SharePoint Farm
- Remote Setup Wizard
- Remote Setup Command Line Utility
- Using the Multipath I/O Component
- Use the VDS Provider
- Use SCVMM With the Dell EqualLogic SMP
- Install the Dell EqualLogic Storage Management Provider
- Configure the Dell EqualLogic Storage Management Provider
- Create a Classification for Dell EqualLogic Storage Resources
- Import the SMP Through the SCVMM GUI
- Configure PS Series Groups
- Configure Group Access on Managed Hosts and Clusters
- Configure Storage for VM Rapid Provisioning
- Create a VM Template From a VHD
- Migrate the Rapid-Provisioned VMs
- Migrate Storage of a Deployed VM to Another Location
- Troubleshoot SCVMM Issues
- Supported SMP PowerShell Cmdlets
- Use the HPC iSCSI Provider
- Tools and Utilities
- Index

Initialize an Array and Create a PS Series Group
1. Gather the information described in Information Required for Initializing a PS Series Array.
2. Click Start → All Programs → EqualLogic → Remote Setup Wizard.
3. Select Initialize a PS Series array, then click Next. RSW discovers and lists all uninitialized arrays that are accessible to
the computer. If no arrays appear, click the Rediscover button.
4. Select a PS Series array from the list, then click Next. You can also search for a specific array or sort the list of arrays. For
information on how to search for a specific array, see Search for a PS Series Array Using RSW.
5. Specify the member information (Member Name, IP Address, Subnet Mask, and Default Gateway).
6. Select the Create a new group option, then click Next.
7. Typethe group information in the required fields, then click Next.
8. Click OK.
The next screen displays a message stating that the array has been successfully initialized and the PS Series group has been
created.
9. Click Finish to exit the wizard.
● Click View Log to view a summary of the array configuration.
● Click Next to configure additional arrays.
NOTE: If a problem occurs during the RSW setup, see Troubleshoot RSW.
Initialize an Array and Add It to an Existing Group
1. Obtain the information described in Information Required for Initializing a PS Series Array.
2. Click Start → All Programs → EqualLogic → Remote Setup Wizard.
3. Select Initialize a PS Series array, then click Next. RSW discovers and lists all uninitialized arrays that are accessible to
the computer. If no arrays appear, click the Rediscover button.
4. Select a PS Series array from the list, then click Next. You can also search for a specific array or sort the list of arrays. For
information on how to search for a specific array, see Search for a PS Series Array Using RSW.
5. Specify the member information (Member Name, IP Address, Subnet Mask, and Default Gateway).
6. Select the Join an existing group option, then click Next.
7. Type the group name, IP address, and membership password, then click Next.
When the array joins the group, a message is displayed stating that the new member was successfully added to the group.
8. Perform one of the following steps:
● Click Yes to open the Group Manager GUI so that you can configure a RAID policy for the new member.
● Click No to configure RAID at a later time. Use the Group Manager GUI or CLI to set the RAID policy for the new group
member. For more information, see the Dell EqualLogic Group Manager Administrator’s Guide or Dell EqualLogic Group
Manager CLI Reference Guide.
9. Click Finish to exit the wizard.
● Click View Log to view a summary of the array configuration.
● Click Next to initialize additional arrays.
NOTE:
If a problem occurs during the RSW setup, see Troubleshoot RSW. When you exit RSW, it configures the group
IP address as an iSCSI target discovery address. This configuration enables the computer to discover volumes and
snapshots (iSCSI targets) in the group.
Troubleshoot RSW
If the Remote Setup Wizard is interrupted while initializing an array and the operation fails, you must reset the array before
running the wizard again. To reset an array:
1. Connect the serial cable that shipped with the array between the active control module and a console terminal, or a
computer running a terminal emulator.
2. Enter the reset command and wait for the reset operation to complete.
28
Remote Setup Wizard