
Users Guide

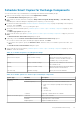
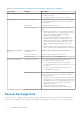


Table Of Contents
- About This Guide
- Dell EqualLogic Auto-Snapshot Manager/Microsoft Edition Version 5.4 User's Guide
- Introduction to ASM/ME
- Functions Provided By ASM/ME
- Supported Applications
- HIT Groups and Multiple Machine Management
- ASM/ME Smart Copies
- Smart Copy Types
- Smart Copy Operations for Template and Thin Clone Volumes
- Robust Data Recovery
- Thin-Provisioning a Volume
- SAN Data Copy Offload
- Scripts and Command Generation
- Alerts and Event Notification
- Remote Installations
- Failover Cluster Support
- ASM/ME and the Virtual Snapshot Service
- Functions Provided By ASM/ME
- Configure ASM/ME
- PS Series Group Requirements
- Windows Computer Requirements
- Required Access Controls
- VSS/VDS Service Access to the Group
- Access to Volumes and Snapshots
- iSCSI Target Connections
- Volume Mount Point and Drive Letter Assignments
- Mount Point Constraints in Cluster Environments
- ASM/ME Settings
- ASM/ME Graphical User Interface
- Start the ASM/ME GUI
- Tree Panel
- Tree Panel Behavior in Failover Cluster Environments
- Tree Panel Nodes
- Tree Panel Icons
- Group SharePoint Farm Nodes, Clusters, or Host Nodes
- About Aliases
- Customize Color Themes
- HIT Groups
- General ASM/ME Operations
- About Volumes
- Operations on Failover Clusters
- About Collections
- About Schedules
- About Smart Copies
- Restoring Data
- View Multipath Information
- View I/O Details
- Using ASM/ME with Exchange
- View Exchange Applications in ASM/ME
- Exchange Operations
- Overview of Exchange Smart Copies
- Exchange eseutil.exe Utility
- Recovery Considerations for Exchange
- Checksum Verification and Soft Recovery
- Run Checksum Verification and Soft Recovery Immediately
- Run Checksum Verification and Soft Recovery After Smart Copy Creation
- Schedule a Global Verification Task for Checksum Verification and Soft Recovery
- Run Checksum Verification and Soft Recovery on a Remote Host
- View Checksum Verification and Soft Recovery Status
- Checksum Verification and Soft Recovery Logging and Notification
- Create Exchange Smart Copies
- Schedule Smart Copies for Exchange Components
- Recover Exchange Data
- Using ASM/ME with SQL Server
- Using ASM/ME with Hyper-V
- Using ASM/ME with SharePoint
- SharePoint Installation Considerations
- Plan to Install on a SharePoint Farm
- Example of ASM/ME Installed on a SharePoint Farm
- Example of a SharePoint Farm with a SQL Cluster
- Install ASM/ME on a SharePoint Farm
- About Changes to an Existing SharePoint Farm
- Remove a HIT Group Host From a SharePoint Farm
- Add a Writer Host to a SharePoint Farm
- Change a Writer Host in a SharePoint Farm
- Change the Writer Host and Disable the VSS Writer in a SharePoint Farm
- Respond to Changes in a SharePoint Farm
- View SharePoint Farm Components in ASM/ME
- SharePoint Smart Copies
- Restore Options for SharePoint Smart Copies
- Availability of SharePoint Data Restoration Operations
- Mount a SharePoint Smart Copy
- Restore Selected Databases from a SharePoint Smart Copy
- Restore a Database In-Place From a SharePoint Smart Copy
- Restore a Database From a SharePoint Smart Copy as a New Database
- Restore an SSA From a SharePoint Smart Copy
- Using the Command Line Interface
- Introduction to ASMCLI
- How to Use ASMCLI Commands
- General Command Syntax
- ASMCLI Command Summary
- Command Parameters
- ASMCLI Commands and Their Syntax
- ASMCLI -alert
- ASMCLI -breaksmartcopy
- ASMCLI -cloneReplica
- ASMCLI -configureASM
- ASMCLI -configureCHAP
- ASMCLI -createCollection
- ASMCLI -delete
- ASMCLI -deleteCollection
- ASMCLI -enumerateiSCSIPortals
- ASMCLI -enumerateSmartCopies
- ASMCLI -help
- ASMCLI -list
- ASMCLI -modifyCollection
- ASMCLI -mount
- ASMCLI -Properties
- ASMCLI -restore
- ASMCLI -selectiveRestore
- ASMCLI -shutdownsystray
- ASMCLI -shutdownverifier
- ASMCLI -smart
- ASMCLI -unmount
- ASMCLI -verify
- ASMCLI -version
- Use a Script to Create Smart Copies
- Recover a Clustered Volume From a Clone
- Index
While you can replace an existing RMD with another, you cannot use ASM/ME to delete an RMD and clean up either the
directories that were created or the mail store and log files that contain the RMD data. If you remove an RMD manually using
the Exchange utilities, you are also left in the same state and are told to manually remove these items. This state can also occur
if you unmount and log off the Smart Copy Set used for the RMD.
Follow Exchange best practices for creating mailbox databases to avoid data recovery problems. For example, Exchange does
not support creating mailbox database files in the root directory of a volume.
Create the database file in the root directory of a volume that is mounted at a mount point for the Smart Copy set instead of a
drive letter. Exchange cannot store mailbox database files (.edb) in a root directory.
Prerequisites for Creating a Recovery Mailbox Database
● At least one mailbox database must exist under the ASM/ME Applications node.
● Create a Smart Copy of the mailbox database, volume, or collection that you want to include in the RMD.
● For Smart Copies of a collection, make sure that the volumes you want to use for the RMD are not already mounted.
● You cannot perform this operation on a public folders database.
● Dell Recommends running Checksum verification and Soft recovery on the Smart Copy. As a minimum, run Soft Recovery
when you use the Smart Copy to recover data. For more detailed information, see Run Checksum Verification and Soft
Recovery After Smart Copy Creation. Running Checksum Verification and Soft Recovery verifies data integrity, but as a
result, it can take a longer time to complete data restoration.
Create a Recovery Mailbox Database
1. Expand the Smart Copies node.
2. Make sure that any volume you want to use is not already mounted. If it is, unmount it before proceeding.
3. Right-click the Smart Copy and select Create Recovery Mailbox Database.
The Create a Recovery Mailbox Database dialog box opens. If you have not yet performed Checksum Verification on the
selected Smart Copy, a warning is displayed along with an option to continue anyway.
4. Perform one of the following steps:
● Click Cancel if you want to exit the wizard to run Checksum Verification.
● Select the option to continue without verification and click Next.
The Select Exchange Mailbox Database dialog box opens.
5. Select the mailbox database and click Next.
The Select Volume Label dialog box opens.
6. Specify a drive letter or an NTFS or ReFS folder for the mount point. Click Next.
The Review Recovery Mailbox Database Configuration dialog box opens.
7. If an existing RMD is found, select the Remove existing Recovery Mailbox Database checkbox, then click Next.
ASM/ME automatically deletes the existing RMD, creates the new one, and performs Soft Recovery if required. The
Recovery Mailbox Database Creation Complete dialog box opens.
8. Click the Launch Exchange Management Shell link to perform data recovery tasks using Exchange utilities.
9. Click Finish to exit the wizard.
The Volumes node in the tree panel is refreshed to show the newly mounted volume for the RMD. The Smart Copies are also
refreshed to show which Smart Copies are in use.
About the Clone and Restore as New Operation
For all supported versions of Exchange Server, the Clone and Restore As New operation allows you to clone a mailbox
database from a source Exchange Server, and then set it up as a new mailbox database on a local or remote Exchange Server.
You can also run Restore As New on a local host.
The source Smart Copy Set is imported to the target server using the Import External Smart Copy menu option from
the ASM/ME instance running on the target server. Then the Clone and Restore As New option becomes available.
When performing the Clone and Restore As New operation on Exchange, you must specify a new name for the mailbox
database, as well as a drive letter or mount point for it.
Using ASM/ME with Exchange
77