Dell Fluid Cache For DAS User's Guide
Notes, Cautions, and Warnings NOTE: A NOTE indicates important information that helps you make better use of your computer. CAUTION: A CAUTION indicates either potential damage to hardware or loss of data and tells you how to avoid the problem. WARNING: A WARNING indicates a potential for property damage, personal injury, or death. © 2013 Dell Inc.
Contents Notes, Cautions, and Warnings...................................................................................................2 1 Dell Fluid Cache For DAS Overview.........................................................................................7 Best Practices For Using Fluid Cache For DAS........................................................................................................7 Related Documentation............................................................................
Enabling Caching On A Back End PERC Virtual Disk..............................................................................................21 Disabling Caching On A Back End PERC Virtual Disk.............................................................................................21 Flushing Dirty Data From A Fluid Cache Disk..........................................................................................................22 Reactivating A PCIe SSD In A Failed State.............................
Message ID: 2930| STORAGE_MODE_DEGRADED_TO_WRITE_THROUGH....................................................33 Message ID: 2931| STORAGE_MODE_DEGRADED_TO_PASS_THROUGH......................................................33 6 Disaster Recovery Scenarios For Fluid Cache For DAS.....................................................35 Data Collection Utility For Fluid Cache For DAS.....................................................................................................
Dell Fluid Cache For DAS Overview 1 Dell Fluid Cache software for direct-attached storage (DAS) is a host caching software that allows you to create a virtual cache pool for supported Dell PowerEdge systems. Fluid Cache for DAS uses Dell PowerEdge Express Flash PCIe SSDs installed on supported Dell systems to provide a read and write cache pool. You can install up to four PCIe SSDs in a Dell system. The supported PCIe SSD capacities are 175 GB and 350 GB.
• Product-specific Dell PowerVault Owner's Manual — Provides information about system features and describes how to troubleshoot the system and install or replace system components. • Product-specific Dell PowerEdge Owner's Manual — Provides information about system features and describes how to troubleshoot the system and install or replace system components. Contacting Dell NOTE: Dell provides several online and telephone-based support and service options.
Getting Started With Dell Fluid Cache For DAS 2 Fluid Cache for DAS monitors your cache usage, protects your writes, programmatically moves data blocks in and out of the cache as needed, and does it all transparently to the application. The following steps provide a broad summary to configure and run Fluid Cache for DAS: 1. Add up to four PCIe SSDs to the Dell PowerEdge system. NOTE: Ensure that all the four PCIe SSDs are of the same capacity. 2. Configure the PCIe SSDs to create a cache pool. 3.
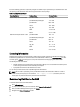
Ensure the following opensource component packages are available in your system before you install Fluid Cache. See the operating system distribution media for the supported version of each package. Table 1. Operating System Packages Operating System Package Name Package Version Red Hat Enterprise Linux 6.2 and 6.3 perl-XML-LibXML 1.70 – 5.el6 perl-XML-NamespaceSupport 1.10 – 3.el6 perl-XML-SAX 0.96 – 7.el6 rrdtool 1.3.8 – 6.el6 sg3_utils 1.28 – 4.el6 libxslt 1.1.26 – 2.el6 libuuid 2.17.
5. Select your operating system. 6. Click Caching Solutions to expand the menu. Fluid Cache for DAS software is listed. Click the link to download the software. Installing Fluid Cache For DAS You can install Fluid Cache for DAS using the Fluid Cache setup.sh shell script. When you run the installation script, it uses the options you provide. If the installation script encounters missing dependencies or discovers other issues with your installation, it stops and an error message is displayed.
want to start the Fluid Cache service with the message: Would you like to start Fluid Cache now? ('y' for yes | 'n' for no and exit install): 10. To start the Fluid Cache service, type y and press . 11.
3 Configuring And Managing Fluid Cache For DAS After Fluid Cache for DAS is installed and running, configure and manage your Fluid Cache environment. Fluid Cache for DAS is configured at the command line using fldc commands or in Dell OpenManage Server Administrator. NOTE: This document contains instructions for configuring and managing Fluid Cache for DAS using the fldc CLI only.
b) For WT mode, run the command: fldc --enable --disk=/dev/sdb --mode=wt The system displays the following message: SUCCESS: Caching enabled on Disk:/dev/sdb Cache Mode:write-through Created Virtual Cache Disk:/dev/fldc0. NOTE: During installation, Fluid Cache for DAS adds a line to /etc/fstab. The /etc/fstab file is a Linux file used to auto-mount file systems at system startup.
CAUTION: A new Fluid Cache disk /dev/fldcx is created as a result of enabling Fluid Cache. You must use the new Fluid Cache disk /dev/fldcx for all data access. Any additional data access to the corresponding virtual disk /dev/sdx or its partitions may lead to data corruption. Fluid Cache for DAS has exclusive control of the back end device. You cannot make changes to devices controlled by Fluid Cache without first disabling caching.
fldc CLI Commands 4 Use fldc in the following format: fldc [options…] .
Description Displays the status of all PCIe SSD devices. Use this command to review the status of the PCIe SSD devices configured in the cache pool. Information displayed includes the PCIe SSD name, UID, disk size (in GiB), and status. Displaying Status Of Fluid Cache Disk Command fldc --status --disk [-v verbose option] Description Displays the current status of the Fluid Cache disk(s) configured for caching. Use this command for all Fluid Cache disks.
Adding Or Applying Fluid Cache For DAS License Command fldc --apply --license (include the path to the license_file) Description Use this command to add or apply a new Fluid Cache for DAS license. This command installs a specified license file. If a previous license exists, the new license overwrites it. Exporting Fluid Cache For DAS Configuration To A .TXT File Command fldc --export= Description This command exports the current Fluid Cache configuration to a text file.
NOTE: The fldc --export and fldc --import commands are not based on UIDs but on system names. On Linux, these system names are subject to “name slippage”. Therefore, before using the export or import commands, you must ensure that the Linux device names for cache devices (PCIe SSDs) and virtual disks are equivalent on the two systems which are involved. For example, if /dev/rssda exists on the exporting host, it must also exist on the importing host and be available for use by Fluid Cache.
NOTE: If, when removing a failed PCIe SSD, you are blocked from using the Linux device name, you can use the UID for the PCIe SSD. To obtain the UID, run the fldc --status --ssd command. Use this command to initiate a discrete process that prepares the system for the physical removal of a PCIe SSD from a localhost.
CAUTION: If this command is run with the --discard option, the data in cache is destroyed without being flushed to storage. Use the --discard option with this command only if you know that destruction of dirty data in cache causes no data integrity issues. NOTE: Use the --umount argument to ensure that the device you listed in /etc/fstab is actually unmounted. The --umount option does not need the back end store or cached device to have an entry in /etc/fstab and, if one exists, it is removed.
accrued since the last run of the report. Both the summary and verbose reports consist of a header row followed by a row (or rows) of statistics. fldcstat Command Options The following are the options that can be added to the fldcstat command: fldcstat Command Description Syntax With Different Options --addr= or localhost Shows hostname or IP address of CFM (default: localhost).
Summary Report Header Description CacheIO-DiskIO Shows the number of bytes read and written to the cache device minus the number of bytes read and written to the disk. A positive value shows I/O activity is being served mostly by the cache while a negative value indicates more disk I/O is being performed than cache I/O. Avg I/O size Shows the average I/O size for the DAS disk. Disk Name Shows the name of the DAS disk. IOPS Shows the number of IOPS for the DAS disk.
Troubleshooting Fluid Cache For DAS 5 This section contains troubleshooting information for common issues that can occur with Fluid Cache for DAS. Many symptoms can have more than a single cause. Use the information in this section to eliminate possible problem sources, determine the root cause of the problem, and correct it. Additional troubleshooting information is available in the Dell PowerEdge Express Flash PCIe SSD User’s Guide at dell.com/support/manuals.
Fluid Cache For DAS Fails To Start Probable Cause Port conflict. Solution If you have a did not start error for a Mongoose server, check for a port conflict. If another service or application is trying to use the default fluid_cache service port, change ports to end the conflict. For more information, see the topic “Fluid Cache For DAS Port Conflict Daemon Error” in this section.
Solution If you have attempted to add the first PCIe SSD by running the fldc --add --ssd command at the prompt and it did not work, follow the steps below: 1. If the PCIe SSD you are trying to add has no status, check if that specific PCIe SSD is supported. Only Dell Express Flash PCIe SSDs of 175 GB or 350 GB capacity are supported as cache media. 2. If the device you are trying to add is supported, determine its status. Run the command: fldc --list --ssd.
5. If the PCIe SSD was removed from the system, plug it back in and reactivate it. 6. Reactivate caching on the back end disk by running the command: fldc -reactivate --disk= 7. Check that the PCIe SSD is now available. At the prompt, run the command: fldc -status If the status of a PCIe SSD is changed to failed, follow the steps below: 1. At the prompt, run either of the following commands: fldc --status -ssd= or fldc --status --ssd 2.
a. Comment out the back end PERC virtual disk entry so the --mount results shown in /etc/fstab is displayed as follows: #/dev/sdd/data1 ext4 defaults 1 2 /dev/fldc0/data1 ext4 defaults 1 2 b. To determine if your edit of the /etc/fstab file has fixed the issue, run the command: fldc --list --disk. If the system returns available for fldc0, the issue is resolved. • An existing Fluid Cache disk cannot be displayed if the Fluid Cache license is missing or expired.
Solution • A PCIe SSD is marked as failed. • Cache status can degrade if you plug in only one PCIe SDD. You must have a minimum of two PCIe SSDs to run Fluid Cache for DAS in WB mode. You can resolve the issue by adding more PCIe SSDs to your system. • Cache status can also degrade because a PCIe SSD has failed. To recover, follow the steps below: a. Check the status of the cache. Run the command: fldc --status b.
Solution The maximum number of virtual disks that can be added to a cache is 64. If you try to add the 65th virtual disk, the add operation fails. Disabling Cache Fails Probable Cause Solution • • The Fluid Cache disk is in use or mounted. The Fluid Cache disk contains dirty data that cannot be flushed to disk. • For the Fluid Cache disk is in use or mounted issue, you cannot disable caching on a Fluid Cache disk unless it is first unmounted.
Follow the next steps to recover your Fluid Cache configuration: 1. Restore your system from a backup. 2. If there is no backup, contact Dell Technical Support. Fluid Cache For DAS Error Messages And Resolution Steps If Fluid Cache for DAS displays an error message described in this section, follow the steps suggested to resolve the issue. Message ID: 2703| JOURNAL_INSUFFICIENT_MIRRORS_EVENT The message indicates that enough journal mirrors are not available to operate.
Message ID: 2916| LICENSE_EVAL_VALID_EVENT The message indicates that you are running an evaluation license. The message also indicates the number of days remaining to run the software in evaluation mode. To resolve the issue, you must install a valid license. Message ID: 2917| LICENSE_EVAL_EXPIRED_90_EVENT The message indicates that you are running on an expired evaluation license. No configuration changes are allowed.
6 Disaster Recovery Scenarios For Fluid Cache For DAS To resolve issues with your Fluid Cache For DAS, see Troubleshooting Fluid Cache For DAS. If the Dell Technical Support contact requests for running fldccollect.pl or fldc_restore, see the sections below. Data Collection Utility For Fluid Cache For DAS fldccollect.pl is a Fluid Cache for DAS data-collection utility for use by Dell Technical Support in analyzing issues.
NOTE: The fluid_cache service cannot be running when you run the fldc_restore command. NOTE: The fldc_restore command accepts up to three UIDs on the command line. The more UIDs you include on the command line, the more likely the utility can locate and use the correct journal for the restore process. NOTE: For a system with only one PCIe SSD, run the command: ./fldc_restore -f . For example: ./fldc_restore WWN 500A07510202EE60 -f .
Frequently Asked Questions 7 Question How do I contact Fluid Cache Technical Support? Answer See Contacting Dell. Question What is the lifecycle of my Dell Express Flash PCIe SSD? Answer Dell warrants the Express Flash PCIe SSD to a maximum amount of data written to the PCIe SSD in total bytes. The PCIe SSD monitors these cycles, and Dell software management applications notify you when the warranty limits are reached.
Answer The cache flush rate is controlled by an internal timer in Fluid Cache for DAS. Question What is the cache eviction policy? Answer The cache eviction policy is set to remove the least recently used (LRU) cache block. The eviction rate can be reviewed using the fldcstat command. To view a sample report, see the topic “fldcstat Command Options” in the section fldc CLI Commands.