THE DATACENTER IN A BOX SOLUTION PERFORMANCE TEST: COMPARING DELL AND HP BLADE SOLUTIONS When you are investing in a converged infrastructure solution to meet the computing needs of a department or remote or branch office of a large enterprise or a small to medium enterprise datacenter, it is important to select wisely. While excellent performance is necessary, other considerations—including how easy the solution is to set up and how much power it will consume—cannot be overlooked in the decision.
BETTER PERFORMANCE AND MORE USERS WITH EASIER SETUP AND LESS COSTLY OPERATION In our study, we examined the following blade server-network-storage solutions to see how well they would meet the needs of a small to medium business (SMB) or departmental computing solution within a large enterprise: The Dell EqualLogic PS-M4110 solution: Three Dell PowerEdge™ M620 servers with two Dell EqualLogic PS-M4110 Blade Arrays, 2 Dell Force10 MXL 10/40GbE Blade Switches and 2 Dell PowerConnect™ M8024-k 10GbE switches
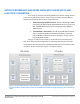
Our testing had three components: first, we examined the setup process for both solutions, recording the number of steps involved and the time required to complete them. Next, we tested the performance of both solutions while running a mixed workload including email, database, and collaboration applications. Finally, we compared the amount of power the two solutions used while performing the workloads. Figures 2 and 3 present comparisons of the factors we tested.
EASIER AND FASTER TO CONFIGURE Figure 4 presents a summary of the steps involved in configuring the two storage blade solutions. The Dell EqualLogic PS-M4110 Blade Array setup was considerably more streamlined, taking only 8 major steps versus the HP StorageWorks D2200sb + VSA’s 18 major steps—a difference of 55.6 percent.
Dell EqualLogic PS-M4110 solution Total number of major steps: 8 Total amount of time: 16 min, 46.7 sec HP StorageWorks D2200sb + VSA solution Total number of major steps: 18 Total amount of time: 1 hour, 30 min, 58.2 sec 12. Set the second VSA VM IP address/networking. Failover Manager (FOM) 13. Deploy the FOM on an appropriate host server to establish quorum between the two nodes. HP Centralized Management Console 14.
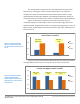
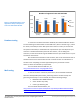
Number of supported users and total IOPS 2,000 1,500 Figure 5. The Dell datacenter in a box supported as many as 50.0 percent more users than the HP solution. 1,748 1,500 1,439 1,500 1,246 1,005 1,000 992 1,000 Dell solution HP solution 500 0 SQL Server (Users) Exchange (Mailboxes) SharePoint (Users) Total IOPS Database testing To create our real-world ecommerce workload, we used the DVD Store Version 2.1 benchmarking tool.
Collaboration testing To simulate the traffic of SharePoint Server 2010 users, we used the WSSDW 1.0.0.0 Beta test. This test creates sample data, populates the server with it, and simulates SharePoint Server users completing everyday tasks. We used Visual Studio 2010 to execute the test workload, generating a realistic user workload where each of the simulated heavy users performed a task every minute.
Figure 8 shows the number of users each solution supported while delivering an acceptable read latency averaging less than 20ms for end users. The number of SQL Server users supported, in this case, is determined by assuming that a user would generate four SQL Server transactions per minute.
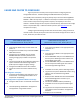
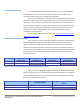
Users per watt (larger numbers are better) 1.4 1.2 1.0 Users Figure 10. The Dell solution supported more users per watt than the HP solution. 1.17 0.82 0.8 Dell solution 0.6 HP solution 0.4 0.2 0.0 1 GREATER USABLE CAPACITY More usable capacity in your server-storage solution provides more room to grow with your business, either by giving applications more space as needed or supporting additional blade servers using the existing storage infrastructure.
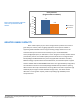
Usable capacity (larger numbers are better) 6.0 5.22 5.0 4.0 TB Figure 11. The Dell solution had greater usable capacity than the HP solution. 2.67 3.0 Dell solution HP solution 2.0 1.0 0.0 1 IN CONCLUSION Throughout our testing, the Dell datacenter in a box solution based on Dell EqualLogic PS-M4110 Blade Arrays had the advantage over the HP solution based on HP StorageWorks D2200sb storage blades. Not only did the Dell solution deliver 40.2 percent better performance, it required 55.
APPENDIX A – DETAILED CONFIGURATION INFORMATION Figures 12 and 13 provide detailed configuration information about the test server blades and chassis from each solution. The Dell used three PowerEdge M620 blade servers to run the applications and test workload while the HP used three ProLiant BL460c blade servers to run the applications and test workload. Additionally, we used two ProLiant BL460c blade servers for the required partner blades for the HP StorageWorks D2200sb arrays.
Server Memory modules Total RAM in system (GB) Number of types of memory modules Vendor and model number Type Speed (MHz) Speed in the system currently running @ (MHz) Timing/latency (tCL-tRCD-iRP-tRASmin) Size (GB) Number of RAM modules Chip organization Hard disk Vendor and model number Number of disks in system Size (GB) Buffer size (MB) RPM Type Operating system Name Build number File system Language Network card/subsystem Dell PowerEdge M620 (Application blade) 64 1 Samsung M393B1K70BH1-CH9 PC3-10600R
HP ProLiant BL460c Gen8 (Application blade) Servers HP ProLiant BL460c Gen8 (Partner blade) Cooling fans of blade Enclosure Name and model number Total number Dimensions (h x w) of each Voltage (V) Amps (A) General processor setup Number of processor packages Number of cores per processor package Number of hardware threads per core System power management policy CPU Vendor Name Stepping Socket type Core frequency (GHz) L1 cache L2 cache L3 cache Platform Vendor and model number Motherboard model number M
Servers Size (GB) Buffer size (MB) RPM Type Operating system Name Build number File system Language Network card/subsystem Type Vendor and model number HP ProLiant BL460c Gen8 (Application blade) 146 16 15,000 SAS Windows Server 2008 R2 Enterprise SP1 7601 NTFS English Flex Module HP FlexFabric 10 Gb dual port 554M Adapter HP ProLiant BL460c Gen8 (Partner blade) 146 16 15,000 SAS ESXi 5.0.0 474610 Ext3 English Flex Module HP FlexFabric 10 Gb dual port 554M Adapter Figure 13.
TEST STORAGE INFORMATION Figures 14 and 15 provide detailed information for the test storage. We used two of each of the storage arrays for each test configuration. Storage array Number of storage controllers per array RAID level Number of drives per array Drive vendor and model number Drive size (GB) Drive buffer size (MB) Drive RPM Drive type Dell EqualLogic PS-M4110 2 50 14 (10 active data drives, 2 parity, 2 spares) Dell MK3001GRRB 300 32 15,000 6Gb SAS Figure 14.
APPENDIX C – STORAGE CONFIGURATION FOR PERFORMANCE TESTING We followed the configuration steps for each of the storage solutions as outlined in Appendix E. For our testing, we placed the Failover Manager (FOM) for the HP D2200sb + VSA solution directly on one of the two nodes to establish quorum without affecting power utilization.
APPENDIX D – SERVER CONFIGURATION FOR PERFORMANCE TESTING For performance testing, we configured each of the three blade servers in each solution to run one of the applications (SQL Server, Exchange Server, and SharePoint Server) with the data for each application on the respective blade storage solution. For our benchmark test clients and domain controller, we configured virtual machines on a separate server, ensuring that each virtual machine had ample hardware resources.
2. Click Run SETUP.EXE. If Autoplay does not begin the installation, navigate to the SQL Server 2012 DVD, and double-click. 3. If the installer prompts you with a .NET installation prompt, click Yes to enable the .NET Framework Core role. 4. In the left pane, click Installation. 5. Click New SQL Server stand-alone installation or add features to an existing installation. 6. At the Setup Support Rules screen, wait for the rule check to complete. If there are no failures or relevant warnings, click OK. 7.
2. Run FilterPackx64.EXE. 3. Click Next. 4. Click I accept the terms in the License Agreement, and click Next. 5. When the installation is complete, click OK. Installing Exchange Server 2010 Click Start, type services and press Enter. Right-click the Net.Tcp Port Sharing service, and click Properties. Change the Net.Tcp Port Sharing startup type to Automatic, and click OK. Open command prompt and type ServerManagerCmd –i RSAT-ADDS, and press Enter. Reboot the server.
3. 4. 5. 6. 7. In the left pane, expand Organization Configuration, and select Hub Transport. In the action pane on the far right, select New Send Connector. Name the send connector SMTP, select the intended use as Internet, and click Next. In the Address space screen, click Add. In the SMTP Address Space screen, type * as the address, ensure that the installer has checked Include all subdomains, and click OK. 8. Click Next. 9. Accept defaults for the next two pages by clicking Next. 10.
1. Insert the installation DVD. 2. Click Run SETUP.EXE. If Autoplay does not begin the installation, navigate to the SQL Server 2012 DVD, and double-click. 3. If the installer prompts you with a .NET installation prompt, click Yes to enable the .NET Framework Core role. 4. In the left pane, click Installation. 5. Click New SQL Server stand-alone installation or add features to an existing installation. 6. At the Setup Support Rules screen, wait for the rule check to complete.
13. 14. 15. 16. 17. 18. 19. 20. 21. 22. 23. Choose Create a new server farm, and click Next. Enter the name of your existing database instance on the same application server. Specify a username and password, and click Next. Enter a passphrase into the Passphrase and Confirm Passphrase fields, and click Next. Leave the default settings on the Configure SharePoint Central Administration Web Application screen, and click Next. Verify your settings, and click Next.
CREATE LOGIN [ds2user] WITH PASSWORD=N’’, DEFAULT_DATABASE=[master], DEFAULT_LANGUAGE=[us_english], CHECK_EXPIRATION=OFF, CHECK_POLICY=OFF GO h. i. j. k. We set the database recovery model back to full. We created the necessary full text index using SQL Server Management Studio. We created a database user and mapped this user to the SQL Server login. We then performed a full backup of the database. This backup allowed us to restore the databases to a pristine state relatively quickly between tests.
10. 11. 12. 13. 14. At the Your password has been changed screen, click OK. Click Start, type change power-saving settings and press Enter. Click Change plan settings. Change the Turn off the display drop-down menu to Never. Click Save changes, and close the Power Options, Screen Saver Settings, and Personalization screens. To set up this server, we had to install several additional software components. The following subsections detail the necessary installation processes. Joining the domain 1.
2. 3. 4. 5. 6. 7. 8. 9. 10. 11. 12. 13. 14. Select StartAll ProgramsMicrosoft ExchangeExchange Load Generator 2010. When the Load Generator screen appears, select Start a new test. Select Create a new test configuration, and click Continue. Change the total length of simulation to 1 hour and 15 minutes. In the Specify test settings screen, type Password1 as the Directory Access Password and Mailbox Account Master Password, and click Continue with recipient management.
7. 8. 9. 10. 11. 12. 13. 14. Close the pop-up window. Click Next. Accept the EULA, review the components to be installed, and click Next. Choose the Full installation and location for the install, and click Install. Click Finish. Reboot the machine. Click StartAll ProgramsMicrosoft Visual Studio 2010Microsoft Visual Studio 2010. When prompted, select General Development Settings and click Start Visual Studio. Setting up and running WSSDW 1.0.0.0 Beta 1.
NumberOfFileVersions="3" /> DocumentLibraryNameBase2="testdoclib_B" /> NumberOfLists="10" /> ListNameBase="testlist" /> NumberOfListItems="20" /> webpartpath="webpartpagesfolder" /> c. Open the command prompt and execute the script: C:\>WSSDW.exe WSS_Data_Population_Sample_File.xml 5. Complete the following steps on the SharePoint 2010 test client: a.
WSSPutDocumentCoded 10% r. Click OK. s. At the Network types screen, select LAN, and click Next. t. At the Browser screen, click Next. u. At the Specify computers to monitor with counters sets during load test run screen, click Next. v. At the Review and edit run settings for load test screen, enter 15 minutes for the Warm-up duration, enter 30 minutes for Run duration, 15 minutes for the Cool down duration, and click Finish. 6.
APPENDIX E – CONFIGURATION COMPARISON Dell EqualLogic PS-M4110 solution 1. Log into the Dell M1000e CMC Web interface using a Web browser. 2. Insert the two storage arrays into the chassis and allow them to power on automatically. Configuring the storage array blades 1. At the Server Overview screen in the CMC Web interface, select the corresponding slot for the first storage blade. 2. At the Storage Array Status screen, click Configure Array. 3.
Dell EqualLogic PS-M4110 solution 4. 5. 6. 7. 8. 9. 10. unconfigured, and click Yes to configure the RAID. At the General Settings screen, leave the default name and storage pool assignment, and click Next. At the RAID configuration screen, select RAID 50, and click Next. At the Summary screen, click Finish. Select the second member (array), which will show as unconfigured, and click Yes to configure the RAID.
Dell EqualLogic PS-M4110 solution 9. At the Ready to install the components screen, click Install. 10. In the Microsoft Multipath I/O feature is not detected pop-up, click Yes to install the feature. 11. At the Installation Complete screen, click Finish. 12. In the System Restart Required pop-up, select Yes, I want to restart my computer now, and click OK. Connecting to the volumes with Microsoft iSCSI Initiator 1. Click Start Administrative ToolsiSCSI Initiator. 2.
Dell EqualLogic PS-M4110 solution HP D2200sb + VSA solution 24. On the Enter a Root Password screen, assign a root password, and confirm it by entering it again. Press Enter to continue. 25. On the Confirm Install screen, press F11 to install. 26. On the Installation Complete screen, press Enter to reboot. 27. After the server reboots, press F2 to log in, and enter the appropriate credentials. 28. Highlight Configure Management Network, and press Enter. 29. Highlight IP Configuration, and press Enter. 30.
Dell EqualLogic PS-M4110 solution HP D2200sb + VSA solution 10. 11. 12. 13. 14. 15. 16. certificate and do not display any security warnings for Host IP Address, and click Ignore. Click Configuration tabStorageAdd Storage. Select the appropriate volume, and click Next. Select VMFS-5, and click Next. Review the disk layout, and click Next. For Datastore name, type VSA-1 and click Next. For Capacity, select Maximum available space, and click Next. Click Finish to create the datastore.
Dell EqualLogic PS-M4110 solution HP D2200sb + VSA solution 5. 6. 7. 8. 9. 10. 11. 12. (the two 10Gb Emulex adapters), and click Next. Enter an appropriate Network Label, and click Next. Click Finish. Click Properties… Under Ports, select the Virtual Machine Port Group, and click Edit… Under Failover Order, check the Override switch failover order checkbox. Select one of the active adapters and move it to be a Standby Adapter. Click OK. Click Close. Deploying the VSA VM 1. Copy the HP P4000 VSA 9.
Dell EqualLogic PS-M4110 solution HP D2200sb + VSA solution 16. 17. 18. 19. 20. 21. 22. 23. 24. 25. 26. 27. 28. 29. 30. 31. 32. The datacenter in a box performance test: Comparing Dell and HP blade solutions address, subnet, and gateway information, and select the appropriate network interface. Click Next. At the Configuration details screen, enter an appropriate virtual appliance name, and click Next.
Dell EqualLogic PS-M4110 solution HP D2200sb + VSA solution 33. At the Configuration details screen, enter an appropriate virtual appliance name, and click Next. 34. At the Configuring Virtual SAN Appliance screen, check two VMDK location checkboxes, select the appropriate datastore that corresponds with the attached D2200sb, and enter the desired size of each VMDK. In our case, we used all available space. Click Next. 35.
Dell EqualLogic PS-M4110 solution HP D2200sb + VSA solution 13. 14. 15. 16. appropriate virtual appliance name, and click Next. At the Configure and install another virtual appliance screen, select the No, I am done radio button, and click Next. At the confirmation pop up, click Yes. At the summary screen, click Deploy. Click Finish when the deployment process completes. Customizing and configuring the VSA appliance VMs 1. Log into the first partner blade using vSphere client. 2.
Dell EqualLogic PS-M4110 solution HP D2200sb + VSA solution 19. Select Back, and then select Log Out. 20. Log into the second partner blade using vSphere client. 21. Right-click the VSA VM, and select PowerShut Down Guest. 22. Click Yes to confirm shutdown. 23. Once the VM has shut down, right-click the VSA VM, and select Edit Settings… 24. Under Memory, set the memory size to 2 GB. 25. Under CPUs, set the number of cores per socket to four. 26.
Dell EqualLogic PS-M4110 solution HP D2200sb + VSA solution 6. Enter an appropriate hostname, select Use the following IP address, enter the appropriate network information, and select OK. 7. Press Enter to confirm when the dialog box pops up. 8. Press Enter to close the pop-up showing that the network was successfully configured. 9. Select Back, and then select Log Out. Installing HP DSM for MPIO 1. Double-click the installer. 2. At the welcome screen, click Next. 3.
Dell EqualLogic PS-M4110 solution HP D2200sb + VSA solution 12. At the Choose a Management Group screen, leave New Management Group selected, and click Next. 13. At the Create a Management Group screen, enter an appropriate management group name, and click Next. 14. At the Add Administrative User screen, enter a user name and password, and click Next. 15. At the Management Group Time screen, select either the appropriate NTP server or manually set the time, and click Next. 16.
Dell EqualLogic PS-M4110 solution HP D2200sb + VSA solution 3. At the iSCSI Initiator Properties screen, click the Configuration tab, and highlight and copy the IQN initiator name. 4. Click StartAll ProgramsHPP4000HP P4000 Centralized Management Console. 5. At the left pane, click the name of your management group. 6. At the right pane, click Log in to view, enter the appropriate credentials, and click Log In. 7.
ABOUT PRINCIPLED TECHNOLOGIES We provide industry-leading technology assessment and fact-based marketing services. We bring to every assignment extensive experience with and expertise in all aspects of technology testing and analysis, from researching new technologies, to developing new methodologies, to testing with existing and new tools. Principled Technologies, Inc. 1007 Slater Road, Suite 300 Durham, NC, 27703 www.principledtechnologies.