
Specifications


A Principled Technologies test report 4
The datacenter in a box performance test: Comparing Dell and HP
blade solutions
EASIER AND FASTER TO CONFIGURE
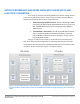
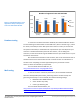
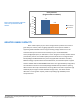
Figure 4 presents a summary of the steps involved in configuring the two
storage blade solutions. The Dell EqualLogic PS-M4110 Blade Array setup was
considerably more streamlined, taking only 8 major steps versus the HP StorageWorks
D2200sb + VSA’s 18 major steps—a difference of 55.6 percent. When we compare the
entire number of steps each storage solution requires, the disparity is even more
dramatic—the Dell storage solution required a total of 44 steps, whereas the HP storage
solution required 259 steps—a difference of 83.0 percent. (See Appendix E for the
complete set of steps.)
Configuring the Dell storage solution was also much faster, taking a total of 16
minutes and 46.7 seconds, 81.6 percent less time than the HP storage solution’s total of
1 hour, 30 minutes, and 58.2 seconds.
Dell EqualLogic PS-M4110 solution
Total number of major steps: 8
Total amount of time: 16 min, 46.7 sec
HP StorageWorks D2200sb + VSA solution
Total number of major steps: 18
Total amount of time: 1 hour, 30 min, 58.2 sec
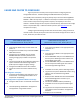
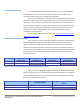
Storage blades
1. Insert the two blade arrays into the chassis and
power on.
2. Configure the first blade array in the Dell M1000e
CMC Web interface.
3. Configure the second blade array in the Dell
M1000e CMC Web interface (and add to the
existing storage group created in the previous
step)
4. Log into the EqualLogic Group Manager GUI from a
system attached to the iSCSI storage network
(Fabric-B) and configure the group settings.
5. Configure the RAID level of the two members.
6. Create the volumes and restrict iSCSI access by
IQN.
Host Integration Tools (HIT)
7. Install the Dell EqualLogic Host Integration Tools
for Microsoft on each application blade. This is
required for multipathing.
iSCSI configuration on application blades and storage
8. Configure iSCSI initiator on each blade in Windows.
Notes:
The Dell EqualLogic PS-M4110 is managed via a
Java application using a Web browser.
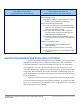
Storage blades
1. Insert the storage blades in the appropriate slots
and power on.
Partner blades
2. Insert the partner blades in the appropriate slots
and power on.
3. Use the BIOS RAID utility to set the RAID level for
the first partner blade logical drive and the first
storage blade logical drive.
4. Use the BIOS RAID utility to set the RAID level for
the second partner blade logical drive and the
second storage blade logical drive.
ESXi
5. Install ESXi on the first partner blade logical drive.
6. Log into the first partner blade ESXi instance using
vSphere client and add the storage blade
datastore.
7. Deploy the first VSA VM and install the HP P4000
Centralized Management Console on your
management system.
8. Set the first VSA VM IP address/networking.
9. Install ESXi on the second partner blade logical
drive.
10. Log into the second partner blade ESXi instance
using vSphere client and add the storage blade
datastore.
11. Deploy the second VSA VM.