Dell™ OptiPlex™ FX160 Setup and Quick Reference Guide This guide provides an overview of features, specifications, quick setup, software, and troubleshooting information for your computer. For more information about your operating system, devices, and technologies, see the Dell Technology Guide at support.dell.com. Model DC01T w w w. d e l l . c o m | s u p p o r t . d e l l .
Notes, Notices, and Cautions NOTE: A NOTE indicates important information that helps you make better use of your computer. NOTICE: A NOTICE indicates either potential damage to hardware or loss of data and tells you how to avoid the problem. CAUTION: A CAUTION indicates a potential for property damage, personal injury, or death. If you purchased a Dell™ n Series computer, any references in this document to Microsoft® Windows® operating systems are not applicable.
Contents 1 2 About Your Computer . . . . . . . . . . . . . . . . . 5 Front View . . . . . . . . . . . . . . . . . . . . . . . . . 5 Back View . . . . . . . . . . . . . . . . . . . . . . . . . 6 Setting Up Your Computer . . . . . . . . . . . . . 7 Before Setting Up Your Computer . . . . . . . . . . . . . 7 . . . . . . . . . . . . . . . . . . . . . . . . 7 Quick Setup 3 Specifications 4 Troubleshooting Tips . . . . . . . . . . . . . . . . . . . . . . . . . . . . . . . . . . . . .
5 Reinstalling Software Drivers . . . . . . . . . . . . . . . . . . . . . . . . . . . . . . . . . . . . . . . . 23 . . . . . . . . . . . . . . . . . 23 . . . . . . . . . . 24 . . . . . . . . . . . . 26 Identifying Drivers Reinstalling Drivers and Utilities Restoring Your Operating System Using Microsoft Windows System Restore (Windows Vista hard drive operating systems only) . . . . . . . . . . . . . . . . 6 Finding Information 7 Getting Help . 26 29 . . . . . . . . . . . . . . . . . . .
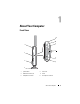
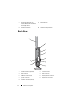
About Your Computer Front View 10 9 8 1 7 2 6 3 5 4 1 power button 2 side cover 3 USB 2.
7 diagnostic lights (see your Service Manual for information about light codes) 8 Wi-Fi indicator 9 hard drive indicator 10 network activity indicator Back View 1 2 3 4 5 9 6 8 7 6 1 wireless antenna (optional) 2 serial connector 3 DVI connector 4 VGA connector 5 USB 2.
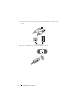
Setting Up Your Computer Before Setting Up Your Computer When positioning your computer, ensure that you allow easy access to a power source, adequate ventilation, and a level surface on which to place your computer. NOTICE: Keep the computer on the stand and in the vertical position. Setting up the computer horizontally (on its side) restricts airflow and can impact performance. Restricting airflow around the computer may cause it to overheat. To prevent overheating ensure that you leave at least 10.
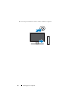
1 Connect the monitor using either the white DVI cable or the blue VGA cable. 2 Connect a USB device, such as a keyboard or mouse.
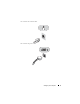
3 Connect the network cable. 4 Connect the power cable.
5 Press the power buttons on the monitor and the computer.
Specifications NOTE: Offerings may vary by region. For more information regarding the configuration of your computer, click Start→Help and Support and select the option to view information about your computer.
Memory (continued) Minimum memory 1 GB (512 MB for Linux) Maximum memory 4 GB Video Type: SiS Mirage integrated video default 128 MB shared video memory (can be changed in BIOS system setup) Audio Type: ADI 1984A Integrated HD Audio Drives Internally accessible one 2.5-in drive bay Available devices one 2.5-in SATA hard drive NOTE: A hard drive is optional and requires a hard drive kit.
Connectors (continued) System board connectors: Serial ATA (hard drive) one 7-pin connector Serial ATA (NVRAM module) one 22-pin connector Fan one 5-pin connector Mini-PCI Express X1 one 52-pin connector Front panel LED one 14-pin connector Front panel USB two 10-pin connectors Front panel audio one 12-pin connector Memory two 240-pin connectors Power 12 V one 4-pin connector BIOS ROM one 8-pin socket Serial ATA hard drive power one 4-pin connector Controls and Lights Front of computer
Controls and Lights (continued) Drive activity light blue light — A blinking blue light indicates the computer is reading data from or writing data to the SATA hard drive. Rear of computer: Link integrity light (on green light — 10-Mb operation network adapter connector) orange light — 100-MB operation yellow light — 1-Gb operation off (no light) — The computer is not detecting a physical connection to the network.
Environmental Temperature: Operating 10° to 35° C (50° to 95° F) Storage –40° to 65° C (–40° to 149° F) Relative humidity 20% to 80% (noncondensing) Maximum vibration: Operating 5 to 350 Hz at 0.0002 G2/Hz Storage 5 to 500 Hz at 0.001 to 0.01 G2/Hz Maximum shock: Operating 40 G +/- 5% with pulse duration of 2 msec +/- 10% (equivalent to 20 in/sec [51 cm/sec]) Storage 105 G +/- 5% with pulse duration of 2 msec +/- 10% (equivalent to 50 in/sec [127 cm/sec]) Altitude: Operating –15.
Specifications
Troubleshooting Tips CAUTION: Always unplug your computer from the electrical outlet before opening the cover. NOTE: For detailed troubleshooting information, including responding to system messages, see your Service Manual at support.dell.com. Using the Hardware Troubleshooter 1 Click Start (Microsoft® Windows® XP embedded) or the Windows Vista® Start button , and click Help and Support. 2 Type hardware troubleshooter in the search field and press to start the search.
I F T H E P O W E R L I G H T I S O F F — The computer is either turned off or is not receiving power. • Reseat the power cable in the power connector on the back of the computer and the electrical outlet. • Bypass power strips, power extension cables, and other power protection devices to verify that the computer turns on properly. • Ensure that any power strips being used are plugged into an electrical outlet and are turned on.
• Reseat the memory modules to ensure that your computer is successfully communicating with the memory. • Run the Dell Diagnostics (see "Dell Diagnostics" on page 21). IF YOU EXPERIENCE OTHER MEMORY PROBLEMS — • Reseat the memory modules to ensure that your computer is successfully communicating with the memory. • Ensure that you are following the memory installation guidelines. • Ensure that the memory you are using is supported by your computer.
A program is designed for an earlier Microsoft Windows operating system RUN THE PROGRAM COMPATIBILITY WIZARD — 1 Click Start →Control Panel→Programs→Use an older program with this version of Windows. 2 In the welcome screen, click Next. 3 Follow the instructions on the screen.
The Dell Support Utility provides self-support information, software updates, and health scans of your computing environment. Access the Dell Support Utility from the icon on the taskbar, or from the Start menu. If the Dell Support icon does not appear in your taskbar: 1 Click Start →All Programs→Dell Support→Dell Support Settings. 2 Ensure that the Show icon on the taskbar option is checked. NOTE: If the Dell Support Utility is not available from the Start menu, go to support.dell.
3 Shut down and restart the computer. When the DELL logo appears, press immediately. NOTE: If you wait too long and the operating system logo appears, continue to wait until you see the Microsoft Windows desktop; then, shut down your computer and try again. NOTE: The next steps change the boot sequence for one time only. On the next start up, the computer starts according to the devices specified in the system setup program.
Reinstalling Software Drivers Identifying Drivers Windows Vista® 1 Locate the list of devices for your computer: a Click the Windows Vista Start button b Click Properties→Device Manager. , and right-click Computer. NOTE: The User Account Control window may appear. If you are an administrator on the computer, click Continue; otherwise, contact your administrator to continue. 2 Scroll down the list to see if any device has an exclamation point (a yellow circle with a [!]) on the device icon.
2 Scroll down the list to see if any device has an exclamation point (a yellow circle with a [!]) on the device icon. If an exclamation point is next to the device name, you may need to reinstall the driver or install a new driver (see "Reinstalling Drivers and Utilities" on page 24). Reinstalling Drivers and Utilities NOTICE: The Dell Support website at support.dell.com provides approved drivers for your computer. If you install drivers obtained from other sources, your computer might not work correctly.
2 Right-click the device for which the new driver was installed and click Properties. 3 Click the Drivers tab→Roll Back Driver. If Device Driver Rollback does not resolve the problem, use System Restore (see "Restoring Your Operating System" on page 26) to return your computer to the operating state that existed before you installed the new driver. Manually Reinstalling Drivers Windows Vista 1 Click the Windows Vista Start button , and right-click Computer. 2 Click Properties→Device Manager.
2 Right-click the device for which you need a driver, and click Update Driver. 3 Click the Drivers tab→Update Driver. 4 Follow the instructions that appear on the screen to either install the driver from a local source, or to search the Web for a driver.
Undoing the Last System Restore NOTICE: Before you undo the last system restore, save and close all open files and exit any open programs. Do not alter, open, or delete any files or programs until the system restoration is complete. 1 Click the Windows Vista Start button . 2 In the Start Search box, type System Restore and press . 3 Click Undo my last restoration and click Next.
Reinstalling Software
Finding Information NOTE: Some features or media may be optional and may not ship with your computer. Some features or media may not be available in certain countries. NOTE: Additional information may ship with your computer. Document/Media/Label Contents Service Tag/Express Service Code • Use the Service Tag to identify your computer when you use support.dell.com or contact support. The Service Tag/Express Service Code is located on your computer.
Finding Information
Getting Help Obtaining Assistance CAUTION: If you need to remove the computer cover, first disconnect the computer power and modem cables from all electrical outlets. Follow the safety instructions that shipped with your computer. If you experience a problem with your computer, you can complete the following steps to diagnose and troubleshoot the problem: 1 See "Tips" on page 17 for information and procedures that pertain to the problem your computer is experiencing.
NOTE: Some of the following services are not always available in all locations outside the continental U.S. Call your local Dell representative for information on availability. Technical Support and Customer Service Dell's support service is available to answer your questions about Dell hardware. Our support staff uses computer-based diagnostics to provide fast, accurate answers.
• Dell Support e-mail addresses: mobile_support@us.dell.com support@us.dell.com la-techsupport@dell.com (Latin America and Caribbean countries only) apsupport@dell.com (Asian/Pacific countries only) • Dell Marketing and Sales e-mail addresses: apmarketing@dell.com (Asian/Pacific countries only) sales_canada@dell.com (Canada only) • Anonymous file transfer protocol (FTP): ftp.dell.
Product Information If you need information about additional products available from Dell, or if you would like to place an order, visit the Dell website at www.dell.com. For the telephone number to call for your region or to speak to a sales specialist, see "Contacting Dell" on page 37.
Before You Call NOTE: Have your Express Service Code ready when you call. The code helps Dell’s automated support telephone system direct your call more efficiently. You may also be asked for your Service Tag (located on the back or bottom of your computer). Remember to fill out the Diagnostics Checklist (see "Diagnostics Checklist" on page 36). If possible, turn on your computer before you call Dell for assistance and call from a telephone at or near the computer.
Diagnostics Checklist Name: Date: Address: Phone number: Service Tag (bar code on the back or bottom of the computer): Express Service Code: Return Material Authorization Number (if provided by Dell support technician): Operating system and version: Devices: Expansion cards: Are you connected to a network? Yes No Network, version, and network adapter: Programs and versions: See your operating system documentation to determine the contents of the system’s start-up files.
Contacting Dell For customers in the United States, call 800-WWW-DELL (800-999-3355). NOTE: If you do not have an active Internet connection, you can find contact information on your purchase invoice, packing slip, bill, or Dell product catalog. Dell provides several online and telephone-based support and service options. Availability varies by country and product, and some services may not be available in your area. To contact Dell for sales, technical support, or customer service issues: 1 Visit support.
Getting Help
Index C connecting monitor, 8 network cable, 9 power cables, 9 contacting Dell, 31, 37 D Dell contacting, 31, 37 software updates, 20 Support Utility, 20 technical support and customer service, 32 Technical Update Service, 20 Dell Diagnostics, 21 starting from the Drivers and Utilities media, 21 starting from your hard drive, 21 Dell Technology Guide, 29 DellConnect, 32 diagnostics Dell, 21 documentation, 29 Dell Technology Guide, 29 Service Manual, 29 drivers, 23 identifying, 23 reinstalling, 24 returnin
O operating system System Restore, 26 operating system product key, 29 P phone numbers, 37 power power light conditions, 17 troubleshooting, 17 problems restore to previous state, 26 R regulatory information, 29 reinstalling drivers and utilities, 24 software, 23 software (continued) troubleshooting, 19-20 updates, 20 specifications all, 11 audio, 12 connectors, 12 controls and lights, 13 drives, 12 environmental, 15 memory, 11 physical, 14 power, 14 processor, 11 system information, 11 video, 12 support
troubleshooting (continued) Dell Diagnostics, 21 memory, 18 power, 17 power light conditions, 17 program crashes, 19 programs and Windows compatibility, 20 restore to previous state, 26 software, 19-20 tips, 17 W U wizards Program Compatibility wizard, 20 warranty information, 29 Windows License label, 29 Windows Vista Device Driver Rollback, 24 Program Compatibility wizard, 20 returning to a previous device driver version, 24 System Restore, 26 Windows XP System Restore, 26 updates software and hardwa
Index