
User Manual

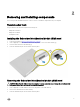
Table Of Contents
- Dell Latitude E5470 Owner's Manual
- Working on your computer
- Removing and installing components
- Recommended tools
- Installing the Subscriber Identification Module (SIM) card
- Removing the Subscriber Identification Module (SIM) card
- Removing the base cover
- Installing the base cover
- Removing the battery
- Installing the battery
- Removing the hard drive assembly
- Removing the hard drive from the hard drive bracket
- Installing the hard drive into the hard drive bracket
- Installing the hard drive assembly
- Installing the optional M.2 SSD
- Removing the optional M.2 Solid State Drive (SSD)
- Installing the optional PCIe SSD
- Removing the optional PCIe SSD
- Removing the memory module
- Installing the memory module
- Removing the WLAN card
- Installing the WLAN card
- Removing the WWAN card
- Installing the WWAN card
- Removing the dock frame
- Installing the dock frame
- Removing the touchpad button
- Installing the touchpad button
- Removing the power connector port
- Installing the power connector port
- Removing the keyboard
- Installing the keyboard
- Removing the display assembly
- Installing the display assembly
- Removing the optional SmartCard reader board
- Installing the optional SmartCard reader board
- Removing the optional finger print reader board
- Installing the optional finger print reader board
- Removing the LED board
- Installing the LED board
- Removing the heat sink assembly
- Installing the heat sink assembly
- Removing the speakers
- Installing the speakers
- Removing the system board
- Installing the system board
- Removing the coin cell battery
- Installing the coin cell battery
- Removing the palmrest
- Installing the palmrest
- System setup options
- Boot Sequence
- Navigation keys
- System Setup overview
- Accessing System Setup
- General screen options
- System Configuration screen options
- Video screen options
- Security screen options
- Secure Boot screen options
- Intel Software Guard Extensions screen options
- Performance screen options
- Power Management screen options
- POST Behavior screen options
- Virtualization support screen options
- Wireless screen options
- Maintenance screen options
- System Log screen options
- Updating the BIOS in Windows
- System and setup password
- Technical specifications
- System specifications
- Processor specifications
- Memory specifications
- Storage specifications
- Audio specifications
- Video specifications
- Camera specifications
- Communication specifications
- Port and connector specifications
- Contactless smart card specifications
- Display specifications
- Keyboard specifications
- Touchpad specifications
- Battery specifications
- AC Adapter specifications
- Physical specifications
- Environmental specifications
- Diagnostics
- Contacting Dell

CAUTION: Before touching anything inside your computer, ground yourself by touching an unpainted metal surface,
such as the metal at the back of the computer. While you work, periodically touch an unpainted metal surface to
dissipate static electricity, which could harm internal components.
CAUTION: Make sure that you place the cooler outlet side of your system at least 5 cm away from wall to prevent
system overheat.
CAUTION: Your system cannot be placed crosswise and make sure that there is no equipment on the side cover.
Turning o your computer
After working inside your computer
After you complete any replacement procedure, ensure you connect any external devices, cards, and cables before turning on your
computer.
CAUTION: To avoid damage to the computer, use only the battery designed for this particular Dell computer. Do not use
batteries designed for other Dell computers.
1. Replace the battery.
2. Replace the base cover.
3. Connect any external devices, such as a port replicator or media base, and replace any cards, such as an ExpressCard.
4. Connect any telephone or network cables to your computer.
CAUTION: To connect a network cable, rst plug the cable into the network device and then plug it into the
computer.
5. Connect your computer and all attached devices to their electrical outlets.
6. Turn on your computer.
Keyboard Short-Cut Key Function
The below table is a list of combination of short-cut key functions using the E3 series keyboard.
Combination Key
83 Keys Keyboard 104 Keys Keyboard
<FN>+<F1>
Enter sleep/hibernation mode.
<FN>+<F2>
In the BIOS, the Post Behaviour section, the
Keypad(Embedded) option is set to 'Fn Key Only'
option by default. Change to 'By Numlock' otherwise,
user will need to press and hold the <FN>+<F2> keys
in order to use the embedded number keys.
N/A
<FN>+<F3>
Enable or disable Scroll Lock.
<FN>+<F5>
Enable or disable the touchpad and/or touchstick.
<FN>+<F7>
Launch Dell Control Point.
<FN>+<F8>
Enable or disable multiple display. Option include, clone display or extended display to an external monitor.
Or project the current view to external monitor only.
<FN>+<F10>
Go back to previous track when playing a le in
Windows Media Player.
N/A
7