Dell EMC 호스트 버스 어댑터 사용자 가이드 HBA330 및 외부 12Gbps SAS HBA 규정 모델: UCSE 900, UCSF-1000, UCSN-1000
참고, 주의 및 경고 노트: "참고"는 제품을 보다 효율적으로 사용하는 데 도움이 되는 중요 정보를 제공합니다. 주의: "주의"는 하드웨어 손상이나 데이터 손실의 가능성을 설명하며, 이러한 문제를 방지할 수 있는 방법을 알려줍니다. 경고: "경고"는 재산상의 피해나 심각한 부상 또는 사망을 유발할 수 있는 위험이 있음을 알려줍니다. © 2017 - 2018 Dell Inc. 또는 자회사. 저작권 본사 소유. Dell, EMC 및 기타 상표는 Dell Inc. 또는 자회사의 상표입니다. 기타 상표는 각 소유자의 상표일 수 있습니다.
목차 1 개요............................................................................................................................................................... 5 Dell HBA 카드 사양............................................................................................................................................................7 지원되는 운영 체제..........................................................................................................................................................
6 BIOS 구성 유틸리티.....................................................................................................................................29 BIOS 구성 유틸리티 시작.............................................................................................................................................. 29 구성 유틸리티 종료........................................................................................................................................................ 29 부팅 볼륨 설정...........................
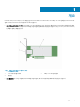
1 개요 Dell EMC HBA(Host Bus Adaptor) 카드 제품군은 Dell HBA330 MMZ, Dell HBA330 MX, Dell 12Gbps SAS HBA 컨트롤러, Dell HBA330 어 댑터 카드 및 Dell HBA330 미니 모놀리식 카드로 구성됩니다. • Dell 12Gbps SAS HBA 컨트롤러: Dell 12Gbps SAS HBA 컨트롤러는 RAID 기능이 없는 물리적 디스크 드라이브 인터페이스를 제공 하는 HBA이며 외부 스토리지용 로우 프로파일 및 전체 높이 폼 팩터에서 사용할 수 있습니다. 이는 Dell SAS(Serial-Attached SCSI) 컨트롤러 솔루션 제품군입니다. 그림 1 . 12Gbps SAS HBA 컨트롤러의 특징 1 SAS 외부 케이블 커넥터 3 방열판 • 2 12Gbps SAS HBA 컨트롤러 Dell HBA330: 이 카드는 어댑터(로우 프로파일 및 전체 높이) 및 미니 모놀리식 폼 팩터에서 사용할 수 있습니다.
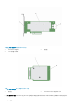
그림 2 . Dell HBA330 어댑터 카드의 기능 1 Dell HBA330 어댑터 3 SAS 케이블 커넥터 2 방열판 2 Dell HBA330 미니 모놀리식 카드 그림 3 . Dell HBA330 미니 모놀리식 카드 기능 방열판 1 • Dell HBA330 MX: Dell HBA330은 MX7000 컨트롤러 제품군에 속하며 내부 드라이브와의 인터페이스에 사용됩니다.
그림 4 . Dell HBA330 MX 어댑터 카드의 특징 1 방열판 3 SAS 케이블 커넥터 • 2 분리 레버 Dell HBA330 MMZ: Dell HBA330 MMZ는 MX7000 컨트롤러 제품군에 속하며 MX5016 스토리지 엔클로저에 있는 드라이브와의 인 터페이스에 사용됩니다. 그림 5 . Dell HBA330 MMZ 어댑터 카드의 특징 1 메자닌 커넥터 3 방열판 2 분리 레버 주제: • Dell HBA 카드 사양 • 지원되는 운영 체제 • 관련 설명서 Dell HBA 카드 사양 아래 표는 Dell HBA 카드 사양을 나열 및 설명합니다. 표 1.
기능 Dell HBA(12Gbps SAS HBA 및 HBA330 카드) 비휘발성 캐시 없음 캐시 정책 아니오 드라이브 유형 3 Gbps SATA, 6 Gbps SATA/SAS 및 12Gbps SAS PCIe 지원 3세대 비 RAID 또는 패스 스루 모드 예 SAS 및 SATA 기술 예 노트: SATA는 Dell HBA330 MMZ 및 12Gbps SAS HBA 컨트롤러 카드에서 지원되지 않습니다. 부팅 지원 예 큐 크기 9548 지원되는 운영 체제 Dell HBA 컨트롤러는 다음과 같은 운영 체제를 지원합니다. • • Microsoft – Windows Server 2012 R2 – Windows Server 2016 VMware – ESXi 6.5 업데이트 1 – ESXi 6.7 노트: VMware ESXi용 12GBPS SAS HBA 드라이버는 Dell에서 사용 가능한 VMware ISO 이미지와 함께 번들로 제공됩니다. 자 세한 내용은 Dell.
2 기능 Dell HBA 카드는 다음 기능을 지원합니다. LED 포트 작동 12Gbps SAS HBA 컨트롤러에는 포트 작동 또는 상태 LED가 장착되어 있습니다. LED를 통해 외부 SAS 포트의 상태를 신속하게 확인할 수 있습니다. 각각의 x4 커넥터에는 자체 LED 세트가 있습니다. 노트: HBA330 카드에는 LED 포트 표시등이 없습니다. 다음 표에서는 LED 색상 및 해당 SAS 포트 상태를 설명합니다. 표 2. x4 커넥터 LED 설명 LED 색상 SAS 포트 상태 꺼짐 이는 다음 중 하나를 나타냅니다. • • • 전원이 꺼졌음 포트가 재설정되었음 포트의 모든 링크의 연결이 끊겼거나 케이블이 분리됨 녹색 포트의 모든 링크가 연결되어 있고 작동함 황색등 포트에 하나 이상의 링크가 연결되어 있지 않습니다. 이는 와이드 포 트 구성에만 해당됩니다.
3 Dell EMC HBA 엔클로저 지원 다중 경로 시스템용으로 설정하면 HBA330 MMZ 및 12Gbps SAS 컨트롤러가 다중 경로를 통해 물리적 드라이브에 액세스하여 드라이 브에 중복성과 로드 밸런스를 제공할 수 있습니다. 그러나 컨트롤러는 이러한 경로를 관리하지 않습니다. 이 기능은 호스트 운영 체제 의 다중 경로 레이어로 제어됩니다. 결과적으로 다중 경로 구성에서 드라이브에 대한 각 개별 경로는 독립적인 드라이브로 취급되며, 하나의 드라이브가 운영 체제에 여러 드라이브로 제공될 수 있습니다. 드라이브에 대한 다중 경로의 복잡성을 피하려면 이러한 다중 경로를 동일한 단일 드라이브에 매핑하기 위한 경로 관리 소프트웨어가 필요합니다. 이 섹션에서는 다양한 운영 체제 및 관리 인터페 이스에 대한 다중 경로 관리 옵션에 대해 설명합니다.
7 MPIO가 활성화되어 있고 HBA 드라이브를 관리하고 있는지 확인하려면 Device Manager(디바이스 관리자)를 열고 Disk Drives(디스크 드라이브)를 선택합니다. 이제 액세스 가능한 드라이브가 Multipath Disk Device(다중 경로 디스크 디바이스)로 나열됩니다. 8 다중 경로 디스크를 마우스 오른쪽 버튼으로 클릭하고 Properties(속성)를 선택합니다. 9 MPIO를 클릭합니다. MPIO 정책을 설정하고 드라이브에 대한 경로가 모두 활성 상태인지 여부를 확인할 수 있습니다. 제대로 구 성된 경우 This device has the following paths(이 디바이스에 있는 경로) 섹션 아래에 두 경로가 모두 Active/Optimised(활성/최 적화됨)로 표시됩니다. 경로가 하나만 나열되는 경우 시스템 스토리지 할당 및 하드웨어 구성을 확인하십시오.
그림 6 . MX7000 모듈식 시스템의 다중 토폴로지 이 다이어그램에서 HBA330 MMZ는 컴퓨트 슬레드에 있으며 MX7000의 SAS 토폴로지에 대한 인터페이스로 작동됩니다. HBA330 MMZ는 MX7000의 컴퓨트 슬레드와 스토리지 슬레드 간의 연결을 관리하는 한 쌍의 MX5000 SAS IOM(I/O modules)에 연결됩니다. 드라이브 할당 구성에 대한 자세한 내용은 Dell EMC OpenManage Enterprise Modular 사용자 가이드를 참조하십시오. 노트: I/O 모듈은 독립적으로 구성할 수 없습니다. HBA330 MMZ는 SAS IOM에 연결된 후 스토리지 슬레드의 SAS 확장기 중 하나에 연결됩니다. 그런 다음, 스토리지 슬레드의 확장기 는 스토리지 슬레드의 모든 드라이브에 연결되므로 스토리지 슬레드의 드라이브와 HBA330 MMZ 사이에 하나의 경로를 제공합니다.
슬레드에 할당되어야 합니다. 여러 컴퓨트 슬레드에 스토리지 슬레드 할당에 대한 자세한 내용은 OpenManage Enterprise Modular 사 용자 가이드를 참조하십시오. 그러나 스토리지 슬레드가 할당되면 디스크 공유 및 예약을 관리하기 위해 컴퓨트 클러스터링 소프트 웨어가 필요합니다. 지원되는 운영 체제에 대한 문서 자료 또는 관리 세부 정보에 대한 클러스터링 솔루션을 참조하십시오. 노트: Windows 2016은 공유 스토리지(여러 컴퓨트 슬레드에 할당된 동일한 디스크)를 위해 Dell에서 검증한 유일한 클러스터 솔 루션입니다.
4 Dell HBA 카드 배포 주의: 대부분의 수리는 인증받은 서비스 기술자가 수행해야 합니다. 문제 해결이나 간단한 수리에 한해 제품 문서에 승인된 대로 또는 온라인/전화 서비스 및 지원팀이 안내하는 대로 사용자가 직접 처리할 수 있습니다. Dell의 승인을 받지 않은 서비스 작업으 로 인한 손상에 대해서는 보상을 받을 수 없습니다. 시스템과 함께 제공된 안전 지침을 읽고 따르십시오. 이 문서에서는 다음 Dell HBA 카드 컨트롤러를 위한 고급 레벨의 설치 및 분리 지침을 제공합니다.
7 해당하는 경우, 저장소 컨트롤러 카드를 교체하고 케이블을 연결합니다. 카드 설치에 대한 자세한 정보는 12Gbps SAS HBA 컨트 롤러 설치를 참조하십시오. 8 시스템 덮개를 장착합니다. 9 전원 케이블 및 네트워크 케이블을 다시 연결합니다. 그림 7 . 12Gbps SAS HBA 컨트롤러 분리 1 SAS 케이블(2개) 2 SAS 케이블 커넥터(2개) 3 12Gbps SAS HBA PCIe 커넥터 4 시스템 보드의 PCIe 커넥터 5 12Gbps SAS HBA 컨트롤러 12Gbps SAS HBA 컨트롤러 설치 주의: 대부분의 수리는 인증받은 서비스 기술자가 수행해야 합니다. 문제 해결이나 간단한 수리에 한해 제품 문서에 승인된 대로 또는 온라인/전화 서비스 및 지원팀이 안내하는 대로 사용자가 직접 처리할 수 있습니다. Dell의 승인을 받지 않은 서비스 작업으 로 인한 손상에 대해서는 보상을 받을 수 없습니다. 제품과 함께 제공된 안전 지침을 읽고 따르십시오.
7 커넥터가 단단히 맞물릴 때까지 컨트롤러를 아래로 누릅니다. 8 브래킷 나사(있는 경우)를 조이거나 시스템 고정 클립을 사용하여 컨트롤러를 고정합니다. 9 SAS 케이블을 사용하여 외부 테이프 장치 또는 인클로저의 어댑터에 연결합니다. 10 시스템 덮개를 장착합니다. 11 전원 케이블 및 네트워크 케이블을 다시 연결한 다음 시스템을 켭니다. 호스트 서버에 설치된 12Gbps SAS HBA 컨트롤러를 스토리지 엔클로저에 케이블 연결 다음 단계를 수행하여 12Gbps SAS HBA 컨트롤러를 스토리지 인클로저에 있는 물리 디스크 드라이브에 연결합니다. 1 12Gbps SAS HBA 컨트롤러를 설치합니다. 12Gbps SAS HBA 컨트롤러 설치를 참조하십시오. 2 컨트롤러의 단일 포트에 연결된 엔클로저 중 하나와 첫 4개의 엔클로저가 데이지 체인 방식으로 연결되도록 SAS 케이블을 연결 합니다.
그림 8 . 12 GBPS SAS HBA 컨트롤러를 스토리지 인클로저에 케이블 연결 HBA330 어댑터 카드 제거 주의: 대부분의 수리는 인증받은 서비스 기술자가 수행해야 합니다. 문제 해결이나 간단한 수리에 한해 제품 문서에 승인된 대로 또는 온라인/전화 서비스 및 지원팀이 안내하는 대로 사용자가 직접 처리할 수 있습니다. Dell의 승인을 받지 않은 서비스 작업으 로 인한 손상에 대해서는 보상을 받을 수 없습니다. 제품과 함께 제공된 안전 지침을 읽고 따르십시오. 1 시스템 및 장착된 주변 장치를 끄고 시스템을 콘센트 및 주변 장치에서 분리합니다. 2 시스템을 엽니다. 3 시스템 보드에서 HBA 카드를 찾습니다. 4 브래킷 나사(있는 경우)를 제거하거나 시스템 고정 클립을 사용하여 시스템에서 컨트롤러를 제거합니다. 5 카드를 들어 올려 시스템 보드의 커넥터에서 분리합니다. 6 카드에 연결된 SAS 케이블을 분리합니다.
7 해당하는 경우, 스토리지 컨트롤러 카드를 교체하고 케이블을 연결합니다. 카드 설치에 대한 자세한 내용은 HBA330 어댑터 카드 설치를 참조하십시오. 8 시스템을 닫습니다. 9 시스템을 콘센트에 다시 연결하고 시스템 및 장착된 주변 장치를 모두 켭니다. 그림 9 . HBA330 카드 분리 및 설치 1 HBA330 어댑터 카드 2 SAS 케이블(2개) 3 SAS 케이블 커넥터(2개) 4 시스템 보드의 카드 커넥터 5 HBA330 어댑터 카드 커넥터 HBA330 어댑터 카드 설치 주의: 대부분의 수리는 인증받은 서비스 기술자가 수행해야 합니다. 문제 해결이나 간단한 수리에 한해 제품 문서에 승인된 대로 또는 온라인/전화 서비스 및 지원팀이 안내하는 대로 사용자가 직접 처리할 수 있습니다. Dell의 승인을 받지 않은 서비스 작업으 로 인한 손상에 대해서는 보상을 받을 수 없습니다. 제품과 함께 제공된 안전 지침을 읽고 따르십시오.
HBA330 MMZ 어댑터 카드 제거 주의: 대부분의 수리는 인증받은 서비스 기술자가 수행해야 합니다. 문제 해결이나 간단한 수리에 한해 제품 문서에 승인된 대로 또는 온라인/전화 서비스 및 지원팀이 안내하는 대로 사용자가 직접 처리할 수 있습니다. Dell의 승인을 받지 않은 서비스 작업으 로 인한 손상에 대해서는 보상을 받을 수 없습니다. 제품과 함께 제공된 안전 지침을 읽고 따르십시오. 1 슬레드 및 연결된 주변 기기를 끄고, MX 섀시에서 슬레드를 제거합니다. 노트: 컨트롤러가 제거되기 전에 캐시의 데이터가 디스크로 플러시되도록 슬레드를 정상적으로 종료합니다. 노트: 시스템 내부의 구성요소를 다룰 때는 항상 정전기 방지 매트와 접지대를 사용하는 것이 좋습니다. 2 시스템을 엽니다. 3 시스템 보드에서 HBA 카드를 찾습니다. 4 파란색 탭을 사용하여 컨트롤러의 레버를 돌립니다. 5 레버와 컨트롤러 전면을 단단히 잡아 당겨 컨트롤러에서 커넥터를 분리합니다.
5 시스템 섀시 7 HBA 카드 커넥터 6 시스템 보드의 카드 커넥터 HBA330 MMZ 어댑터 카드 설치 주의: 대부분의 수리는 인증받은 서비스 기술자가 수행해야 합니다. 문제 해결이나 간단한 수리에 한해 제품 문서에 승인된 대로 또는 온라인/전화 서비스 및 지원팀이 안내하는 대로 사용자가 직접 처리할 수 있습니다. Dell의 승인을 받지 않은 서비스 작업으 로 인한 손상에 대해서는 보상을 받을 수 없습니다. 제품과 함께 제공된 안전 지침을 읽고 따르십시오. 1 슬레드 및 연결된 주변 기기를 끄고, MX 섀시에서 슬레드를 제거합니다. 2 시스템을 엽니다. 노트: 시스템 내부의 구성요소를 다룰 때는 항상 정전기 방지 매트와 접지대를 사용하는 것이 좋습니다. 3 브래킷 노치를 시스템 양쪽의 탭에 맞추고 HBA 카드 커넥터를 시스템 보드의 커넥터에 맞춥니다. 4 HBA 카드가 단단히 고정될 때까지 커넥터 쪽으로 누릅니다. 5 분리 레버를 눌러 슬레드에 카드를 고정합니다.
그림 11 . HBA330 MX 카드 제거 및 설치 1 브래킷 노치(3개) 2 분리 레버 3 카드 브래킷 4 시스템 섀시 5 HBA 카드 커넥터 6 시스템의 카드 커넥터 HBA330 MX 어댑터 카드 설치 주의: 대부분의 수리는 인증받은 서비스 기술자가 수행해야 합니다. 문제 해결이나 간단한 수리에 한해 제품 문서에 승인된 대로 또는 온라인/전화 서비스 및 지원팀이 안내하는 대로 사용자가 직접 처리할 수 있습니다. Dell의 승인을 받지 않은 서비스 작업으 로 인한 손상에 대해서는 보상을 받을 수 없습니다. 제품과 함께 제공된 안전 지침을 읽고 따르십시오. 1 슬레드 및 연결된 주변 기기를 끄고, MX 섀시에서 슬레드를 제거합니다. 노트: 시스템 내부의 구성요소를 다룰 때는 항상 정전기 방지 매트와 접지대를 사용하는 것이 좋습니다. 2 시스템을 엽니다. 3 브래킷 노치를 시스템 양쪽의 탭에 맞추고 HBA 카드 커넥터를 시스템 보드의 커넥터에 맞춥니다.
9 슬레드를 닫습니다. 10 MX 섀시에 슬레드를 삽입하고 시스템 및 연결된 MX 섀시 주변 기기의 전원을 켭니다. HBA330 미니 모놀리식 컨트롤러 분리 주의: 대부분의 수리는 인증받은 서비스 기술자가 수행해야 합니다. 문제 해결이나 간단한 수리에 한해 제품 문서에 승인된 대로 또는 온라인/전화 서비스 및 지원팀이 안내하는 대로 사용자가 직접 처리할 수 있습니다. Dell의 승인을 받지 않은 서비스 작업으 로 인한 손상에 대해서는 보상을 받을 수 없습니다. 제품과 함께 제공된 안전 지침을 읽고 따르십시오. 1 시스템 및 장착된 주변 장치를 끄고 시스템을 콘센트 및 주변 장치에서 분리합니다. 노트: 시스템 내부의 구성요소를 다룰 때는 항상 정전기 방지 매트와 접지대를 사용하는 것이 좋습니다. 2 시스템을 엽니다. 3 시스템 보드에서 HBA 카드를 찾습니다. 4 스토리지 컨트롤러 케이블을 분리하려면: a 케이블을 카드에 고정시키는 나사 2개를 분리합니다.
그림 12 . HBA330 미니 모놀리식 카드 분리 및 설치 1 스토리지 컨트롤러 케이블 2 스토리지 컨트롤러 카드 3 저장소 컨트롤러 카드 홀더 4 스토리지 컨트롤러 고정 고리 HBA330 미니 모놀리식 컨트롤러 설치 주의: 대부분의 수리는 인증받은 서비스 기술자가 수행해야 합니다. 문제 해결이나 간단한 수리에 한해 제품 문서에 승인된 대로 또는 온라인/전화 서비스 및 지원팀이 안내하는 대로 사용자가 직접 처리할 수 있습니다. Dell의 승인을 받지 않은 서비스 작업으 로 인한 손상에 대해서는 보상을 받을 수 없습니다. 제품과 함께 제공된 안전 지침을 읽고 따르십시오. 1 시스템 및 장착된 주변 장치를 모두 끄고 콘센트에서 시스템을 분리합니다. 노트: 시스템 내부의 구성요소를 다룰 때는 항상 정전기 방지 매트와 접지대를 사용하는 것이 좋습니다. 2 시스템을 엽니다.
7 카드의 클립과 섀시 안쪽의 채널을 통과하도록 SAS 데이터 케이블을 배선합니다. 8 "SAS A"로 표시된 커넥터를 후면판의 SAS A 커넥터에 연결하고 "SAS B"로 표시된 커넥터를 후면판의 SAS B 커넥터에 연결합니 다. 9 시스템을 닫습니다. 10 시스템을 콘센트에 다시 연결하고 시스템 및 장착된 주변 장치를 모두 켭니다.
5 드라이버 설치 Dell HBA 카드의 지원 운영 체제와 함께 작동하려면 소프트웨어 드라이버가 필요합니다. 이 장에서는 Dell HBA 컨트롤러용 드라이버 설치 절차를 제공합니다. 노트: VMware ESXi의 Dell HBA 컨트롤러용 드라이버는 Dell에서 다운로드한 VMware ESXi ISO 이미지 내에서 패키징됩니다. 자 세한 정보는 Dell.com/virtualizationsolutions에서 VMware 설명서를 참조하십시오. 이 장에서는 다음과 같은 두 가지 드라이버 설치 방법에 대해 설명합니다. • 운영 체제 설치 중 드라이버 설치: 운영 체제를 새로 설치하는 중에 드라이버를 포함하려면 이 방법을 사용합니다. • 기존 드라이버 업데이트: 운영 체제 및 Dell HBA 컨트롤러가 이미 설치되어 있고 최신 드라이버로 업데이트하려면 이 방법을 사용 하십시오. 노트: 설치 후 기존 운영 체제 드라이버를 업데이트하는 것이 좋습니다.
Dell 시스템 서비스 및 진단 도구 매체에서 드라이버 다운로드 Dell 시스템 서비스 및 진단 도구 매체에서 드라이버를 다운로드하려면 다음을 수행합니다. 1 시스템에 Dell 시스템 서비스 및 진단 도구 매체를 삽입합니다. Welcome to Dell Service and Diagnostic Utilities(Dell 서비스 및 진단 유틸리티 시작) 화면이 표시됩니다. 2 시스템 모델 및 운영 체제를 선택합니다. 3 Continue(계속)를 클릭합니다. 4 표시되는 드라이버 목록에서 필요한 드라이버를 선택합니다. 5 자동 압축 해제 zip 파일을 선택하고 Run(실행)을 클릭합니다. 6 드라이버를 드라이브, CD, DVD 또는 USB 드라이브에 복사합니다. 7 필요한 모든 드라이버에 대해 1~6 단계를 반복합니다. Windows 드라이버 설치 Dell HBA 컨트롤러용 Windows 드라이버를 설치하기 전에 먼저 장치 드라이버 매체를 만들어야 합니다.
4 Next(다음)을 클릭합니다. 5 장치 드라이버 찾기 화면에서 장치에 적절한 드라이버 검색을 선택하고 다음을 클릭합니다. 6 Locate Driver Files(드라이버 파일 찾기) 화면에서 드라이버를 찾아 선택합니다. 7 Next(다음)을 클릭합니다. 8 Finish(마침)를 클릭하여 설치를 완료합니다. 9 메시지가 나타나면 시스템을 재부팅합니다. 적절한 장치 드라이버를 감지하여 설치합니다. 기존 Windows Server 2012 R2 이상 버전을 위한 Dell HBA 컨트 롤러 드라이버 업데이트 노트: 드라이버를 업데이트하기 전에 먼저 시스템의 응용프로그램을 모두 닫습니다. 1 드라이버가 포함된 매체(CD, DVD 또는 USB 드라이브)를 삽입합니다. 2 시작 > 설정 > 제어판 > 시스템을 클릭합니다. System Properties(시스템 속성) 화면이 표시됩니다. 노트: 시스템에 대한 경로는 운영 체제 제품군에 따라 달라질 수 있습니다.
KMOD를 지원하는 RPM 드라이버 패키지 설치 또는 업데이트 노트: 이 절차는 Red Hat Enterprise Linux 6.5 SP2에 적용됩니다. KMOD를 지원하는 RPM 패키지를 설치하려면 다음 단계를 수행하십시오. 1 gzip으로 압축된 tarball 드라이버 릴리스 패키지의 압축을 풉니다. 2 rpm –ihv lsi-mpt3sas-kmp-default- 명령을 사용하여 드라이버 패키지를 설치합니다. 3 이전 장치 드라이버가 사용 중인 경우 업데이트된 드라이버가 적용되도록 시스템을 재부팅해야 합니다. 4 modinfo mpt3sas 시스템 명령을 사용하여 드라이버가 로드되었는지 확인합니다. 노트: 기존 패키지를 업그레이드하는 경우 rpm -Uvh 을 사용합니다. KMP를 지원하는 RPM 드라이버 패키지 설치 또는 업데이트 노트: 이 절차는 처음 지원되는 SUSE Enterprise Linux 11 및 SLES 11 SP3에 적용 가능합니다.
6 BIOS 구성 유틸리티 BIOS Configuration Utility(BIOS 구성 유틸리티)(Ctrl+C)는 Dell HBA 카드에 내장된 스토리지 관리 애플리케이션입니다. Ctrl+C 기능 은 운영 체제와는 독립적입니다. 노트: 외부 연결 스토리지 장치로는 시스템을 부팅할 수 없습니다. 노트: 시스템을 부팅할 때 Ctrl+C 키를 눌러 HBA 컨트롤러를 위한 BIOS Configuration Utility(BIOS 구성 유틸리티)를 로드합니 다. BIOS Configuration Utility(BIOS 구성 유틸리티)는 부트 디바이스를 선택한 후에만 로드합니다. BIOS Configuration Utility(BIOS 구성 유틸리티)(Ctrl+C)는 HBA330 MMZ 및 HBA330 MX에서 지원되지 않습니다. 노트: 초기 설정 및 재해 복구를 위해 BIOS Configuration Utility(BIOS 구성 유틸리티)(Ctrl+C)를 사용합니다.
부팅 볼륨 설정 구성 유틸리티에서 부팅 볼륨을 설정하려면 다음 단계를 수행합니다. 1 BIOS 구성 유틸리티를 시작합니다. Device Settings(장치 설정) 화면에 Dell HBA 카드 목록이 표시됩니다. 노트: BIOS Configuration Utility(BIOS 구성 유틸리티)(Ctrl+C)를 시작한 후, 시스템에서 사용 가능한 모든 디바이스를 입력 하여 BIOS 부팅 순서대로 설정합니다. 이 순서는 언제든지 BIOS Configuration Utility(BIOS 구성 유틸리티)(Ctrl+C)를 시작 하여 재설정할 수 있습니다. 2 Dell HBA 카드 중 하나를 선택하고 키를 누릅니다. 예를 들어, Dell HBA330 Mini를 선택하고 키를 누릅니다. 선택한 Dell HBA 카드 컨트롤러 속성이 표시됩니다. 3 화살표 키를 사용하여 SAS 토폴로지를 선택하고 Enter를 누릅니다.
7 HII(Human Interface Infrastructure) 구성 유틸리 티 HII 구성 유틸리티는 장치 구성을 보고 설정할 수 있도록 표준화된 방법입니다. HII 구성 유틸리티에서는 다음을 포함한 사전 운영 체 제 기능 및 관리를 제공합니다. • 물리적 장치 속성 보기 • 물리적 장치 작동 실행 • 디버깅 정보 검색 주제: • HII 구성 유틸리티 시작 • HII 구성 유틸리티 종료 • HII 구성 유틸리티에서 부트 디바이스 선택 • Dell HBA 구성 유틸리티 탐색 • 물리적 디스크 드라이브 관리 HII 구성 유틸리티 시작 HII 구성 유틸리티를 시작하려면 다음 단계를 수행하십시오. 1 시스템을 켭니다. 2 시스템 시작 중에 F2를 눌러 시스템 설정을 시작합니다. 3 Device Settings(장치 설정)을 클릭합니다. 시스템 설정 기본 메뉴 화면에 메뉴 목록이 표시됩니다. 컨트롤러에 대한 관리 메뉴에 액세스하려면 화살표 키 또는 마우스를 사용합니다.
기존 OpROM 부트 디바이스에서 No(아니요)를 클릭합니다. 노트: 이건 기존 BIOS 모드를 위한 부트 디바이스입니다. 서버가 UEFI 부팅 모드라면 시스템 BIOS에서 부트 디바이스를 설 정해야 합니다. HII 부트 디바이스에서 물리적 디스크 드라이브 작업 선택 이 표는 물리 디스크 드라이브 작업 선택 화면의 세부 사항을 설명합니다. 메뉴 항목 설명 물리 디스크 선택 물리 디스크를 선택할 수 있습니다. 기존 OpROM 부트 디바이스 선택한 장치를 부트 디바이스로 설정할 수 있습니다. 쓰기 캐시 설정 활성화 또는 비활성화할 수 있습니다. Dell HBA 구성 유틸리티 탐색 1 HII 구성 유틸리티를 시작합니다. HII 구성 유틸리티 시작을 참조하십시오. Device Settings(장치 설정) 화면에 NIC 포트 목록과 Dell HBA 구성 유틸리티가 표시됩니다.
메뉴 항목 설명 기본 NVData 버전 기본 NVData 버전을 나타냅니다. 영구 NVData 버전 영구 NVData 버전을 나타냅니다. 컨트롤러 속성 변경 1 2 Dell HBA Configuration Utility(Dell HBA 구성 유틸리티)를 시작합니다. Dell HBA 구성 유틸리티 탐색을 참조하십시오. Controller Management(컨트롤러 관리) > Change Controller Properties(컨트롤러 속성 변경)를 클릭합니다. 레거시 BIOS를 활성화 또는 비활성화할 수 있습니다. 물리적 디스크 드라이브 관리 물리적 디스크 드라이브를 관리 및 확인할 수 있으며 물리적 디스크 드라이브 속성을 수행할 수 있습니다. 물리 디스크 드라이브 속성 보기 물리 디스크 드라이브 속성 보기 화면을 사용하면 물리 디스크 드라이브 속성을 볼 수 있습니다.
메뉴 항목 설명 물리적 링크 속도 물리적 링크 속도를 표시합니다. 논리 링크 속도 논리 링크 속도를 표시합니다. 물리 디스크 드라이브 작업 선택 1 Dell HBA 구성 유틸리티를 시작합니다. Dell HBA 구성 유틸리티 탐색을 참조하십시오. 2 Physical Disk Management(물리 디스크 관리) > Select Physical Disk Operations(물리 디스크 운영 선택)를 클릭합니다. 이 표는 물리 디스크 드라이브 작업 선택 화면의 세부 사항을 설명합니다. 메뉴 항목 설명 물리 디스크 선택 물리 디스크를 선택할 수 있습니다. 위치 찾기/깜박임을 드라이버의 LED를 활성화할 수 있습니다. 시작합니다. 위치 찾기/깜박임을 드라이버의 LED를 비활성화할 수 있습니다. 중지합니다.
8 펌웨어 업데이트 아래 절차를 수행하여 펌웨어를 업데이트할 수 있도록 DUP를 다운로드하여 실행해야 합니다. 1 Dell.com/support로 이동합니다. 2 사용중인 시스템의 서비스 태그를 입력하고 제출을 클릭합니다. 제품 지원 페이지가 표시됩니다. 3 드라이버 및 다운로드를 클릭합니다. 4 운영 체제, 범주 및 업데이트 중요도를 선택합니다. 5 다운로드를 클릭합니다. 6 다운로드가 완료되면 파일 이름을 두 번 클릭하여 DUP를 실행할 수 있습니다. 적용 가능한 업데이트 목록이 표시됩니다. 노트: File Title(파일 제목) 열에서 DUP 파일 형식을 선택하고 클릭하여 다른 파일 형식을 다운로드할 수도 있습니다. 하나 이상의 파일 형식을 다운로드하려는 경우 한 번에 하나씩 수행해야 합니다. 노트: Dell Repository Manager를 사용하여 DUP 또는 DUP 그룹을 다운로드할 수도 있습니다.
9 도움말 얻기 Dell에 연락하여 Dell 제품에 대한 도움말을 얻거나 제품 설명서에 대한 피드백을 보낼 수 있습니다. Dell에 문의하기 노트: 인터넷 연결을 사용할 수 없는 경우에는 제품 구매서, 포장 명세서, 청구서 또는 Dell 제품 카탈로그에서 연락처 정보를 찾을 수 있습니다. Dell은 다양한 온라인/전화 기반의 지원 및 서비스 옵션을 제공합니다. 제공 여부는 국가/지역 및 제품에 따라 다르며 일부 서비스는 소재 지역에 제공되지 않을 수 있습니다. 판매, 기술 지원 또는 고객 서비스 문제에 대해 Dell에 문의하려면 Dell.com/contactdell로 이동합니다. 설명서에 대한 사용자 의견 Dell 설명서의 모든 페이지에 있는 Feedback(피드백) 링크를 클릭해 양식을 작성한 다음 Submit(제출)을 클릭하여 의견을 보낼 수 있 습니다. 시스템의 서비스 태그 찾기 시스템은 특급 서비스 코드와 서비스 태그 번호로 식별됩니다.