DELL EMC HPC Solution for Life Sciences v1.
Revisions Date Description February 2017 Initial release THIS WHITE PAPER IS FOR INFORMATIONAL PURPOSES ONLY, AND MAY CONTAIN TYPOGRAPHICAL ERRORS AND TECHNICAL INACCURACIES. THE CONTENT IS PROVIDED AS IS, WITHOUT EXPRESS OR IMPLIED WARRANTIES OF ANY KIND. Copyright © - Dell Inc. All rights reserved. Dell and the Dell EMC logo are trademarks of Dell Inc. in the United States and/or other jurisdictions.
Table of contents Revisions.............................................................................................................................................................................2 1 Introduction ...................................................................................................................................................................4 2 Audience.....................................................................................................................
1 Introduction Dell HPC Solution for Life Sciences is a pre-integrated, tested, tuned and purpose-built platform, leveraging the most relevant of Dell’s High Performance Computing line of products and best-in-class partner products due to the high diversity in life sciences applications. It encompasses all the hardware resources required for various life sciences data analysis while providing an optimal balance of compute density, energy efficiency, and performance from Enterprise server line-up of Dell.
2 Audience This deployment guide describes the Dell EMC HPC Solution for Life Sciences and its configuration on the PowerEdge C6320 with Intel® Omni-Path interconnect. It assumes the reader is familiar with Dell PowerEdge products and switches, HPC cluster deployments, Bright Cluster Manager and standard HPC validation. It focuses on the special aspects of the Dell EMC HPC Solution for Life Sciences, and the genomics applications, molecular dynamics simulation applications, installation and benchmarking.
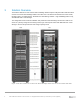
3 Solution Overview The Dell HPC Solution for Life Sciences with PowerEdge C6320 compute subsystem with Intel® OPA fabric consists of 24 nodes of PowerEdge C6320 in one 48U rack. This solution also includes two master nodes, two login nodes, one CIFS gateway, Dell EMC HPC NFS Storage Solution - High Availability (NSS7.0-HA), and Dell EMC HPC Lustre Storage. The configuration used for solution validation and performance benchmarking is shown here. NSS7.
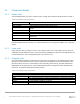
3.1 Component details 3.1.1 Master node The PowerEdge R430 is the choice of master nodes, and high level component details are listed in Table 1.
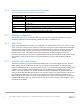
3.1.4 Common Internet File System (CIFS) gateway Table 3 PowerEdge R430 configuration as CIFS gateway Component PowerEdge R430 Processors Memory Disk RAID controller Intel Omni-Path 1GbE 10GbE 3.2 Information 2x Intel Xeon E5-2680 v4 processors 6 x 8GB RDIMM, 2400 MT/s, Dual Rank 2 x 500GB 7.2K RPM NLSAS 6Gbps 2.5in Hot-plug Hard Drive,3.
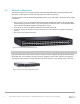
3.3 Network configuration This solution comprises of two network switches, Dell Networking S3048-ON and Dell Networking H1048OPF switch, for management network and high-speed interconnects respectively. The port assignment of the Dell Networking S3048-ON switch for the Intel® OPA or IB versions of the solution is as follows. • • • • Ports 01-04 and 27–52 are assigned to the cluster’s private management network to be used by Bright Cluster Manager® connecting master, login, CIFS gateway and compute nodes.
4 Cluster installation 4.1 Installing the head node It is recommended that all the nodes are connected beforehand so that how things are connected is known. 1. The BIOS of the head node should have the local time set. 2. The head node should be booted from a Bright Cluster Manager (BCM) DVD or a flash. We created a bootable USB drive with a BCM ISO image containing BCM version 7.3 and Red Hat Enterprise Linux (RHEL) version 7.3. 3. Install Bright Cluster Manager should be selected in the text boot menu.
6. At the Linux base distribution screen, the acceptance checkbox should be ticked. Continue should then be clicked. 7. Continue at the Kernel Module screen. 8. At the Hardware Information screen, all the relevant hardware is detected. Continue should be clicked. 9. At the Nodes screen: • The number of racks and compute nodes are specified • The base name for the compute nodes is set. Accepting the default of node means nodes names are prefixed with node.
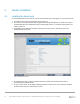
Figure 7 Additional High Speed Networks Figure 6 Intel Omni-Path Setup 12 DELL EMC HPC Solution for Life Sciences v1.
12. At the Networks screen, the network parameters for the head node should be entered for the interface facing the network named externalnet. Uncheked DHCP checkbox, and add static values. Then OK button should be clicked. 13. At the Nameservers screen, add proper DNS search domains and external DNA name servers. 14. At the Network Interface screen, review IP addresses assigned to the network interfaces. Continue should be clicked. 15.
21. At the Authentication screen, a hostname should be entered for the head node. Also a password should be entered for use in system administration. Continue. 22. At the Console screen, a text or graphical console can be configured for the nodes in the cluster. 23. At the Summary screen, the network summary should be reviewed. The Start button then starts the installation. Yes should be clicked to confirm that the data on the listed volume may be erased. 24.