
Administrator Guide

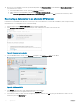

d Copy all the VHDs that you recovered earlier to the location you obtained in step 8a.
e If there are dierencing disk VHDs, copy the VHDs with the correct folder hierarchy.
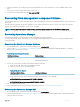
For example, there is a child VHD at the following path: \\s20sfs.contoso.com\Share01\asd
\DPM_9-15-2015_8.39.7\Recovered_At_9-15-2015_10.1.25\s20sfs-Share01-Vol\NewVM1\child.vhdx
There is a parent VHD at the following path: \\s20sfs.contoso.com\Share01\asd
\DPM_9-15-2015_8.39.7\Recovered_At_9-15-2015_10.1.25\s20sfs-Share01-Vol\Parent1.vhdx
Compare the paths, and look for where the path is not the same—bold in the examples. Copy the uncommon content to the
location that you obtained in step 8a. In this example, you would copy the NewVM1 folder, and its contents, and Parent1.vhdx.
f If there is no dierencing disk VHD, add all the VHDs to the VM. If there is a dierencing disk VHD, add only the child VHD.
9 Start the VM.
You do not have to perform a consistency check because this VM is a new VM. It will be protected separately by DPM during the next
run of the Protect-TenantVMs runbook. The old VM recovery points are deleted automatically after they reach retention range limits.
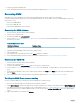
Recovering a database to its original location
As part of a recovery process, recovering management component databases by using DPM is an important step. The following procedure
provides the general steps for database recovery.
NOTE: When you recover a specic component, you must follow the component’s specic recovery steps as described in
Recovering from management component failures.
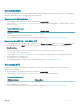
1 In the DPM Administrator console, open the Recovery workspace.
2 Expand SQL Server (for the instance of SQL Server that hosts the database that you want to recover), expand All Protected SQL
Instances, and then expand the instance.
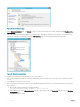
3 Select the database that you want to recover, for example:
Figure 37. Select database
4 In the Recovery points pane, select a recovery point:
a Click any date and time in the calendar to see available recovery points. Dates that are shown in bold have active recovery
points. To minimize data loss, it is important to choose to recover from the latest possible recovery point
b To select the recovery source, in the Recovery time list, select a recovery point that either indicates Disk or Online —from
Azure.
c On the ribbon, click Recover to start the Recovery Wizard.
5 In the Recovery Wizard, on the Select Recovery Type page, select Recover to the original instance of SQL Server (Overwrite
database), and then click Next.
6 If doing a disk restore, on the Specify Database State page, keep the default setting of Leave database operational.
7 On the Specify Recovery Options page, leave the Network bandwidth usage throttling and SAN Recovery settings without any
changes.
8 On the Summary page, review your settings and then click Recover.
9 After the recovery nishes, click Close to close the Recovery Wizard.
Operations
75