
White Papers


19 Update 1611 for Cloud Platform System (CPS) Standard
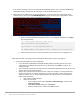
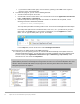
The PowerShell output looks similar to the following screenshot:
7. To cancel the jobs and disable the agents, do the following:
a. From an elevated Windows PowerShell session, run the following commands. Press Enter after
each command.
cd \\<Prefix>CON01\PUShare\<CPSPU Folder
Name>\PU\Framework\PatchingUpgrade"
Import-Module .\PatchingUpgrade\DPM.psm1
Set-DPMBackupMode -BackupMode Disable -Credential (Get-Credential)
b. When prompted, enter the account credentials of the account that you are logged on as.
8. The Patch and Update process should begin, with verbose output of the progress. During the patching
process, note the following:
If you click inside the Windows PowerShell window during the patching process, the screen
output will freeze, although the update process is still running. Press Enter to continue the
scrolling of output.
Some component updates do not output status to the Windows PowerShell console. See the next
step (9) for other ways to monitor progress.
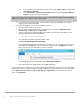
Updates of the physical cluster nodes may take a while. For example, a task that involves the
compute cluster (CCL) or storage cluster (SCL) may take some time, and the output may not
update for a while. You can use the following steps to view the progress of cluster updates in
Failover Cluster Manager.
i. Open Failover Cluster Manager.
ii. Connect to the cluster.
a. In the navigation pane, right-click Failover Cluster Manager, and then click
Connect to Cluster.
b. In the Select Cluster dialog box, click Browse.
c. Click the desired cluster, and then click OK two times.
iii. In the navigation pane, right-click the cluster name, point to More Actions, and then click
Cluster-Aware Updating.
iv. In the ClusterName – Cluster-Aware Updating dialog box, click the Log of Updates in
Progress tab to monitor what is happening.
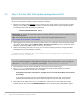
Note: After Cluster-Aware Updating (CAU) completes, you can click Generate a report on past Updating
Runs to view details about what was installed through CAU.