
Administrator Guide
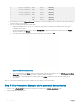
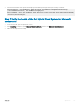


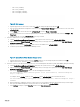
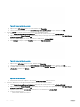
Table Of Contents
- Dell Hybrid Cloud System for Microsoft Cloud Platform System Standard Version 1.5 Administrators Guide based on release 1803
- Overview
- Administration
- What to do first
- Next steps
- Managing Dell Hybrid Cloud System for Microsoft
- Creating tenant VM networks
- Adding tenant VM networks to the cloud
- Flagging the operating system VHD in the VM templates
- Enabling guest-specified IP addresses in VMM
- Creating additional tenant storage shares
- Using Windows Azure Pack
- Default Windows Azure Pack configuration
- Before you go into production
- Setting up tenant portal access on an isolated network
- Replacing self-signed certificates
- Disabling the tenant AuthSite and the admin Windows AuthSite websites
- Updating to a Security Token Service and re-establishing trust
- How to open the management portal for administrators
- How to open the management portal for tenants
- Offering services to tenants
- Optional configuration
- Automating tasks for efficiency
- Windows Azure Pack API reference content for developers
- Configuring disaster recovery protection
- Operations
- Monitoring
- Backup and recovery
- Onboard to Azure Backup
- Default backup schedule and retention policy
- DPM protection groups
- Disable machine account password rotation on management VMs
- Protecting tenant VMs
- Recovering VMs and databases—high level
- Recovering from management component failures
- Recovering a tenant VM
- Recovering DPM from DPM failures
- Adding extra disks to DPM
- Monitoring DPM
- Using the Dell Hybrid Cloud System for Microsoft data consistency runbooks
- Updating the Dell Hybrid Cloud System for Microsoft
- Shutting down and starting up the stamp
- Security
- Appendix A Expanding the stamp
- Appendix B Performing a factory reset
- Appendix C Retrieving cluster names, host names, and IP addresses
- Appendix D Ports and protocols

K Backup-S20DPM01-3 NTFS Fixed Healthy
L Backup-S20DPM02-1 NTFS Fixed Healthy
M Backup-S20DPM02-2 NTFS Fixed Healthy
N Backup-S20DPM02-3 NTFS Fixed Healthy
C NTFS Fixed Healthy
NTFS Fixed Healthy
e In the VMM console (in the VMs and Services workspace) or in Hyper-V Manager, check to make sure the DPM VMs that are
hosted on this server are running.
f Log on to each DPM VM, and verify the following:
1 Open Disk Management (Diskmgmt.msc), and verify that there are 23 disks present, and that all are online. Disk
numbering starts at Disk 0.
2 Open the DPM Administrator console, open the Management workspace, and multiselect all the hosts. In the Agents
group on the ribbon, click Refresh.
3 In the protected computers, make sure that the agent status of all computers is OK.
Figure 50. DPM Refresh Agent Status
4 In the navigation pane, click Disks
, and verify that the DPM storage pool has 20 disks. Look for DPM Storage Pool Disks
(Total: 20) in the heading, and that the status of all disks is green (checkmark).
5 If you opted in to Azure Backup, in the navigation pane, click Online, and make sure that the online status is green
(
checkmark).
After you verify that the backup infrastructure is working correctly, continue to the next procedure.
Step 6 Clear Operations Manager alerts generated during startup
1 Connect to the
<
Prex
>CON01 VM with an account that is a member of the <
Prex
>-Ops-Admins group.
2 Open the Operations Manager Shell.
112 Operations