Dell EMC iDRAC Service Module 3.3 User’s Guide November 2018 Rev.
Notes, cautions, and warnings NOTE: A NOTE indicates important information that helps you make better use of your product. CAUTION: A CAUTION indicates either potential damage to hardware or loss of data and tells you how to avoid the problem. WARNING: A WARNING indicates a potential for property damage, personal injury, or death. © 2018 - 2019 Dell Inc. or its subsidiaries. All rights reserved. Dell, EMC, and other trademarks are trademarks of Dell Inc. or its subsidiaries.
Contents Chapter 1: Introduction................................................................................................................. 5 What’s New.......................................................................................................................................................................... 5 Supported features—operating systems matrix.........................................................................................................
Installing the iDRAC Service Module using SSH or Local Command Shell.................................................... 27 Installing iDRAC Service Module when the System Configuration Lock Down Mode is enabled.................. 27 Support for iDRAC URI to get iSM installer..........................................................................................................28 Support for idrac.local and drac.local as iDRAC FQDN............................................................................
1 Introduction This guide provides information and step-by-step instructions on how to install iDRAC Service Module on the supported operating systems. The Integrated Dell Remote Access Controller(iDRAC) Service Module is a lightweight optional software application that can be installed on Dell’s 12th generation of PowerEdge servers or later. The iDRAC Service Module complements iDRAC interfaces – Graphical User Interface (GUI), RACADM CLI and Web Service Management (WSMAN) with additional monitoring data.
Table 1.
Software availability The iDRAC Service Module software is available on: ● Dell EMC OpenManage Systems Management Tools and Documentation DVD ● Support site—dell.com/support Downloading iDRAC Service Module You can download the iDRAC Service Module software from dell.com/support. In the support site, click Choose from all products > Software & Security > Enterprise Systems Management > iDRAC Service Module. Select the latest version of iSM and click Drivers & downloads.
● The Integrated Dell Remote Access Controller (iDRAC) User’s Guide provides detailed information about configuring, and using the iDRAC. ● The Dell Remote Access Controller Racadm User's Guide provides information about using the RACADM command-line utility. ● The Dell Update Packages User's Guide provides information about obtaining and using Dell Update Packages as part of your system update strategy.
2 Preinstallation setup Ensure that you assess the following before installing the iDRAC Service Module: ● ● ● ● ● ● ● 12th generation or later of Dell PowerEdge servers. For the list of supported platforms, see Supported Platforms Minimum firmware version—For iDRAC8 – 2.61.60.60 and for iDRAC9 – 3.21.21.21. Administrator privileges. Read the installation instructions for the operating system. Read the applicable release notes files and the Systems Software Support Matrix.
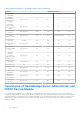
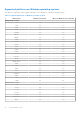
Supported platforms on Windows operating systems The table lists the platforms that are supported by iDRAC Service Module 3.3 on Windows operating systems. Table 2.
Table 2.
Supported platforms on Linux operating systems The table lists the platforms that are supported by iDRAC Service Module 3.3 on Linux operating systems. Table 3. Supported platforms on Linux operating systems Dell Systems SLES 15 Ubuntu 18.04.1 RHEL 7.5 RHEL 6.
Table 3. Supported platforms on Linux operating systems (continued) Dell Systems SLES 15 Ubuntu 18.04.1 RHEL 7.5 RHEL 6.
Supported platforms on Virtualization operating systems The table lists the platforms that are supported by iDRAC Service Module 3.3 on Virtualization operating systems. Table 4. Supported platforms on Virtualization operating systems Dell Systems VMware vSphere 6.5 U2 vSphere 6.
Table 4. Supported platforms on Virtualization operating systems (continued) Dell Systems VMware vSphere 6.5 U2 vSphere 6.
Supported operating systems on Dell Precision Rack System The table lists the operating systems on Dell Precision Rack System. Table 5. Supported operating systems on Dell Precision Rack System Dell Systems Microsoft Windows 10 RHEL 7.5 R7920 Yes Yes System requirements ● One of the supported operating systems. For more information on supported operating systems, see Supported operating systems. ● Minimum 2 GB RAM. ● Minimum 512 MB of hard drive space. ● Administrator rights. ● TCP/IPv4 connection.
3 Installing iDRAC Service Module The iDRAC Service Module can be installed in any of the following operating systems: ● Installing the iDRAC Service Module On Microsoft Windows Operating Systems ● Installing iDRAC Service Module on supported Linux operating system ● Installing the iDRAC Service Module on VMware ESXi ● Installing the iDRAC Service Module on Citrix XenServer Topics: • • • • • • • • Initial installation of iDRAC Service Module through iDRAC for Windows Initial installation of iSM through iD
The Service Module Installer is exposed to the Host OS, and a job has been created in iDRAC. 2. For Microsoft Windows OS, RDP to the server or go to the physical server console. For Linux OS, SSH to the host IP or go to the physical server console. 3. Find the mounted volume in your device list labeled SMINST, and click the appropriate script to start the installation. For Microsoft Windows OS, run the ISM-Win.bat script. For Linux OS, run the script ISM-Lx.sh from the shell. 4.
○ iDRAC Hard Reset ○ Support Assist ○ iDRAC GUI Launcher NOTE: The following steps are applicable, only if you select the Custom option in the Setup Type window. NOTE: By default, the In-Band SNMP Traps feature is not enabled. a. Choose the program features you want to install and click Next. The Lifecycle Controller Log Replication window is displayed. b. Specify the location where the LC logs are to be replicated.
Table 6. Silent installation (continued) Locale Number Language 1036 French 1041 Japanese 2052 Simplified Chinese Modifying the iDRAC Service Module components on Microsoft Windows operating systems To modify iDRAC Service Module components: 1. Browse to SYSMGMT > iSM > Windows, and then run iDRACSvcMod.msi. The iDRAC Service Module ˗ InstallShield Wizard is displayed. 2. Click Next. 3. Select Modify. 4. Enable or disable the features as required and then click Next.
5. Click Finish. Uninstalling the iDRAC Service Module on Microsoft Windows operating systems The iDRAC Service Module can be uninstalled using two different methods: ● Unattended uninstall using the product ID ● Uninstalling using the add/remove feature Unattended uninstall using the product ID Type msiexec /x {BE762CE4-B8D4-4BFC-BA12-16360808DCF3} /qn to uninstall the iDRAC Service Module using the product ID.
Linux install dependency The following are the list of dependent packages/executable(s) that need to be installed to complete the installation. Table 7.
NOTE: To know if iDRAC Service Module is installed on your Linux operating system, run the command /etc/init.d/ dcismeng status. If the iDRAC Service Module is installed and running, the status running is displayed. NOTE: Use the systemctl status dcismeng.service command instead of the init.d command to check if the iDRAC Service Module is installed on RedHat Enterprise Linux 7 or SUSE Linux Enterprise 12 operating system.
Uninstalling the iDRAC Service Module using the uninstall script The script used for uninstalling the iDRAC Service Module is dcism-setup.sh. Run the shell script and select d to uninstall the iDRAC Service Module. Uninstalling the iDRAC Service Module using the RPM command The iDRAC Service Module can be uninstalled using the RPM command rpm -e dcism in the command line. Installing the iDRAC Service Module on VMware ESXi VMware ESXi is factory-installed on some systems.
4. Right-click New Datacenter and click Add Host. Provide information for the ESXi server per online instructions. 5. Right-click the ESXi host added in step 4 and click Maintenance Mode. 6. From Plug-ins, select Manage Plug-ins > download VMware Update Manager. (The status is enabled if the download is successful.) Follow the instructions to install the VUM client. 7. Select the ESXi host.
NOTE: You can upgrade iDRAC Service Module from the VMware Update Manager repository https:// vmwaredepot.dell.com/. Using the Power CLI To install the iDRAC Service Module using Power CLI: 1. Install the supported PowerCLI of ESXi on the supported Microsoft Windows operating system. 2. Copy the ISM-Dell-Web-3.3.0-.VIB-i-Live.zip file to the ESXi host. 3. Navigate to the bin directory. 4. Run Connect-VIServer and provide the server and other credentials. 5.
Importing DELL GPG keys to Citrix XenServer For importing Dell GPG keys to the Citrix XenServer 7.1, complete the following tasks: 1. Download Dell GPG keys to Citrix XenServer: https://linux.dell.com/repo/pgp_pubkeys/0x1285491434D8786F.asc. or download the file directly to the host using SSH or Local Command Shell with: $ wget https://linux.dell.com/repo/pgp_pubkeys/0x1285491434D8786F.asc 2. The file must be renamed: $ mv 0x1285491434D8786F.asc RPM-GPG-KEY-DELL 3.
Support for iDRAC URI to get iSM installer Starting from 14th generation of servers, you can download the iSM web packs by using the following URL:https:// /software/ism/package.xml. You can download the packages only when iSM LC DUP is uploaded and available in iDRAC. You can also load it in iDRAC by enabling the iDRAC LC autoupdate. To download the packages, use the filename present in the xml to append to the URL. Example: PAGE 294 Configuring the iDRAC Service Module You can configure the iDRAC Service Module using the: ● iDRAC web interface ● RACADM CLI command ● WSMAN command Topics: • • • Configuring the iDRAC Service Module from iDRAC Web Interface Configuring the iDRAC Service Module from RACADM Configuring the iDRAC Service Module from WSMan Configuring the iDRAC Service Module from iDRAC Web Interface To use the iDRAC Service Module from the iDRAC Web interface for 12 th and 13 th generations of servers, go to Overview >
DCIM_ComputerSystem+SystemName=DCIM:ComputerSystem -u:root -p:calvin -r:https:///wsman -SkipCNcheck -SkipCAcheck -encoding:utf-8 -a:basic @{Target="iDRAC.Embedded.1";AttributeName="AgentLite.1#";AttributeValue="1"} To use the iDRAC Service Module from WSMan, see the Dell Lifecycle Controller 2 Web Services Interface Guide provides information and examples for utilizing the Web services for Management (WSMan) Management protocol, available at dell.com/support.
5 iDRAC Service Module monitoring features The services provided are: ● OS information ● Lifecycle Controller Log replication into operating system ● Automatic system recovery ● Windows Management Instrumentation providers inclusive of storage data ● Prepare to remove NVMe SSD device ● Remote iDRAC hard reset ● iDRAC access via Host OS ● In-band support for iDRAC SNMP alerts ● Enable WSMAN remotely ● Auto-updation of iDRAC Service Module ● FullPowerCycle ● Support Assist on the Box NOTE: FullPowerCycle and
Lifecycle Controller log replication into operating system Replicates the Lifecycle Controller (LC) logs to the OS logs. All events that have the OS Log option as the target (in the Alerts page or in the equivalent RACADM or WSMAN interfaces) are replicated in the OS log using the iDRAC Service Module. This process is similar to the System Event Log (SEL) replication performed by OpenManage Server Administrator.
NOTE: This feature only works with iDRAC8 on the 13 th generation PowerEdge servers or later and if logged into the operating system as an administrator. iDRAC access via Host OS Using Dell’s PowerEdge Servers, you can manage the hardware or the firmware of a device through iDRAC by configuring an iDRAC dedicated network. Through the dedicated network port, you can access the iDRAC interfaces such as GUI, WSMAN, RACADM, and Redfish client.
Enable WSMAN Remotely Currently with the WMI information feature, you can connect to the host Microsoft Windows WMI namespace to monitor the system hardware. The WMI interface on the host is enabled by default and you can access it remotely. However, if you wish to access the WMI interfaces using WINRM’s WMI adapter, you have to enable it manually as it is not enabled by default. Using this feature, you can access the WINRM WMI namespaces remotely by enabling it during installation.
server power cord to reset the hardware running on auxiliary power. Forcing someone to physically unplug/plug the power cords leads to a significant cost and hassle for customers as well as support personnel. The FullPowerCycle feature enables the administrator to connect or disconnect the auxiliary power remotely without visiting the data center. This feature is supported on and after 14th generation of Dell EMC PowerEdge servers.
● Open ● Closed ● Submitted Support Assist Overview You can view the Service Contract details such as Contract Type and Expiration Date and the Automatic Collection settings details in this session. On the Service Requests tab, you can also view the list of requests created and the status, description, source, service request ID, date opened, the date closed, and so on.
Data to Collect SupportAssist automatically creates and send a collection to technical support when there is an event-based trigger and or on a scheduled cadence. You can collect the following type of information: ● System Information ● Storage Logs ● OS and Application Data ● Debug Logs You can also perform the SupportAssist collection function from an operating system shell to a specified file path using: .
Identification Information You can include the identification information in the data sent by clicking the drop-down menu and selecting any of the following options: ● No ● Yes Email Notifications You can select the preference to receive email notifications when a new support case is opened or a new SupportAssist collection is uploaded. From the Receive Email Notifications drop-down menu, select any of the following: ● Yes ● No You can also select the language preference.
10. Click Yes, for the PuTTY Security Alert. 11. Log in to iDRAC using the proper credentials. 12. Type racadm get iDRAC.ServiceModule.HostSNMPGet and enter. You can view that HostSNMPGet is enabled. NOTE: If the In-Band SNMP Get feature was not enabled during the Installation of iSM, it can be enabled later through iDRAC GUI/Racadm command. ● Through iDRAC GUI — iDRAC Settings->Settings->iDRAC Service Module Setup->Enable SNMP Get via Host OS->Enable or Disable ● Through Racadm — racadm set idrac.
6 Frequently asked questions This section lists some frequently asked questions about the iDRAC Service Module. Do I need to uninstall OpenManage Server Administrator before installing or running the iDRAC Service Module? No. Before you install or run the iDRAC Service Module, ensure that you have stopped the features of OpenManage Server Administrator that the iDRAC Service Module provide. NOTE: Uninstalling the OpenManage Server Administrator is not required.
Consult the User Guide for additional information about the supported servers. What should I do now? Before installing the iDRAC Service Module, ensure that the server or the system on which the iDRAC Service Module is to be installed is a Dell’s 12 th generation PowerEdge server or later. Also make sure that you have a 64-bit system.
I used the remote iDRAC hard reset feature to reset the iDRAC. However, the IPMI is unresponsive and I am not able to troubleshoot. If you try to use the remote iDRAC hard reset feature on VMware ESXi 5.5 U3 or ESXi 6.0 U1, the IPMI drivers becomes unresponsive, because of this the iDRAC Service Module communication is stopped. You may have to reboot the server and load the IPMI driver again to resolve the issue.
I created a custom folder in Windows Event Viewer, but the LC logs are not replicated in my custom folder. What do I have to do now to replicate the LC logs? Ensure to close the Windows Event Viewer after creating the custom folder. Open the Windows Event Viewer again to view the replicated LC logs. I chose custom install option from the Graphical User Interface during iDRAC Service Module installation and disabled a feature, but I am not able to enable the feature using any of the other interfaces.
I am seeing the past Life Cycle Logs (LCL) alerts targeted for SNMP traps replicated in Operating System logs. Can I troubleshoot the issue? iSM will not be able to distinguish between the past Life Cycle Log (LCL) alerts targeted for SNMP traps and past LCL alerts targeted for OS Logs. Hence user may see past LCL alerts targeted for OS Logs in SNMP traps as well and vice versa. I am seeing 169.254.0.2 as the source IP address in the iDRAC SNMP trap received via iSM.
on this interface, then iSM will retain the user configuration and does not override the interface settings. To restore the communication between iSM and iDRAC, please restart the iSM service on the Host OS. After installing iSM using the Batch file ISM_Win.BAT from the iDRAC exposed logical partition "SMINST" on Microsoft Windows OS, I see a console message saying "The system cannot find the file specified." After iSM is installed successfully, the logical partition SMINST gets unmounted from the Host OS.
7 Linux and Ubuntu installer packages The installer packages for the supported Linux and Ubuntu OS are as follows: Table 12. Linux installer packages Supported Linux Operating System Installer Packages Red Hat Enterprise Linux 6 SYSMGMT\iSM\linux\RHEL6\x86_64\dcism-3.3.0-1290.el 6.x86_64.rpm Red Hat Enterprise Linux 7 SYSMGMT\iSM\linux\RHEL7\x86_64\dcism-3.3.0-1290.el 7.x86_64.rpm SUSE Linux Enterprise Server 12 SYSMGMT\iSM\linux\SLES12\x86_64\dcism-3.3.0-1290.s les12.x86_64.